- Welcome to Westlake Publishing Forums.

News:
REGARDING MEMBERSHIP ON THIS FORUM: Due to spam, our server has disabled the forum software to gain membership. The only way to become a new member is for you to send me a private e-mail with your preferred screen name (we prefer you use your real name, or some variant there-of), and email adress you would like to have associated with the account. -- Send the information to: Russ at finescalerr@msn.com
Recent posts
#1
Modellers At Work / Re: Feldbahnmodule with ship
Last post by Stuart - Today at 08:37:37 AMWell done! Excellent work!
Stuart
Stuart
#2
Modellers At Work / Re: Feldbahnmodule with ship
Last post by fspg2 - October 13, 2026, 11:46:31 PM #3
Modellers At Work / Re: Feldbahnmodule with ship
Last post by Hauk - October 13, 2026, 11:18:17 PMVery nice, as always!
Were do you get your M1.0 nuts, by the way?
Were do you get your M1.0 nuts, by the way?
#4
Modellers At Work / Re: Luke's Garage & Gas Statio...
Last post by Stuart - October 13, 2026, 04:26:17 PMQuote from: finescalerr on October 13, 2026, 11:57:30 AMBefore I read your post, I thought the painted rocks on the right were real and you were using them for inspiration.
Russ - The larger rocks on the right of the photo are real. They are the ones I'm using to push their textured surface into the foam to create the rocky faces on the rocks I'm making.
Stuart
#5
Modellers At Work / Re: Feldbahnmodule with ship
Last post by Bill Gill - October 13, 2026, 02:12:03 PMExcellent work.
#6
Modellers At Work / Re: Feldbahnmodule with ship
Last post by Barney - October 13, 2026, 01:48:43 PMExceptional work - so realistic and true to the prototype
Barney
Barney
#7
Modellers At Work / Re: Luke's Garage & Gas Statio...
Last post by Barney - October 13, 2026, 01:45:57 PMVery nice and very realistic
Barney
Barney
#8
Modellers At Work / Re: Feldbahnmodule with ship
Last post by fspg2 - October 13, 2026, 01:07:08 PMThe windows have all been installed in the meantime, and the window sills have been mounted in front of them.
Alter_Lagerschuppen_345 (fspg2)
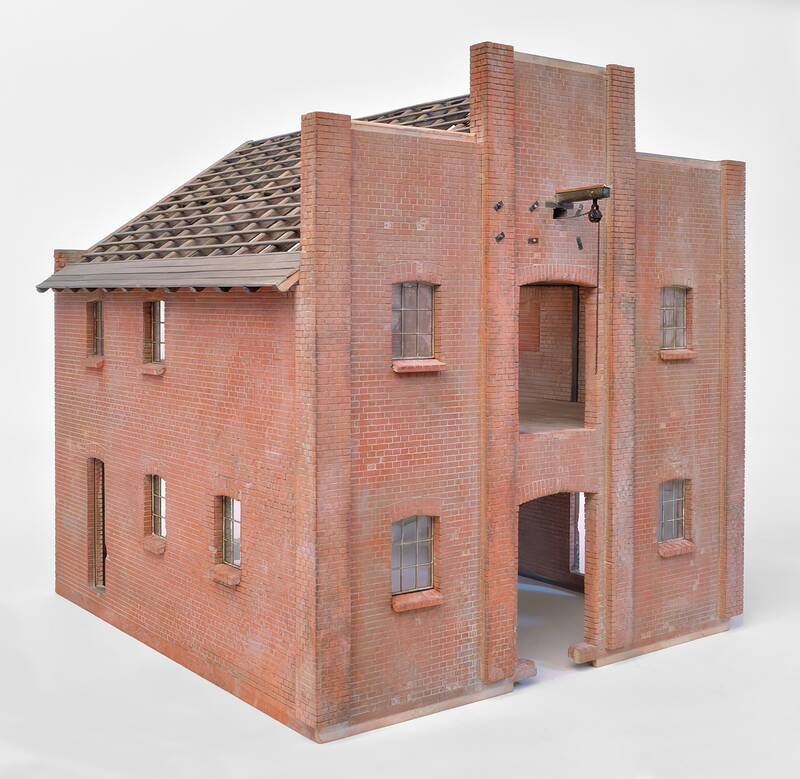
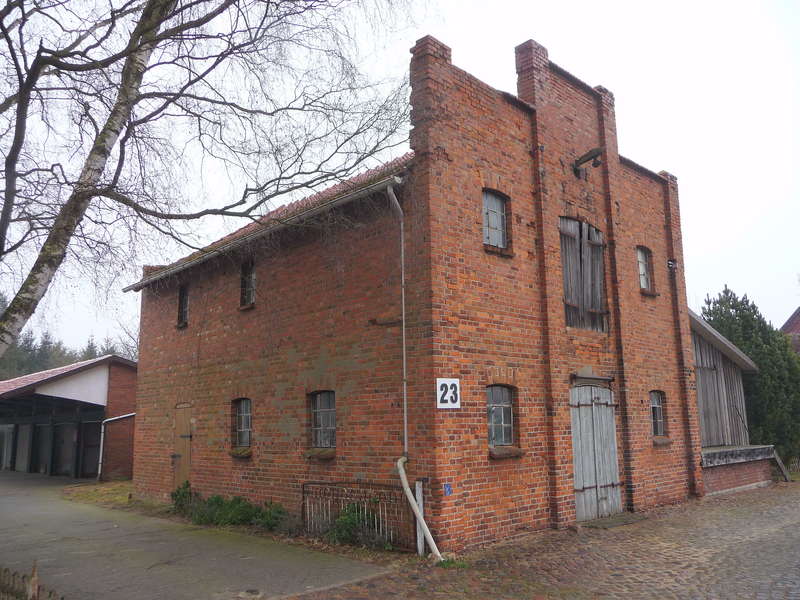
There's definitely a certain resemblance to the prototype.
Rotstein_Lagerschuppen_01_Helmut_Schmidt_ (fspg2)
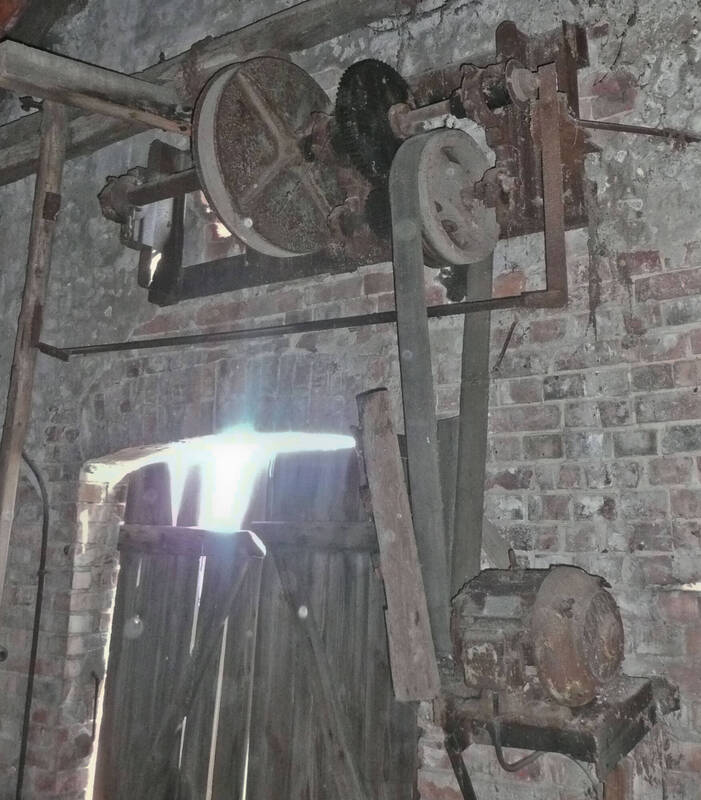
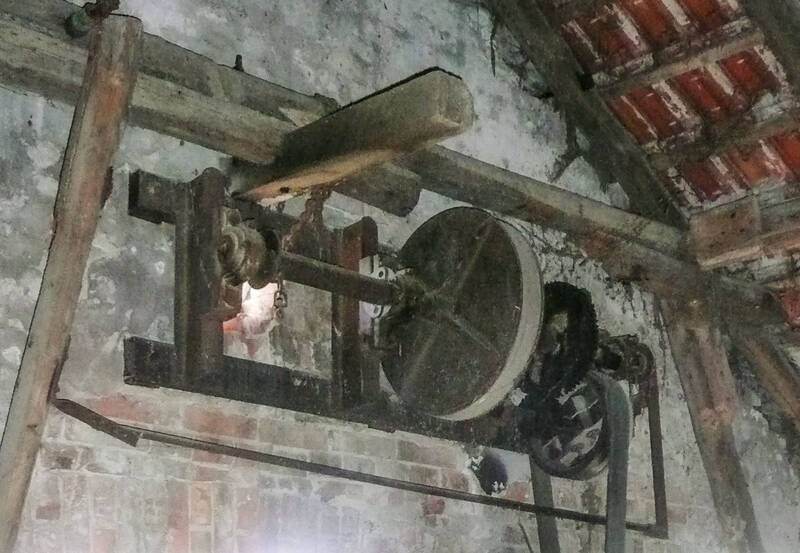
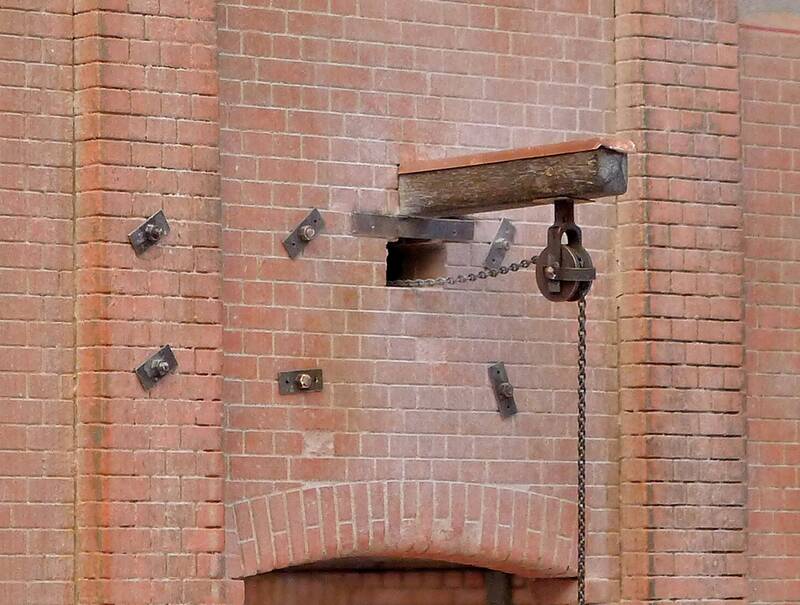
Inside the old storage shed there's a motor-driven winch for the crane beam. Its mounting anchors pass through the wall and are secured on the outside of the gable front with iron plates.
Alter_Lagerschuppen_339 (fspg2)
Alter_Lagerschuppen_340 (fspg2)
Alter_Lagerschuppen_341 (fspg2)
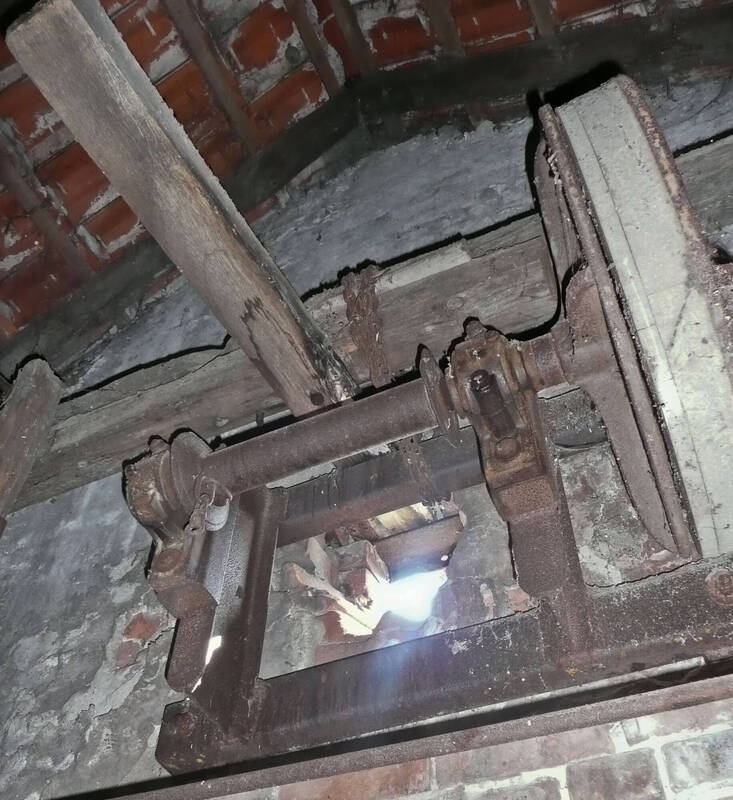
Alter_Lagerschuppen_342 (fspg2)
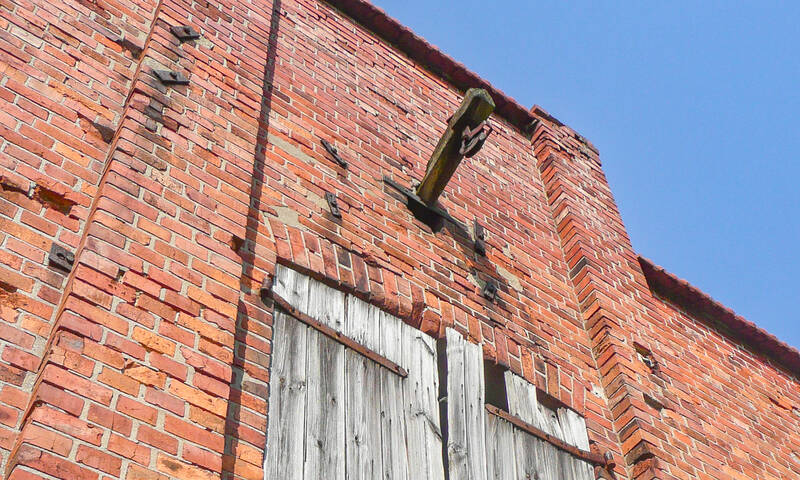
I already reported on the construction of the winch in detail back in 2009 -
have a look: https://www.buntbahn.de/viewtopic.php?t=6691&start=190 - and https://www.buntbahn.de/viewtopic.php?t=6691&sid=f4dec3997d457db62e1d8ccbcec7ce94&start=210
Now it was time to continue. First, the "iron plates" were milled from 0.3 mm nickel silver, and 1.0 mm brass threaded rods were soldered to M1.0 nuts. Then everything was sandblasted and blackened.
Alter_Lagerschuppen_343 (fspg2)
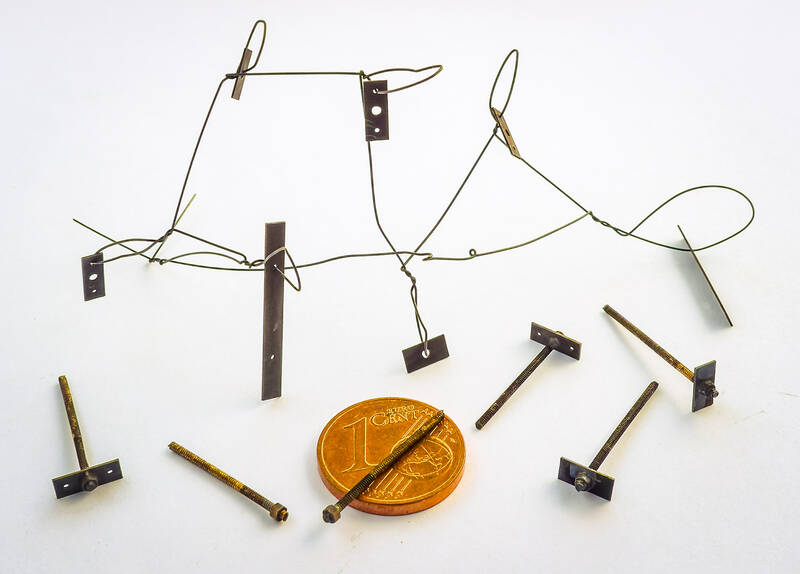
The already pre-assembled winch was pushed, with its threaded rods, through the six 1.1 mm holes drilled in the gable wall...
Alter_Lagerschuppen_346 (fspg2)
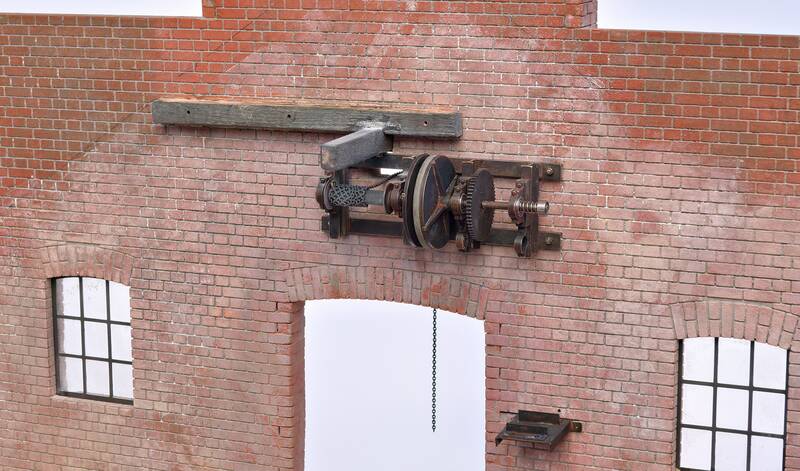
...and secured from the outside with the small anchor plates and M1.0 nuts.
Alter_Lagerschuppen_346 (fspg2)
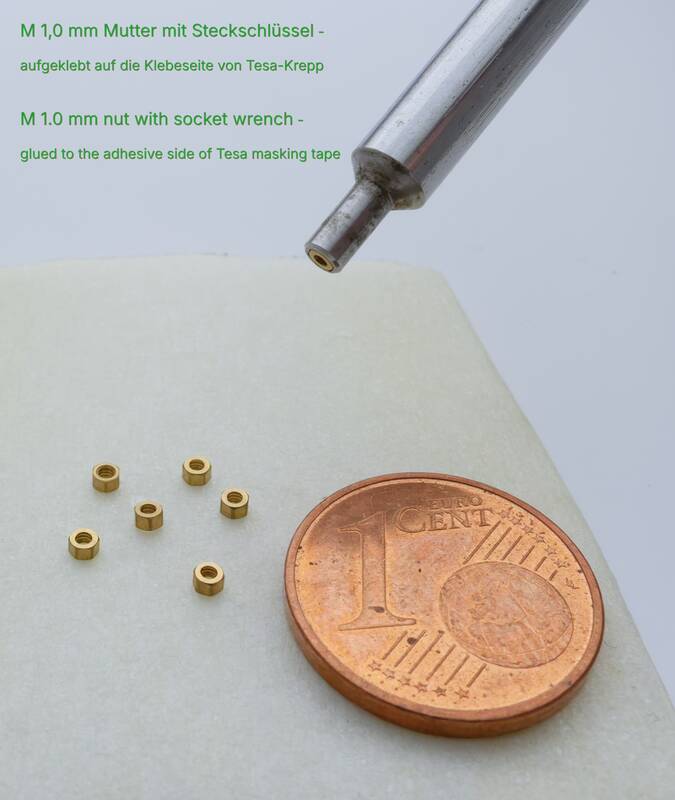
To make it easier to pick up the tiny M1.0 nuts with the nut driver, I simply set them with their bottom sides on the sticky side of Tesa masking tape. That eliminates the tedious fiddling with my fingers, and the work goes much faster.
M1.0 nut with nut driver (fspg2)
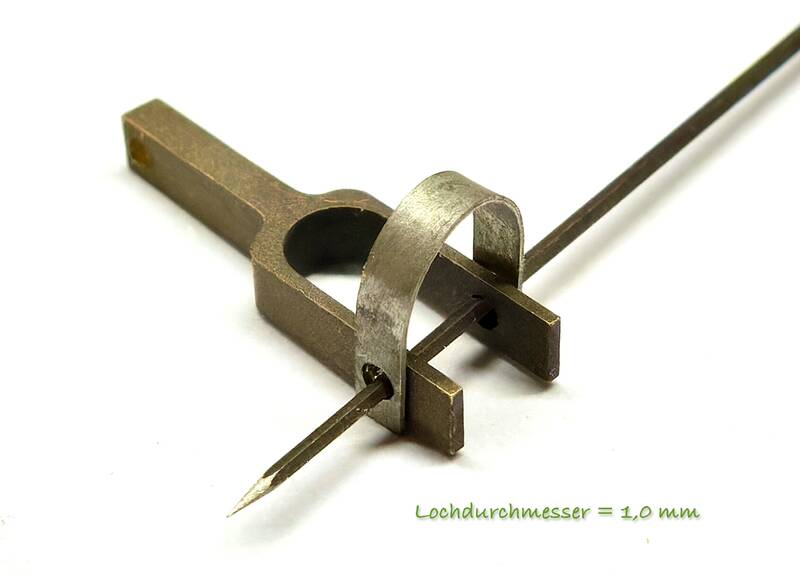
I found it a bit tricky to solder the fork for the cable pulley at a right angle to the bent nickel-silver strip (0.2 mm thick, 1.5 mm high). The 1.0 mm holes will later accept the 1.0 mm axle of the cable pulley, so they had to line up exactly.
To align them, I had originally planned to use a 1.0 mm brass wire that I had colored black with a permanent marker, since marker ink usually works as a solder resist. With parts this small, though, I wasn't sure I'd be able to get the wire back out afterward without damaging the thin nickel-silver sheet. I didn't have a wire made of silver steel that thin, which solder wouldn't stick to in the first place.
Volker came up with the solution (many thanks for that!): the shank of a 1.0 mm drill bit aligned both parts reliably and didn't pick up any solder. A small block of Pertinax (phenolic laminate) served as a stop to ensure the right angle. I did the soldering with a 12 V / 8 W soldering iron.
Alter_Lagerschuppen_344 (fspg2)
Alter_Lagerschuppen_345 (fspg2)
There's definitely a certain resemblance to the prototype.
Rotstein_Lagerschuppen_01_Helmut_Schmidt_ (fspg2)
Inside the old storage shed there's a motor-driven winch for the crane beam. Its mounting anchors pass through the wall and are secured on the outside of the gable front with iron plates.
Alter_Lagerschuppen_339 (fspg2)
Alter_Lagerschuppen_340 (fspg2)
Alter_Lagerschuppen_341 (fspg2)
Alter_Lagerschuppen_342 (fspg2)
I already reported on the construction of the winch in detail back in 2009 -
have a look: https://www.buntbahn.de/viewtopic.php?t=6691&start=190 - and https://www.buntbahn.de/viewtopic.php?t=6691&sid=f4dec3997d457db62e1d8ccbcec7ce94&start=210
Now it was time to continue. First, the "iron plates" were milled from 0.3 mm nickel silver, and 1.0 mm brass threaded rods were soldered to M1.0 nuts. Then everything was sandblasted and blackened.
Alter_Lagerschuppen_343 (fspg2)
The already pre-assembled winch was pushed, with its threaded rods, through the six 1.1 mm holes drilled in the gable wall...
Alter_Lagerschuppen_346 (fspg2)
...and secured from the outside with the small anchor plates and M1.0 nuts.
Alter_Lagerschuppen_346 (fspg2)
To make it easier to pick up the tiny M1.0 nuts with the nut driver, I simply set them with their bottom sides on the sticky side of Tesa masking tape. That eliminates the tedious fiddling with my fingers, and the work goes much faster.
M1.0 nut with nut driver (fspg2)
I found it a bit tricky to solder the fork for the cable pulley at a right angle to the bent nickel-silver strip (0.2 mm thick, 1.5 mm high). The 1.0 mm holes will later accept the 1.0 mm axle of the cable pulley, so they had to line up exactly.
To align them, I had originally planned to use a 1.0 mm brass wire that I had colored black with a permanent marker, since marker ink usually works as a solder resist. With parts this small, though, I wasn't sure I'd be able to get the wire back out afterward without damaging the thin nickel-silver sheet. I didn't have a wire made of silver steel that thin, which solder wouldn't stick to in the first place.
Volker came up with the solution (many thanks for that!): the shank of a 1.0 mm drill bit aligned both parts reliably and didn't pick up any solder. A small block of Pertinax (phenolic laminate) served as a stop to ensure the right angle. I did the soldering with a 12 V / 8 W soldering iron.
Alter_Lagerschuppen_344 (fspg2)
#9
Modellers At Work / Re: Luke's Garage & Gas Statio...
Last post by finescalerr - October 13, 2026, 11:57:30 AMBefore I read your post, I thought the painted rocks on the right were real and you were using them for inspiration. Either you did a remarkable job or I need another visit to my eye doctor. -- Russ
#10
Modellers At Work / Re: Luke's Garage & Gas Statio...
Last post by Bill Gill - October 13, 2026, 08:58:35 AMStuart,
Like Volker said, really good looking stones. the finished retaing walls will be very nice.
Like Volker said, really good looking stones. the finished retaing walls will be very nice.