- Welcome to Westlake Publishing Forums.

News:
REGARDING MEMBERSHIP ON THIS FORUM: Due to spam, our server has disabled the forum software to gain membership. The only way to become a new member is for you to send me a private e-mail with your preferred screen name (we prefer you use your real name, or some variant there-of), and email adress you would like to have associated with the account. -- Send the information to: Russ at finescalerr@msn.com
Recent posts
#1
Military Modeling / Re: Another Artillery Tractor
Last post by Hauk - May 23, 2024, 01:49:38 PMQuote from: Peter_T1958 on May 23, 2024, 04:06:35 AMPerhaps, the difference between the brown primer and the black shading was too little.
I think that is exactly the problem. I have used black preshading on light grey primer, and even then the effect is quite subtle.
Love the models, by the way!
#2
Military Modeling / Re: Another Artillery Tractor
Last post by finescalerr - May 23, 2024, 11:30:41 AMIn many cases, pre-shading can look good but not necessarily realistic ... maybe similar in that way to a woman's makeup. -- Russ
#3
Military Modeling / Re: Another Artillery Tractor
Last post by Peter_T1958 - May 23, 2024, 05:44:56 AMHi Volker
'Preshading' is a term originally borrowed from the aircraft modelers. There it was used to darken panel lines and to break up large areas i.e. surfaces of wings or to recreate highly stressed skin on the fuselage. Later, military modelers adopted this technique on tanks etc.
You are certainly right, when you assume, that the color wasn't thin enough! But moreover it was a rather ambitious goal trying that on such complex surfaces with all details already fitted. It was simply impossible to put the right amount of color at the right spot and even in the right thickness. To be honest, I was just happy to get the color where it should be in the midst of ol those rods, nuts and bolts.
It was an attempt, that failed, but there are more ways for darkening and braking up the surfaces...
#4
Military Modeling / Re: Another Artillery Tractor
Last post by Hydrostat - May 23, 2024, 04:34:47 AMPeter,
I had to look up 'preshading'. It's hard to tell if it worked or not from the pictures. Maybe green color wasn't thin enough?
Pre-Shading seems to be a rather model-making related technique like drybrushing to get a special impression to the naked eye. I'm not sure if it is necessary or even helpful for taking pictures of models, but of course it dpends on what you're after.
Cheers,
Volker
#5
Military Modeling / Re: Another Artillery Tractor
Last post by Peter_T1958 - May 23, 2024, 04:06:35 AMHi Gents
At least, all that boring breaking off, patching, glueing, filling, sanding and cursing finally leads to an outcome.
Primer:

Preshading:

First coat of paint:

Hmm, all that pre-shading turned out as obsolete. Perhaps, the difference between the brown primer and the black shading was too little. So I have to work more with washings and filters.
Still a long way to go, but now I can start already with the funny part: weathering!
Hope you like it!
Cheers, Peter
At least, all that boring breaking off, patching, glueing, filling, sanding and cursing finally leads to an outcome.
Primer:
Preshading:
First coat of paint:
Hmm, all that pre-shading turned out as obsolete. Perhaps, the difference between the brown primer and the black shading was too little. So I have to work more with washings and filters.
Still a long way to go, but now I can start already with the funny part: weathering!
Hope you like it!
Cheers, Peter
#6
Modellers At Work / Re: A snapshot in time. A glim...
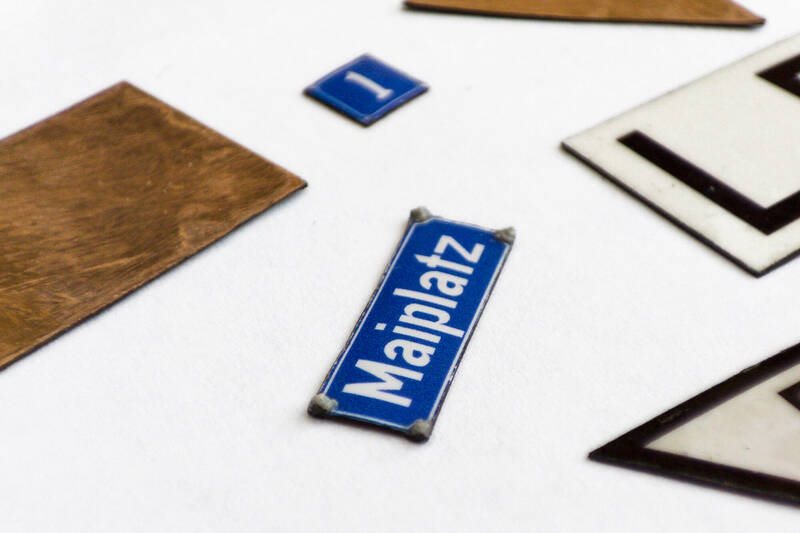
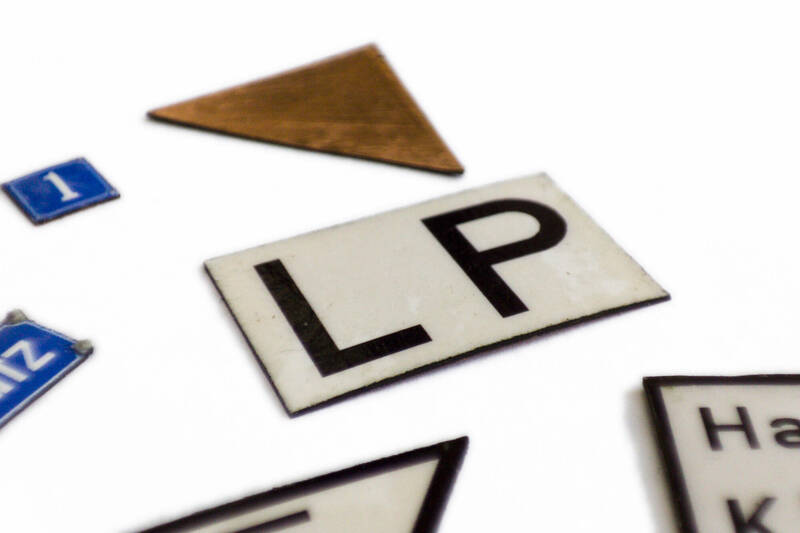
Last post by Hydrostat - May 23, 2024, 01:14:34 AMRay, thank you, I still do have a small piece of the Papilio self adhesive vinyl that you shipped to me years ago, which I'm going to use for some more signs. As per normal there are advantages and disadvantages in different approaches. Printing the signs on photo glossy paper makes it easy to cut the outline exactly. The very thin (I think 0.05 mm [0.002']) self adhesive copper foil glued to the backside prevends any light shining through, an effect that destroys illusion immediately. It's easy to bend or camber those signs, but they are a bit delicate, unless they are glued to a wall. I used CA gel for the edge and mounting adhesive for the inner, curved areas. Unfortunately I picked the wrong one (for absorptive surfaces) and it shrinked completely and took away the curving. I 'saved' the sign by filling the curving with baking soda and CA and then glued the now rather stable part to the wall. Glossy paper and copper foil result in a somewhat prototypical wall thickness of 0.15 mm (0,006'). The copper/paper edges are colored with a black edding. Then I dab clear nail lacquer generously to the surface to amplify the 'glassy' impression of enamel and to reduce the somewhat wavy paper surface. The both blue signs show the effect especially well:
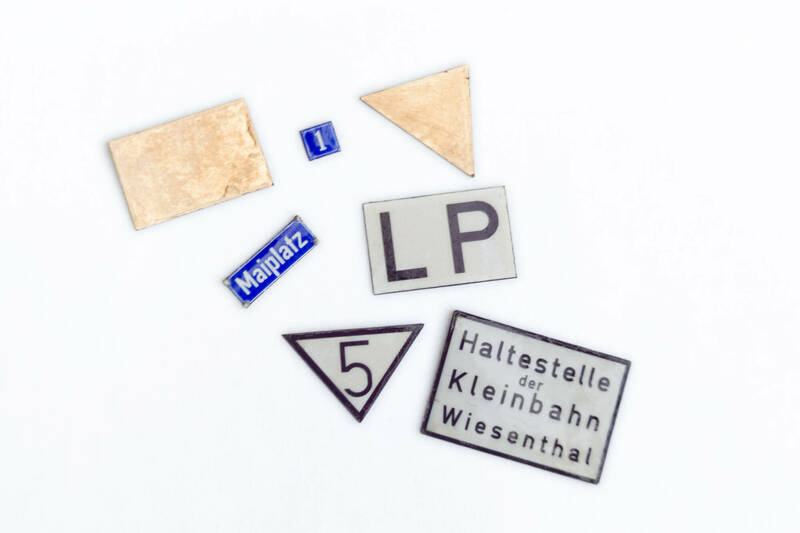
The 'Haltestelle der Kleinbahn' and the blue 'Maiplatz' sign show the typical minor bulge.

Again everything depends on materials used. My current photo glossy paper is double sided foil covered. The white signs were made years ago when I had some one sided foil covered paper. I drenched the backside with very thin CA which gave this somewhat used and weathered impression, much better than the current material.
Although the printouts are protected by fixatives and lacquer those paper items are no way suitable for outside use, of course.
Using thin brass sheet (0.2 mm / 0.008') and self adhesive vinyl is the better way for freestanding signs. They are much more stable and keep a curved shape even if treated unwittingly a bit rough. But it is difficult to align the foil exactly, especially if there's a very thin visible outline at the sign. I still do have to test if and how nail lacquer works on the surface. I used vinyl (without additional lacquer) at the street lamp's toilet sign.
Howsoever: it seems to me that printing quality of inkjet printers has passed the zenith. I once had an Epson Stylus CX 5400, which showed great results and one was able to go deep into printer settings, up to manually numbered resolution. Of course this one died like all inkjets sooner or later from dried ink. All the later printers showed results getting worse and worse and nowadays their menus don't give lots of possibilities of professional intervention anymore.
I can't. They are basifixed.
Cheers,
Volker
The 'Haltestelle der Kleinbahn' and the blue 'Maiplatz' sign show the typical minor bulge.
Again everything depends on materials used. My current photo glossy paper is double sided foil covered. The white signs were made years ago when I had some one sided foil covered paper. I drenched the backside with very thin CA which gave this somewhat used and weathered impression, much better than the current material.
Although the printouts are protected by fixatives and lacquer those paper items are no way suitable for outside use, of course.
Using thin brass sheet (0.2 mm / 0.008') and self adhesive vinyl is the better way for freestanding signs. They are much more stable and keep a curved shape even if treated unwittingly a bit rough. But it is difficult to align the foil exactly, especially if there's a very thin visible outline at the sign. I still do have to test if and how nail lacquer works on the surface. I used vinyl (without additional lacquer) at the street lamp's toilet sign.
Howsoever: it seems to me that printing quality of inkjet printers has passed the zenith. I once had an Epson Stylus CX 5400, which showed great results and one was able to go deep into printer settings, up to manually numbered resolution. Of course this one died like all inkjets sooner or later from dried ink. All the later printers showed results getting worse and worse and nowadays their menus don't give lots of possibilities of professional intervention anymore.
Quote from: finescalerr on May 23, 2024, 12:27:32 AMVolker, remove your magnifying glasses and go stand in the corner. -- Russ
I can't. They are basifixed.
Cheers,
Volker
#7
Modellers At Work / Re: A snapshot in time. A glim...
Last post by finescalerr - May 23, 2024, 12:27:32 AMVolker, remove your magnifying glasses and go stand in the corner. -- Russ
#8
Modellers At Work / Re: A snapshot in time. A glim...
Last post by Ray Dunakin - May 22, 2024, 10:53:26 PMThe signs and old crankcase look great!
#9
Modellers At Work / Re: A snapshot in time. A glim...
Last post by Hydrostat - May 22, 2024, 10:52:01 PMThanks Russ and Barney,
I'm not sure: the crankcase screws are off-center and seem a bit undersized to me .
.
Quote from: finescalerr on May 22, 2024, 11:52:23 AMNo criticism.
I'm not sure: the crankcase screws are off-center and seem a bit undersized to me
. #10
Dioramas / Re: Chamonix Mont-Blanc
Last post by Ray Dunakin - May 22, 2024, 10:41:01 PMExcellent!!