- Welcome to Westlake Publishing Forums.

News:
REGARDING MEMBERSHIP ON THIS FORUM: Due to spam, our server has disabled the forum software to gain membership. The only way to become a new member is for you to send me a private e-mail with your preferred screen name (we prefer you use your real name, or some variant there-of), and email adress you would like to have associated with the account. -- Send the information to: Russ at finescalerr@msn.com
Recent posts
#81
Modellers At Work / Re: Feldbahnmodule with ship
Last post by finescalerr - May 21, 2026, 12:13:18 PMGenerating figures may be straightforward but the result is remarkable and virtually perfect. Most satisfactory. -- Russ
#82
Modellers At Work / Re: A snapshot in time. A glim...
Last post by finescalerr - May 21, 2026, 12:07:23 PM... As Frithjof said, and especially when we remember the extent of Volker's achievement. But it's still under construction! -- Russ
#83
Modellers At Work / Re: Feldbahnmodule with ship
Last post by Lawrence@NZFinescale - May 21, 2026, 11:55:04 AMExcellent!
Generating figures is very straightforward. Generating the figure that you want is trickier, and close fidelity to an input image harder still, so this is a real achievement.
I've started using Tripo myself, but this whole area is so rapidly evolving that any advice seems current for only a matter of weeks. It's very clear that the various 3D generators are different. Tripo, for example, tends to sharp relief whereas Meshy tends to be softer. In practice that means that the input needs to be tailored to suit if the output is going to meet expectations.
One thought on 'credits' - make sure to only use the features you need. Tripo offers things like textures (on by default), that have no relevance to 3D printing (they are a graphic/render thing), but cost extra credits to generate (with texture 55, without 30 credits).
#84
Modellers At Work / Re: Luke's Garage & Gas Statio...
Last post by Lawrence@NZFinescale - May 21, 2026, 11:23:12 AMSlightly off topic, but I saw this and thought of Stuart and Chuck.
This is in Omoto Valley Road, Kaiata, just outside Greymouth NZ. Easy to find on Google maps/streeview.
It popped up on Facebook, but streetview confirms it is a more or less contemporary image.
Given the oddly positioned parking meter, I suspect this is, at least partly, an eclectic collection rather than a genuine relic, but it looks nice all the same.
#85
Modellers At Work / Re: Quiet earth (was: Exercise...
Last post by Hydrostat - May 21, 2026, 10:08:11 AMOh man, Narayan, Kim, Russ, thank you. I'm slow. here we go:
about Martin's work and
about my part of the exhibition.
Rüdesheim IS very international. A lot of US american, japanese and chinese tourists. I've already sold one book ever since.
Cheers,
Volker
about Martin's work and
about my part of the exhibition.
Quote from: finescalerr on March 02, 2026, 12:14:38 PMYour work deserves international exhibition. -- Russ
Rüdesheim IS very international. A lot of US american, japanese and chinese tourists. I've already sold one book ever since.
Cheers,
Volker
#86
Modellers At Work / Re: A snapshot in time. A glim...
Last post by fspg2 - May 21, 2026, 08:38:28 AMTime and again, brilliant execution—amazing!
#87
Modellers At Work / Re: Feldbahnmodule with ship
Last post by fspg2 - May 21, 2026, 08:36:01 AMEven though I haven't had much time over the past four weeks, I've still managed to break a few hundred stones...
Steinguss_Versuch_18 (fspg2)
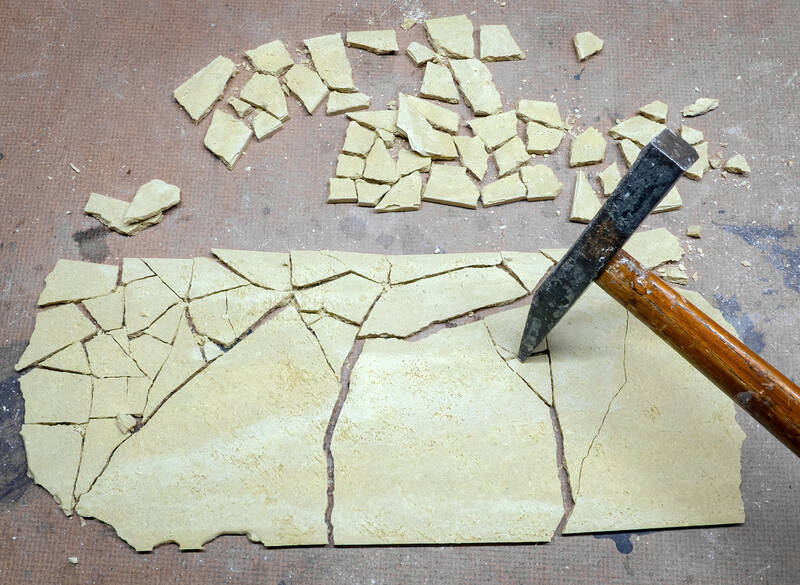
...and glued together,
Steinguss_Versuch_15 (fspg2)
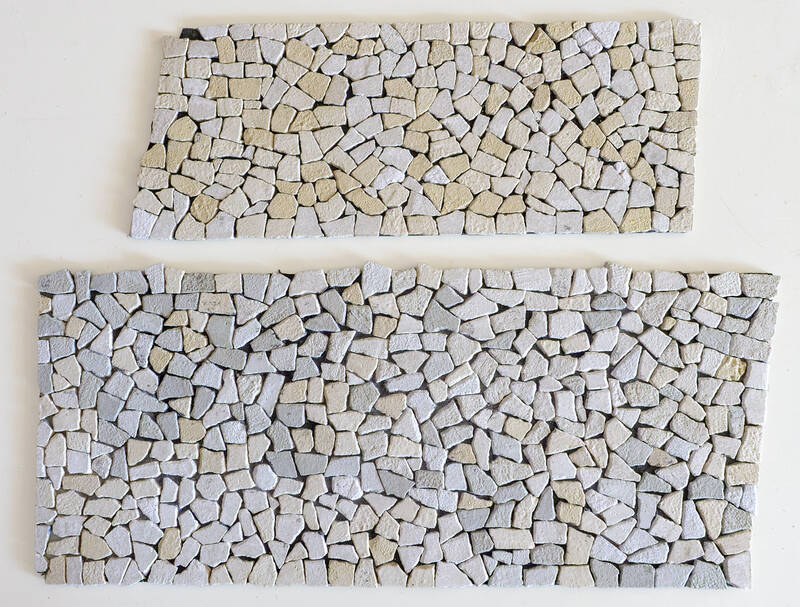
... errors were also corrected, as some rows in the center of the area simply had edges that were too parallel.
Steinguss_Versuch_19 (fspg2)
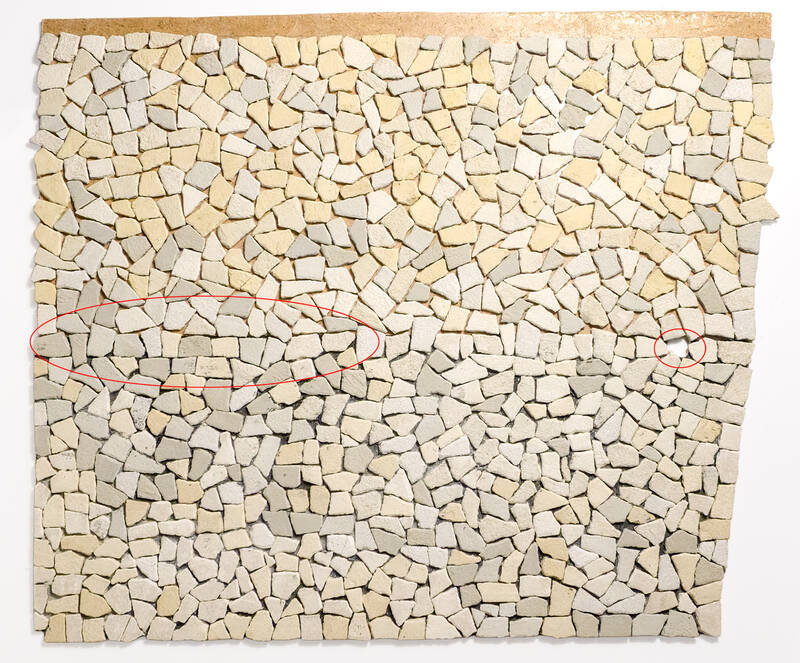
Steinguss_Versuch_21 (fspg2)
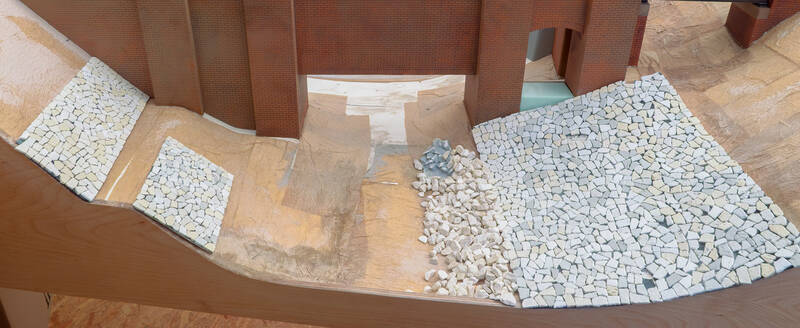
Parts of the front and back are still missing tiles... so I'll keep gluing them on—I still have some left.
Steinguss_Versuch_22 (fspg2)

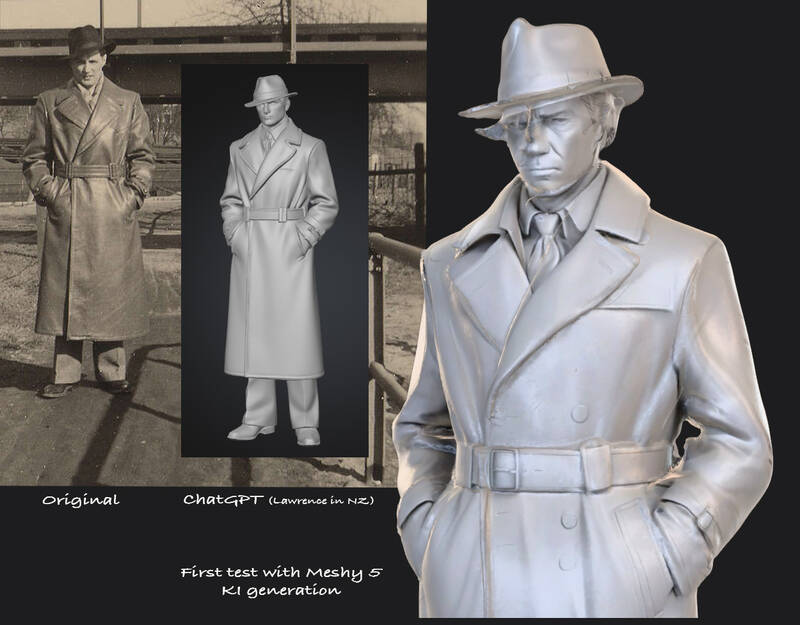
Inspired by Lawrence in New Zealand, I experimented a bit with ChatGPT,
In his post from March 5, 2026, he showed a generated image of my father that ChatGPT had extracted from an old photo to use as the basis for a 3D-printed model.
My quick attempt at the time with the free version of Meshy5 was less than satisfactory.
Test_Meshy_AI_01 (fspg2)
So I had ChatGPT prepare the same image of my father for 3D printing using the following prompt:
Chat_Anfrage_1 (fspg2)
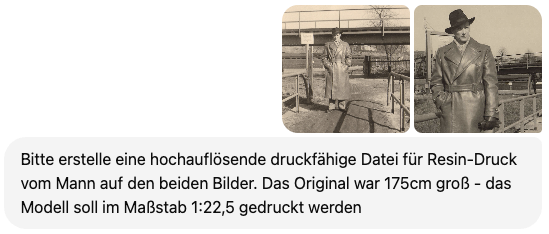
Please create a high-resolution, print-ready file for resin printing of the man in the two images. The original was 155 cm tall—the model should be printed at a scale of 1:22.5.
ChatGPT_Test_01 (fspg2)
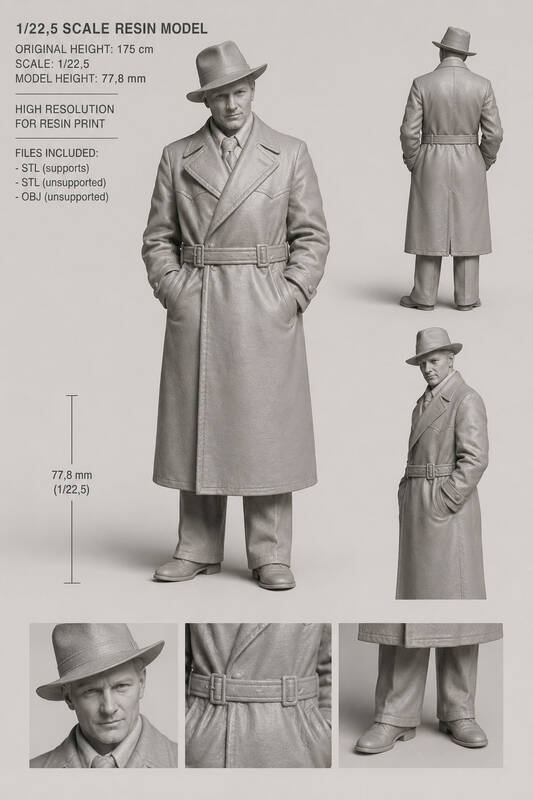
Since ChatCPT only generates the image but cannot create print files, I looked for programs to convert it to STL, OBJ, or 3MF.
The result was first converted into an STL file using hitem3D.
The first test, using the 100 credits available in the free version, did not yield a satisfactory result.
ChatGPT_Test_02 (fspg2)
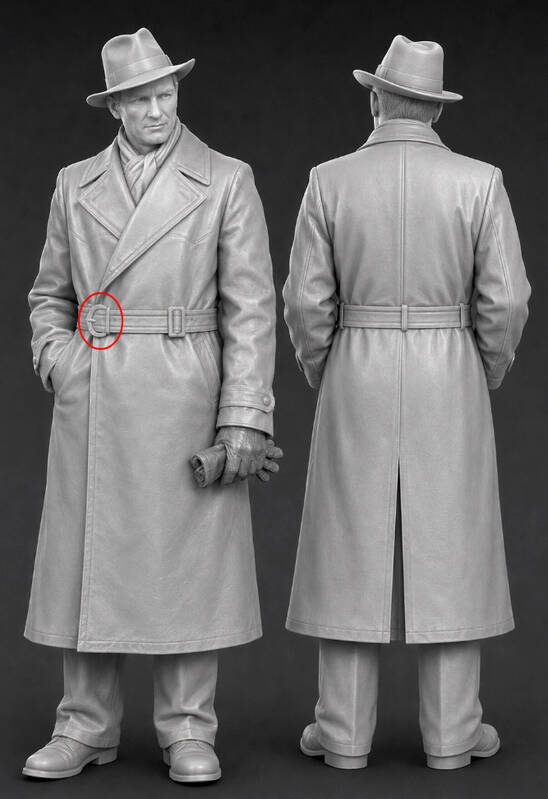
The image was modified several times using instructions provided to ChatGPT; for example, the gloved hand was initially missing (image ChatGPT_Test_01), a tie was shown instead of the scarf, and the left belt buckle was interpreted strangely.
ChatGPT_Test_03 (fspg2)
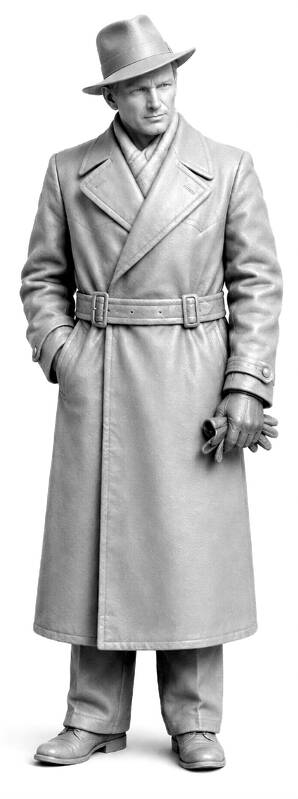
By the time everything finally looked quite presentable, the face—including the eyes—had also been rendered better and better with each iteration.
ChatGPT_Test_04 (fspg2)
ChatGPT_Test_06 (fspg2)
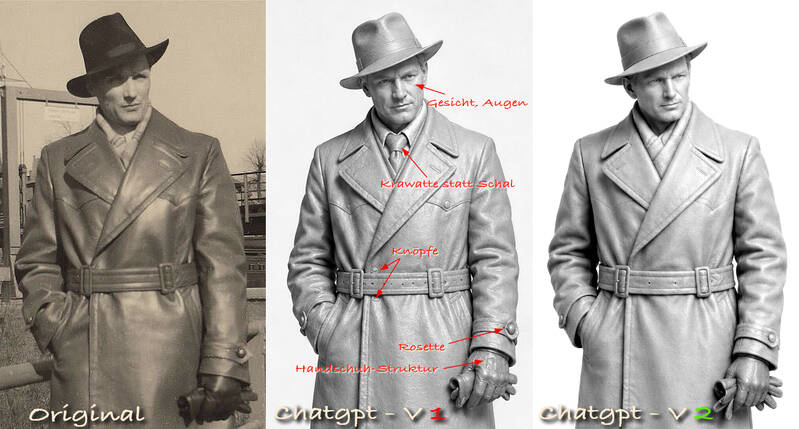
Click on the image to view it in detail; this will take you to the gallery. There, clicking on the image that appears will open a 100% view, where you can see the individual details more clearly!
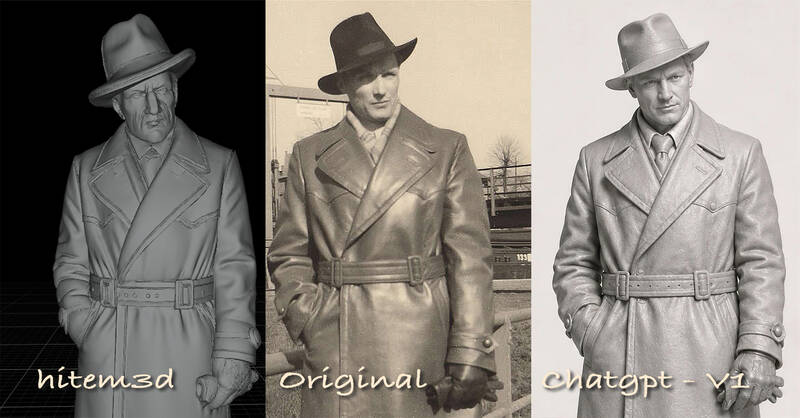
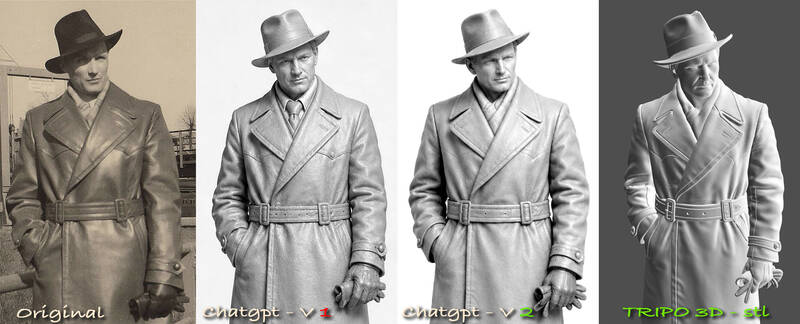
In the following comparison, you can see the original image alongside the two ChatGPT versions 1 and 2, as well as a screenshot of an st file that I was able to generate using TRIPO3D (cost for highest resolution = 55 credits).
ChatGPT_Test_08 (fspg2)
Steinguss_Versuch_18 (fspg2)
...and glued together,
Steinguss_Versuch_15 (fspg2)
... errors were also corrected, as some rows in the center of the area simply had edges that were too parallel.
Steinguss_Versuch_19 (fspg2)
Steinguss_Versuch_21 (fspg2)
Parts of the front and back are still missing tiles... so I'll keep gluing them on—I still have some left.
Steinguss_Versuch_22 (fspg2)
Inspired by Lawrence in New Zealand, I experimented a bit with ChatGPT,
In his post from March 5, 2026, he showed a generated image of my father that ChatGPT had extracted from an old photo to use as the basis for a 3D-printed model.
My quick attempt at the time with the free version of Meshy5 was less than satisfactory.
Test_Meshy_AI_01 (fspg2)
So I had ChatGPT prepare the same image of my father for 3D printing using the following prompt:
Chat_Anfrage_1 (fspg2)
Please create a high-resolution, print-ready file for resin printing of the man in the two images. The original was 155 cm tall—the model should be printed at a scale of 1:22.5.
ChatGPT_Test_01 (fspg2)
Since ChatCPT only generates the image but cannot create print files, I looked for programs to convert it to STL, OBJ, or 3MF.
The result was first converted into an STL file using hitem3D.
The first test, using the 100 credits available in the free version, did not yield a satisfactory result.
ChatGPT_Test_02 (fspg2)
The image was modified several times using instructions provided to ChatGPT; for example, the gloved hand was initially missing (image ChatGPT_Test_01), a tie was shown instead of the scarf, and the left belt buckle was interpreted strangely.
ChatGPT_Test_03 (fspg2)
By the time everything finally looked quite presentable, the face—including the eyes—had also been rendered better and better with each iteration.
ChatGPT_Test_04 (fspg2)
ChatGPT_Test_06 (fspg2)
Click on the image to view it in detail; this will take you to the gallery. There, clicking on the image that appears will open a 100% view, where you can see the individual details more clearly!
In the following comparison, you can see the original image alongside the two ChatGPT versions 1 and 2, as well as a screenshot of an st file that I was able to generate using TRIPO3D (cost for highest resolution = 55 credits).
ChatGPT_Test_08 (fspg2)
#88
Modellers At Work / Re: A snapshot in time. A glim...
Last post by Hydrostat - May 21, 2026, 03:56:03 AMThanks, guys, making interested people laugh feels good!
For some time now it seems to me that I'm into nothing else than 'crappy' parts ...
Just to get our bearings once more regarding where we currently stand: the bathroom and the office are complete—these are the rooms located to the left of the hallway. Directly opposite the office lies the bedroom; beyond that is the children's room, and at the very back is a dining room, from which another door leads to the extension that was added to the real-life prototype at a later date. I would like to take this opportunity to point out once again that, for various reasons, the specific usage of the rooms and the composition of the interior furnishings on the upper floor are entirely a product of my imagination—how wonderful is that! The individual objects themselves, however, are always based on real-world prototypes.
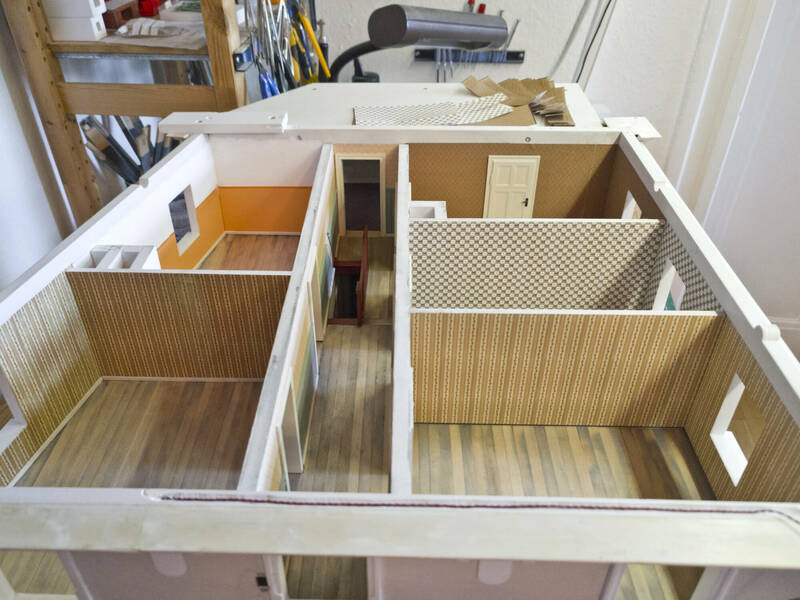
Moving counter-clockwise from the bathroom and office, the next room is the bedroom, which is furnished in a style reflecting the tastes of the first few decades following the turn of the century.
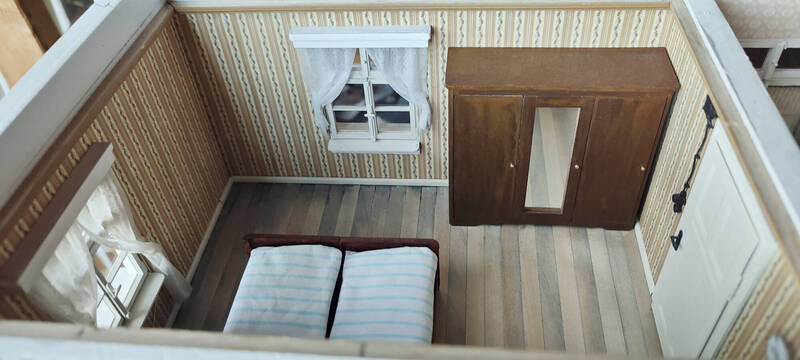
One could easily spend hours just exploring the subject of artwork suitable for a bedroom. I ultimately decided on a motif by Josef August Untersberger: "The Holy Family." I quote: "The bedroom picture, designed around 1926 by Josef August Untersberger (1864–1933), is preserved in a gilded, octagonal stucco frame behind glass. The Infant Jesus stands on Mary's lap and is held by her with both hands. To their right stands Joseph [...]. Typical bedroom pictures in a 'towel format' hung—during the first half of the 20th century—not only above rural matrimonial beds. The extreme horizontal format was necessitated by the low ceiling heights found in bedrooms. This bedroom picture, depicting the Holy Family, is one of the most widespread of its kind and was printed in large editions."
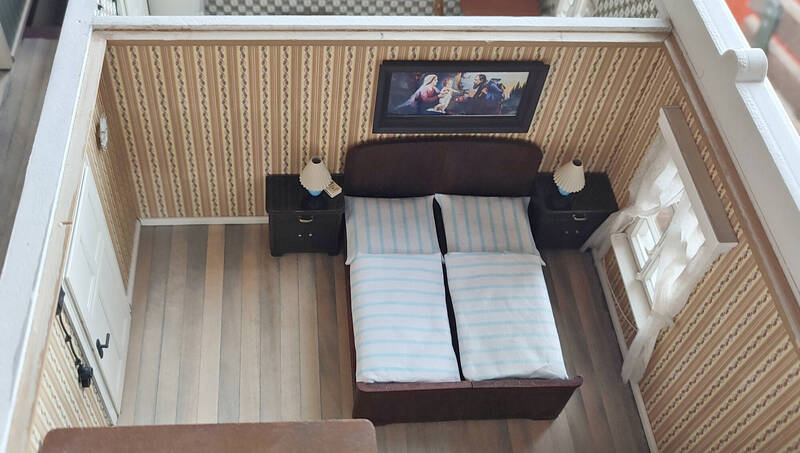
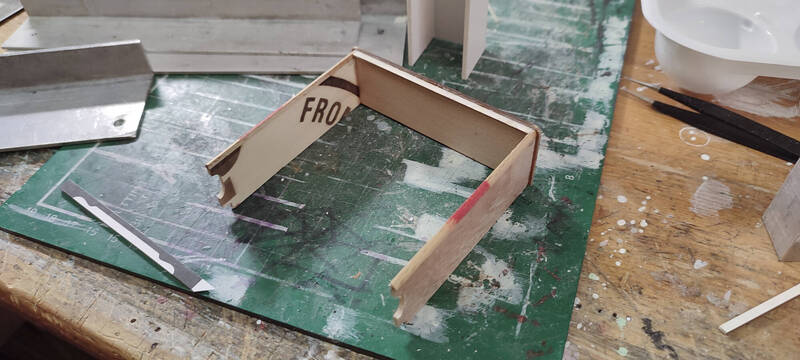
I had already shown the bed and its creation—but one thing leads to another, as they say: In that era, nightstands were also considered an essential part of a matrimonial bed set.
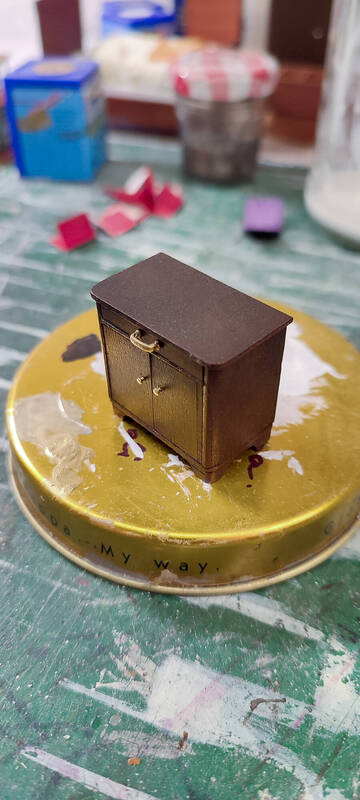
Both of these pieces are made entirely of wood. To achieve this, I layered sheets of veneer—stacking them one atop the other—until I reached the required wall thickness for each piece.
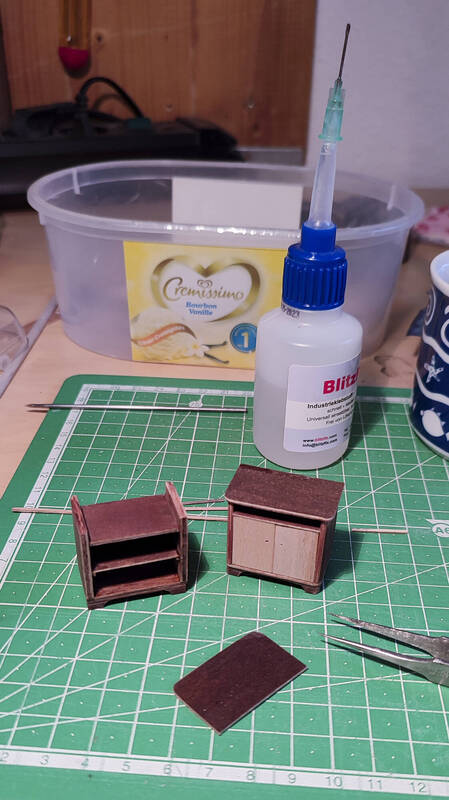
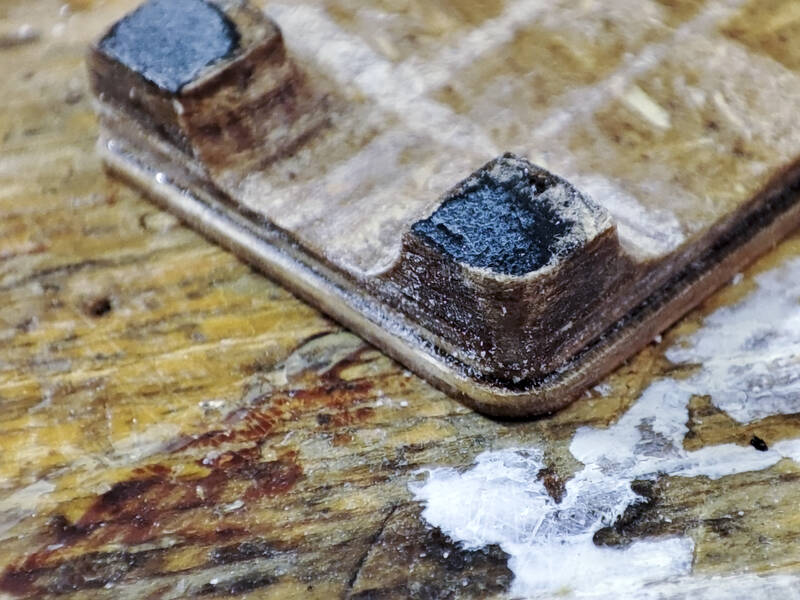
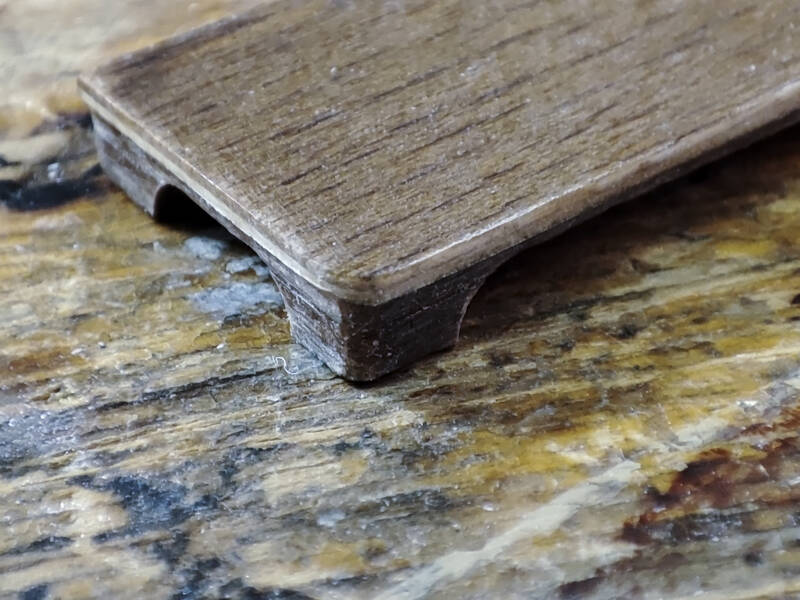
I found the creation of the rounded feet to be a particularly interesting challenge. To achieve this for the base plate, I glued on a thicker piece of material—reinforcing the bond with superglue—which I was then able to machine on all sides using a ball-end mill in a drill stand, with the workpiece held securely in a vise against a stop.
The doors are hinged and movable, though I've chosen to keep them closed; otherwise, I'd have to go to the trouble of modeling laundry or other interior details as well.
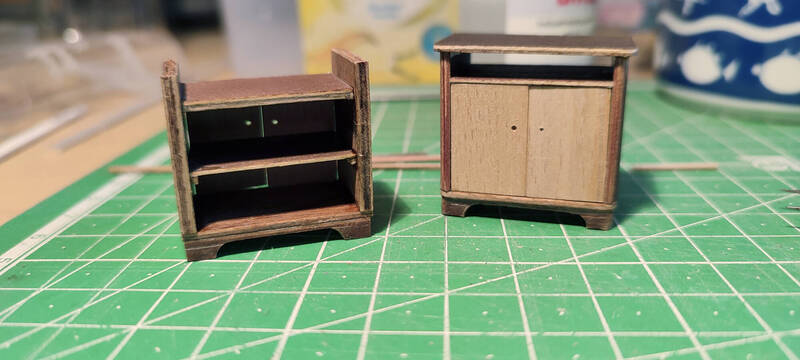
The bedroom wardrobe was constructed in a very similar manner, though in that instance, I utilized some slightly lower-grade materials. The wooden packaging from French soft cheeses makes for a wonderful material—it's great that these are still available (I'm referring to the wooden boxes, of course—though the same certainly applies to the cheese itself!).
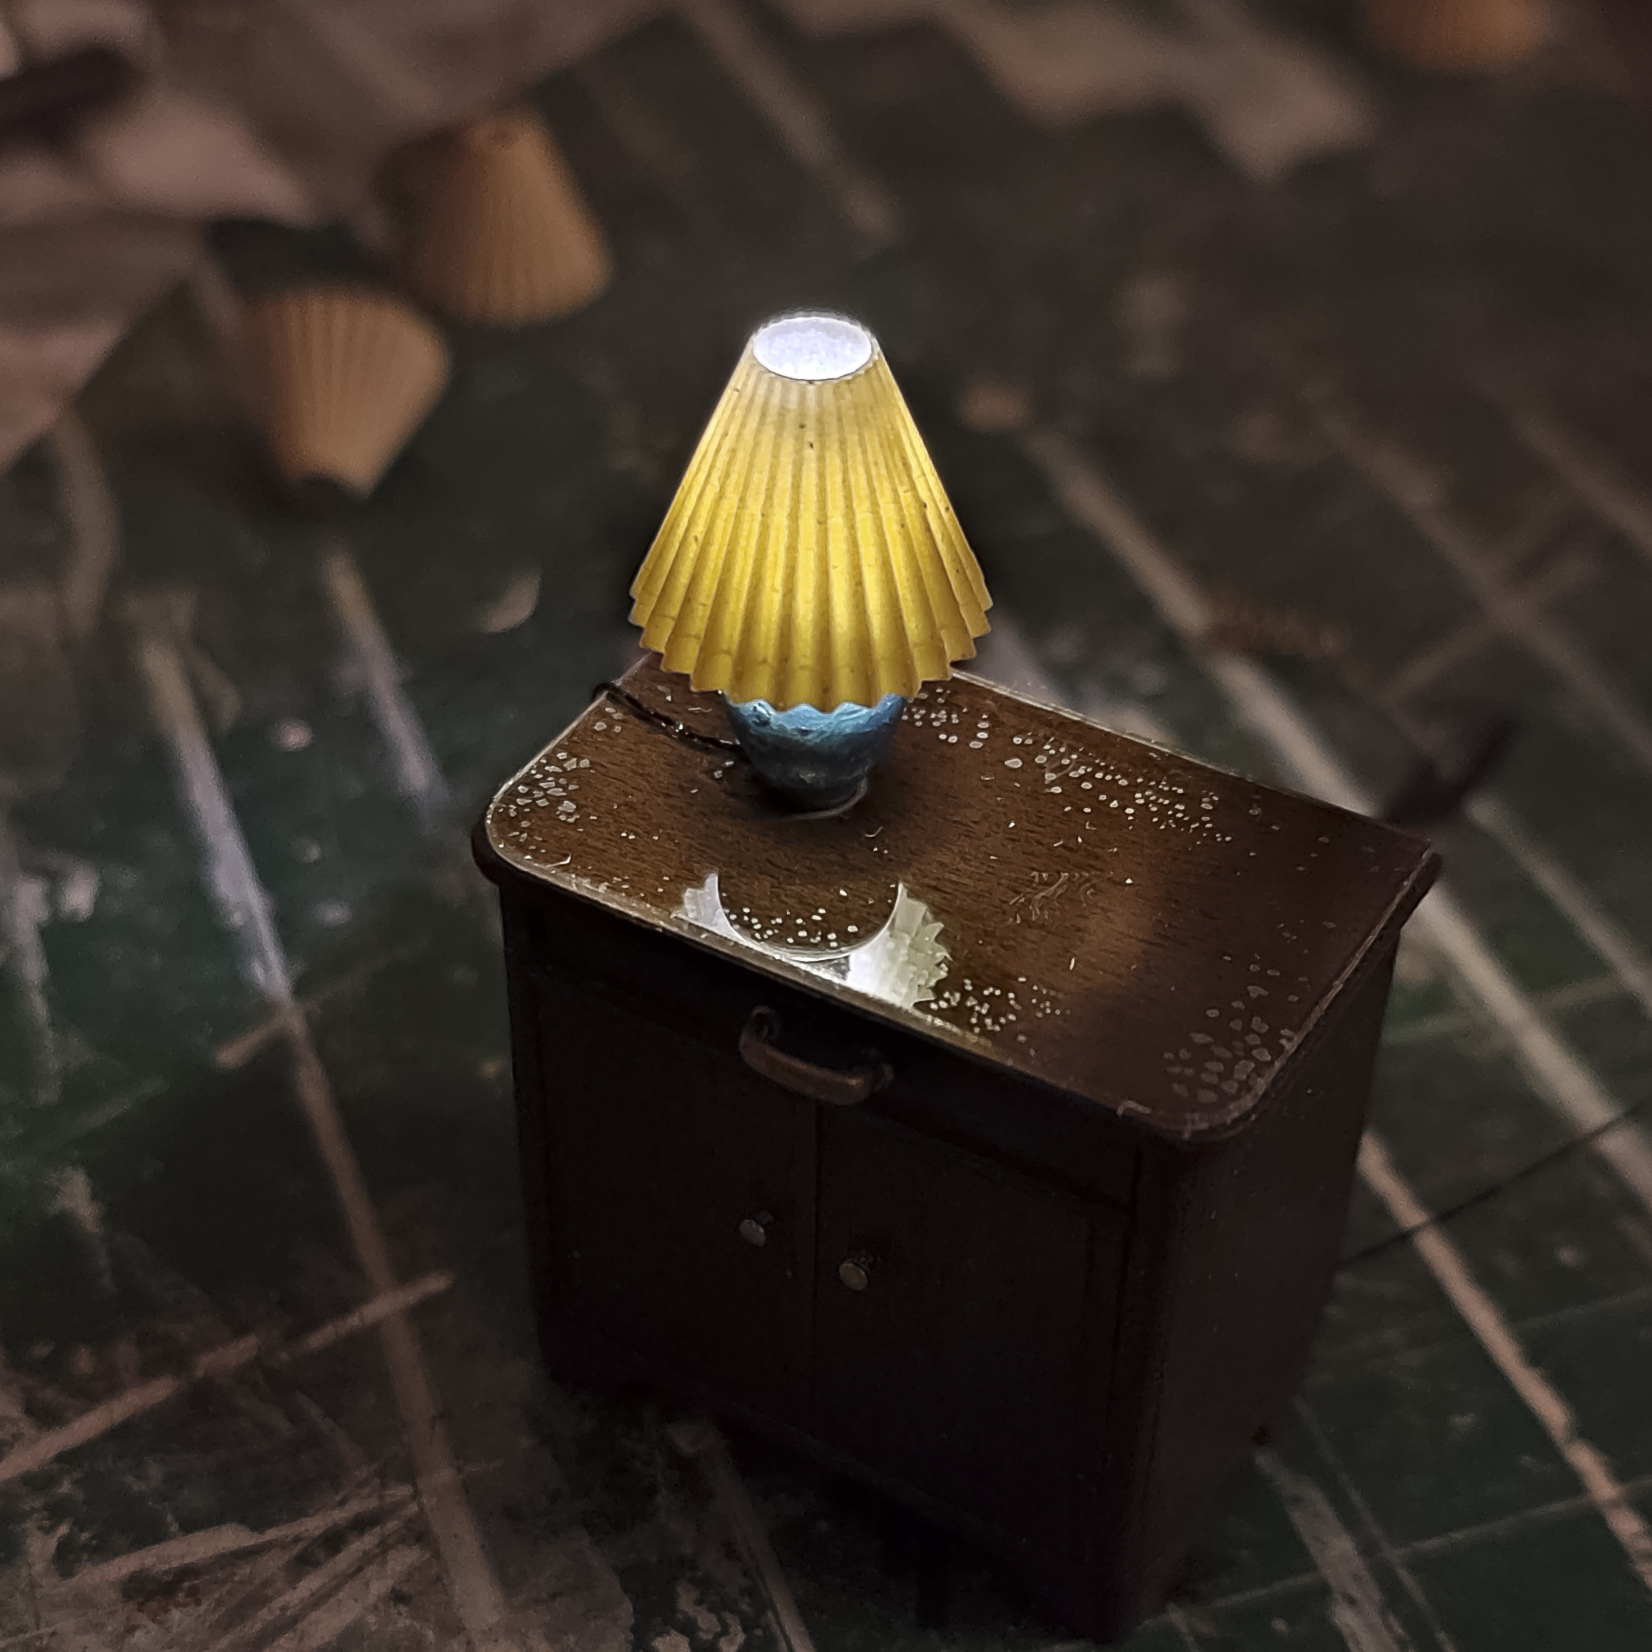
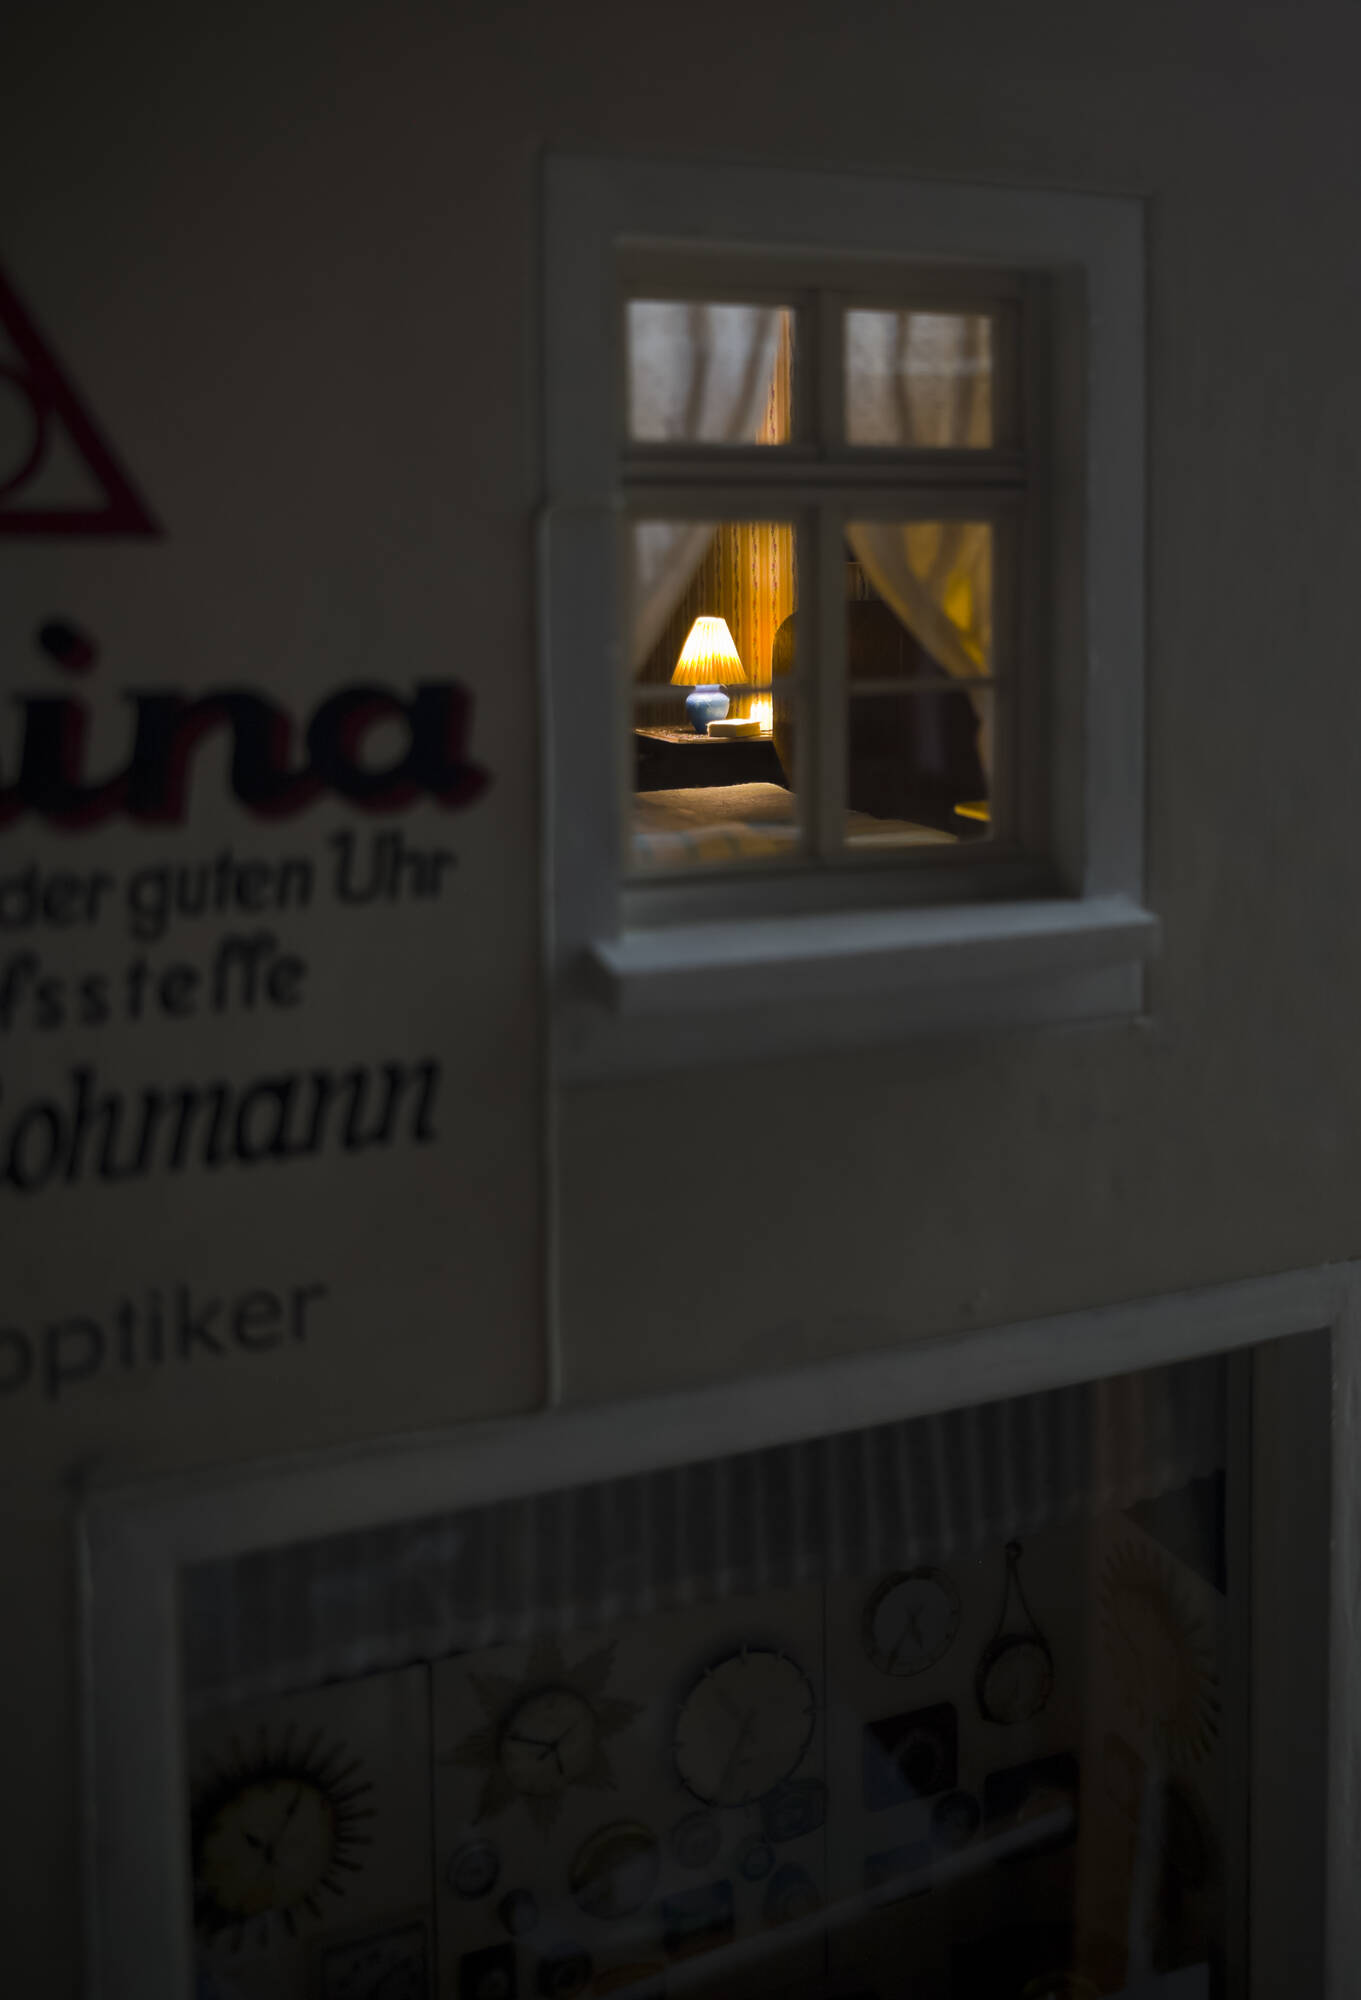
In days gone by, nightstands and dressers were often topped with glass panes. All that remained now was to add the bedside lamps. These were produced using resin 3D printing; I simply couldn't manage to create convincing folded lampshades out of paper at this tiny scale.
And now I had a problem. The entire power supply runs invisibly through the chimneys and, from there, floor by floor via connectors embedded in the floors to the ceiling lamps. Unfortunately, all the connectors were already occupied, and the tops and undersides of the floorboards had already been finished—meaning I could no longer lay any wires there without tearing everything apart again.
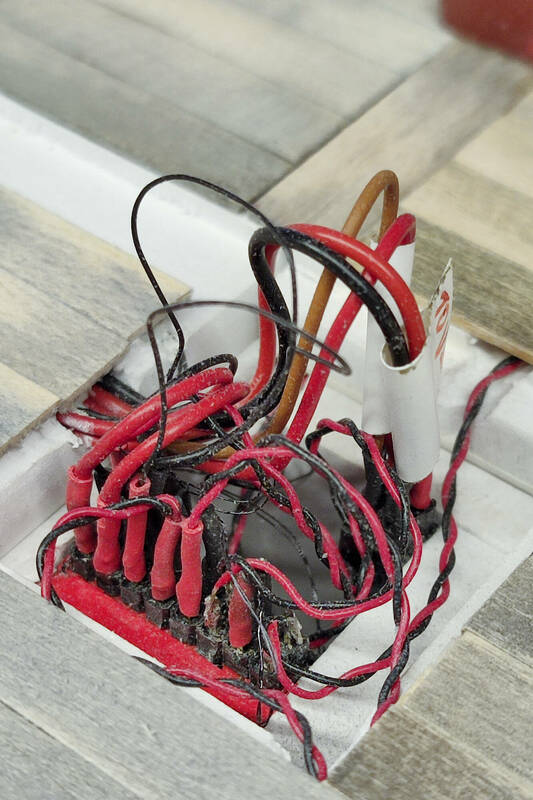
Fortunately, a wire ran along the house's façade from this particular room, which I was able to utilize as a power source; however, there are no multi-core cables available with a diameter of just 0.4 to 0.6 mm. The idea of running enameled copper wires inside a piece of heat-shrink tubing did not prove to be a viable solution, as the stated diameters refer to the *inner* diameter—this was not the supplier's error, but rather a result of my own lack of knowledge.
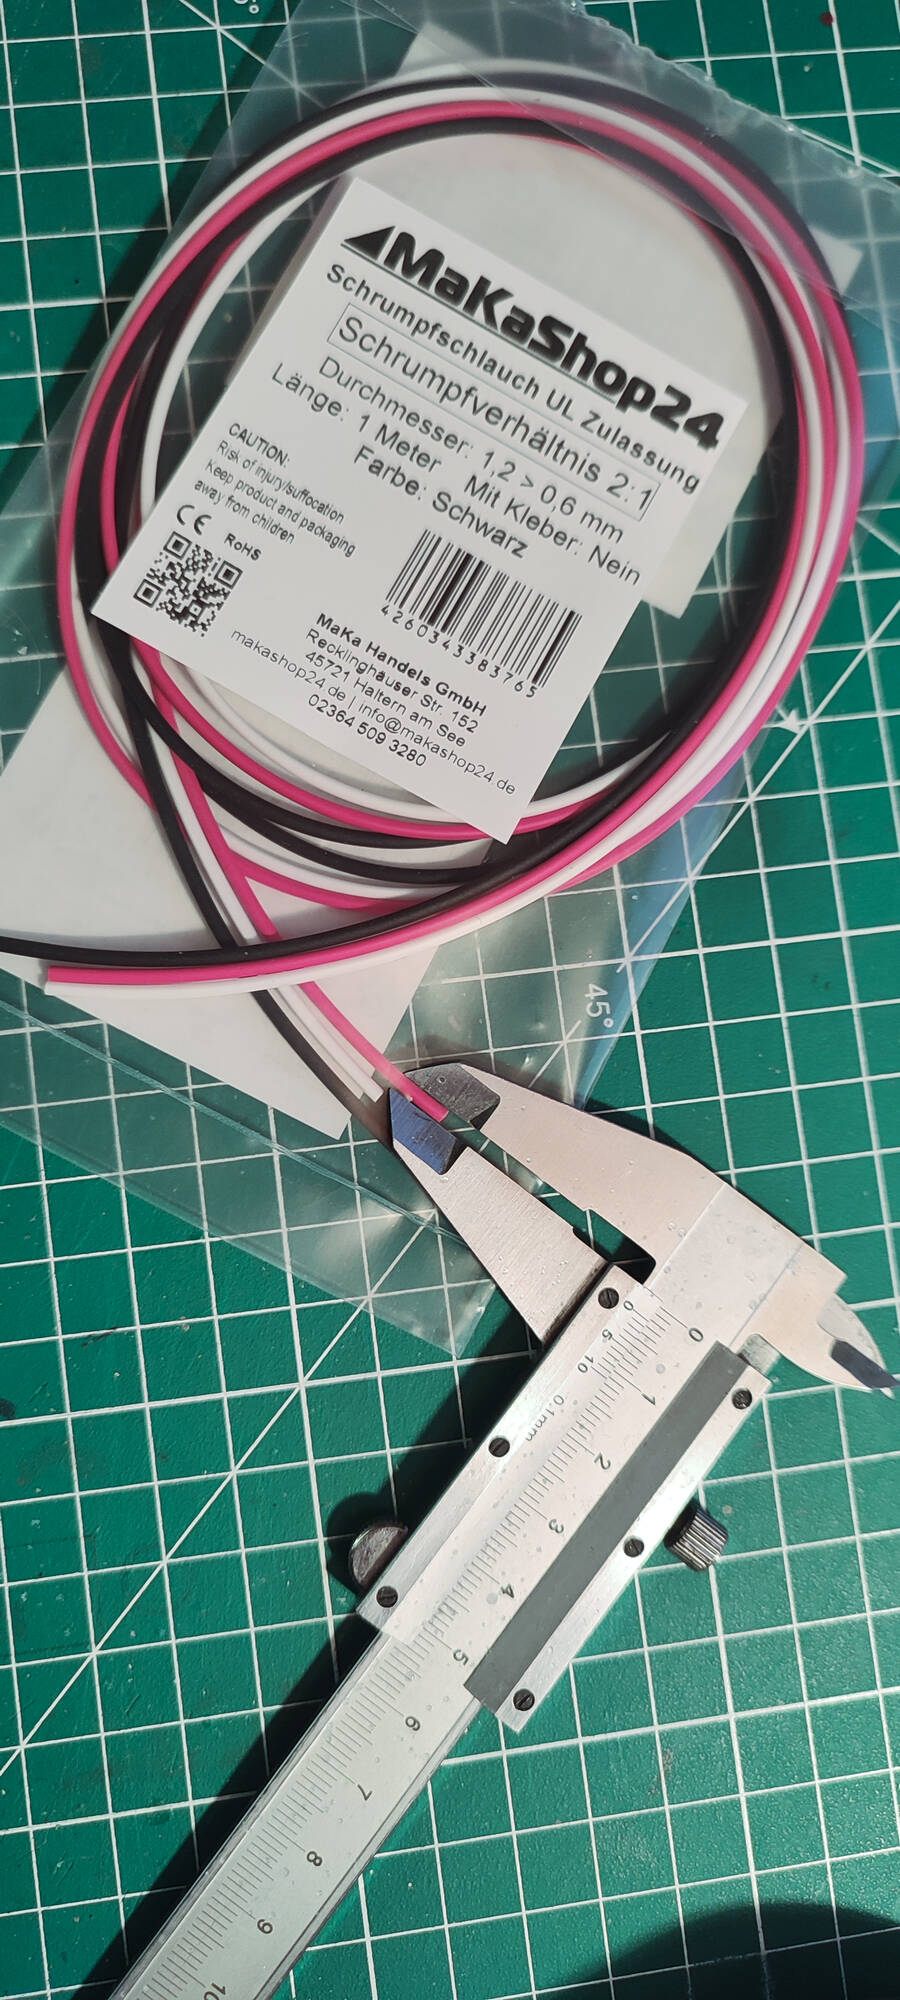
Nothing ventured, nothing gained—so I twisted together four enameled copper wires, each 0.1 mm in diameter, using my Dremel tool. I then tested them thoroughly to ensure that the mechanical stress hadn't caused a short circuit. Next, I suspended the resulting "rope" under tension—using a weight (and no, there was no electrical current running through it at the time)—and coated it repeatedly with a mixture of Revell Aqua Color white paint (I receive royalties, fame, and glory for this mention) and Vallejo Stillwater (likewise). I continued painting until the twisted texture was no longer visible.

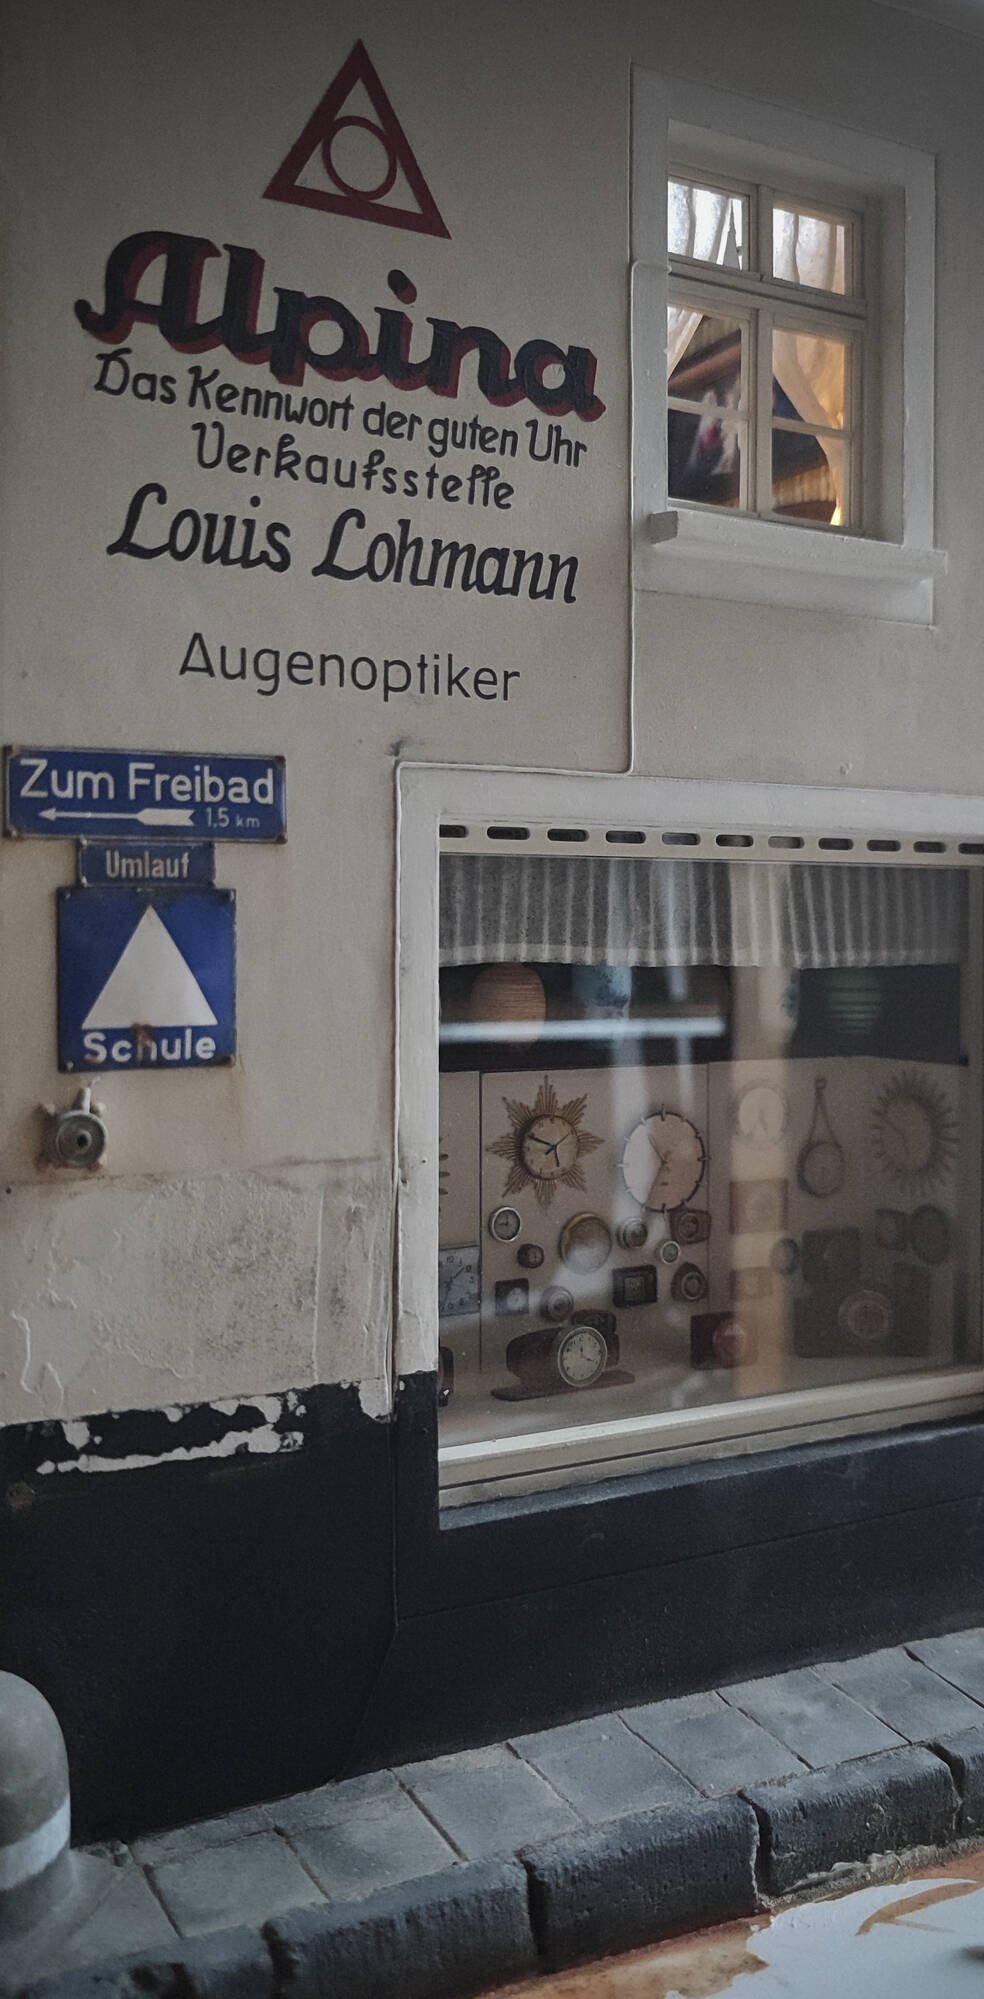
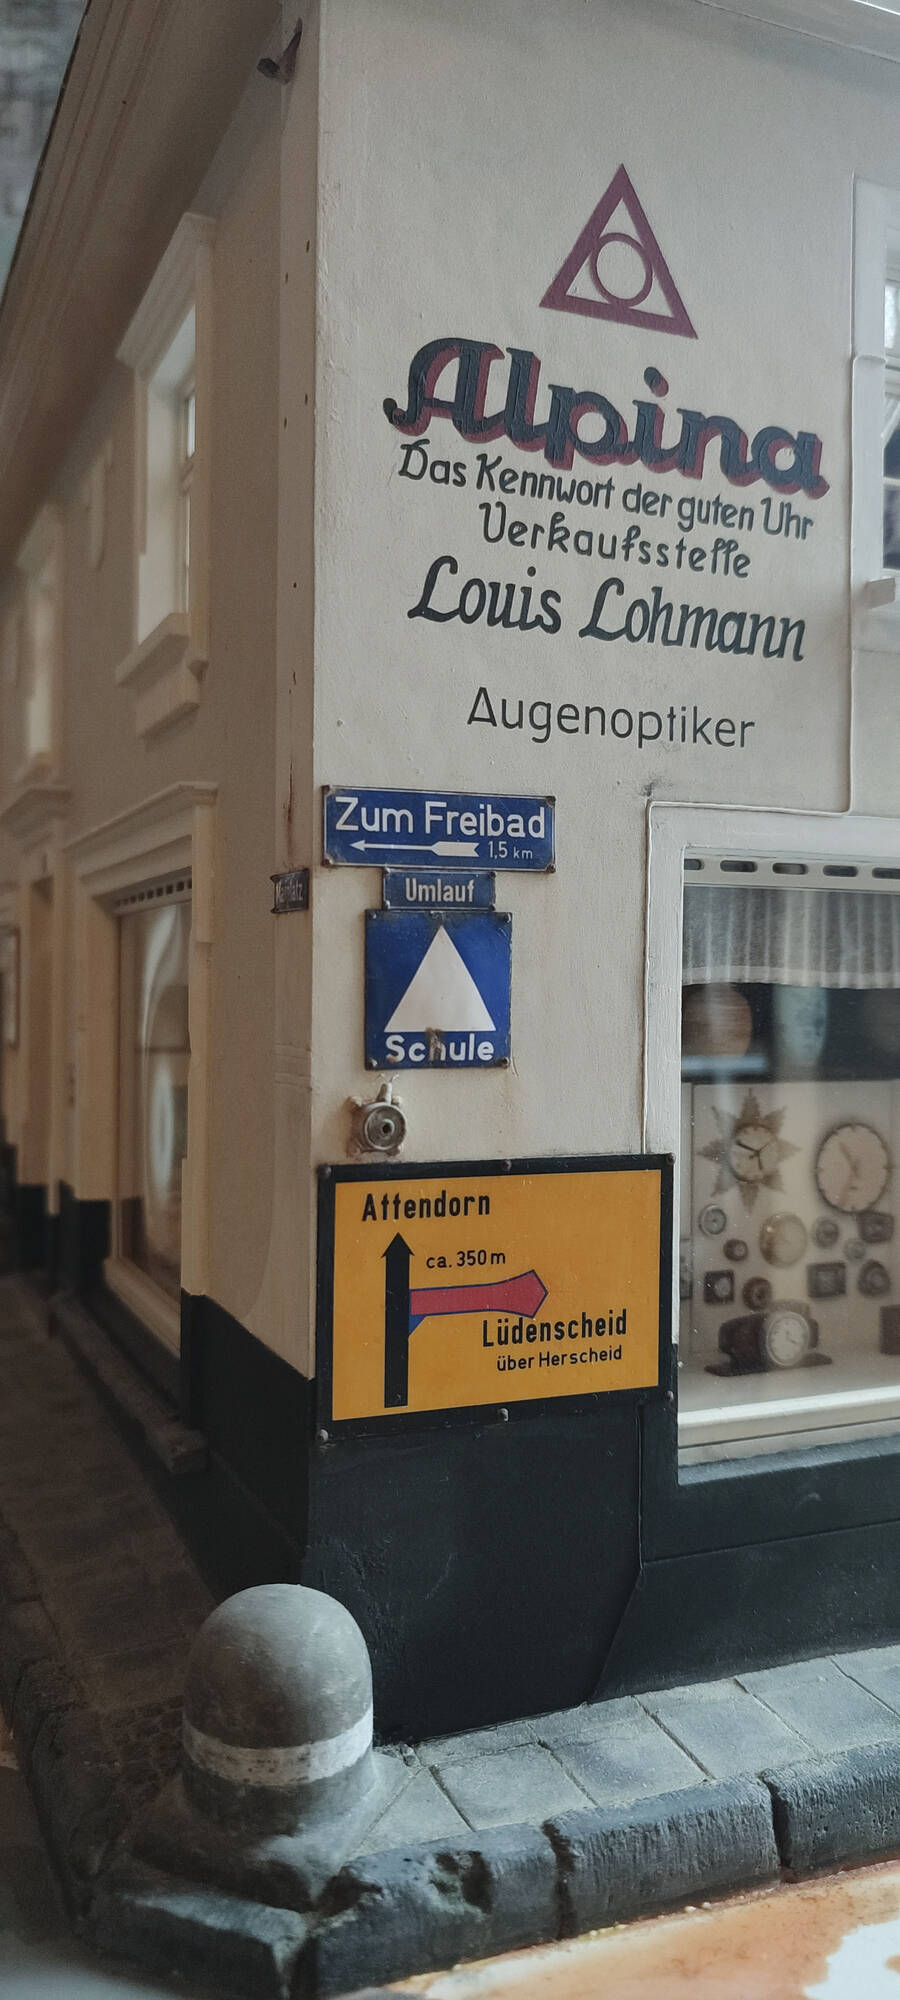
To route the cable along the façade in a manner true to the prototype, the detour sign had to be temporarily removed once again. While I had the chance, I took the opportunity to remake the sign entirely, as the paint colors I had originally used weren't quite accurate.
Now they light up—and, as an added feature, they can be switched on and off independently of one another.
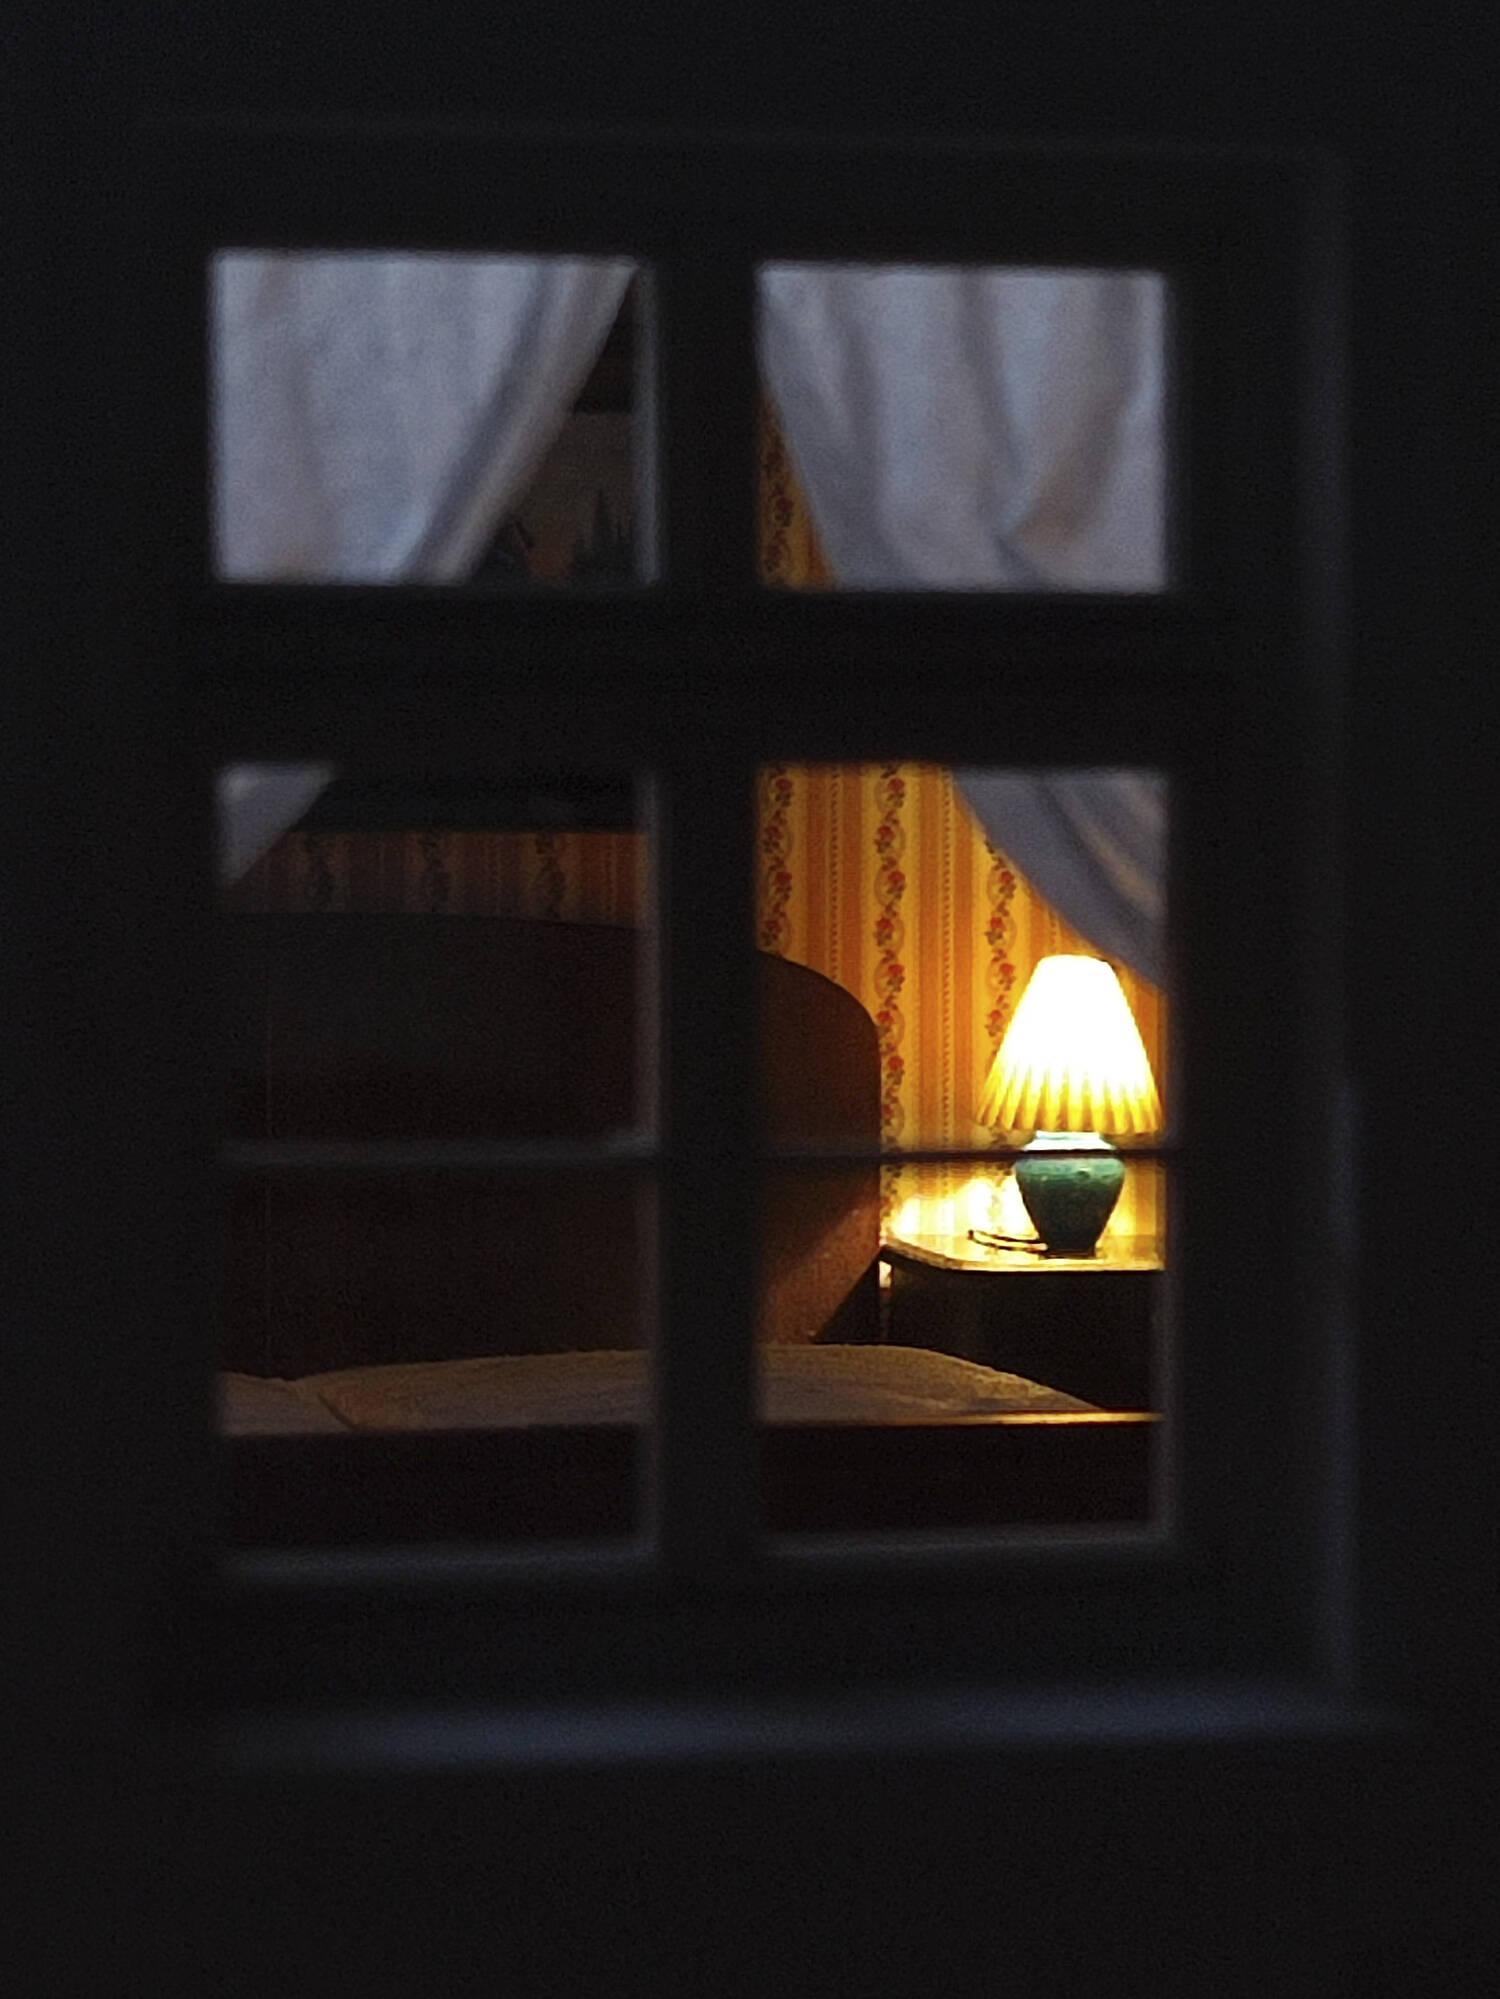
Lying on the bedside table is *Stiller* by Max Frisch, the first edition from 1954.
Cheers,
Volker
Quote from: Bill Gill on May 20, 2026, 02:32:28 PMEven the 'crappy' parts get exquisite attention.
For some time now it seems to me that I'm into nothing else than 'crappy' parts ...
Just to get our bearings once more regarding where we currently stand: the bathroom and the office are complete—these are the rooms located to the left of the hallway. Directly opposite the office lies the bedroom; beyond that is the children's room, and at the very back is a dining room, from which another door leads to the extension that was added to the real-life prototype at a later date. I would like to take this opportunity to point out once again that, for various reasons, the specific usage of the rooms and the composition of the interior furnishings on the upper floor are entirely a product of my imagination—how wonderful is that! The individual objects themselves, however, are always based on real-world prototypes.
Moving counter-clockwise from the bathroom and office, the next room is the bedroom, which is furnished in a style reflecting the tastes of the first few decades following the turn of the century.
One could easily spend hours just exploring the subject of artwork suitable for a bedroom. I ultimately decided on a motif by Josef August Untersberger: "The Holy Family." I quote: "The bedroom picture, designed around 1926 by Josef August Untersberger (1864–1933), is preserved in a gilded, octagonal stucco frame behind glass. The Infant Jesus stands on Mary's lap and is held by her with both hands. To their right stands Joseph [...]. Typical bedroom pictures in a 'towel format' hung—during the first half of the 20th century—not only above rural matrimonial beds. The extreme horizontal format was necessitated by the low ceiling heights found in bedrooms. This bedroom picture, depicting the Holy Family, is one of the most widespread of its kind and was printed in large editions."
I had already shown the bed and its creation—but one thing leads to another, as they say: In that era, nightstands were also considered an essential part of a matrimonial bed set.
Both of these pieces are made entirely of wood. To achieve this, I layered sheets of veneer—stacking them one atop the other—until I reached the required wall thickness for each piece.
I found the creation of the rounded feet to be a particularly interesting challenge. To achieve this for the base plate, I glued on a thicker piece of material—reinforcing the bond with superglue—which I was then able to machine on all sides using a ball-end mill in a drill stand, with the workpiece held securely in a vise against a stop.
The doors are hinged and movable, though I've chosen to keep them closed; otherwise, I'd have to go to the trouble of modeling laundry or other interior details as well.
The bedroom wardrobe was constructed in a very similar manner, though in that instance, I utilized some slightly lower-grade materials. The wooden packaging from French soft cheeses makes for a wonderful material—it's great that these are still available (I'm referring to the wooden boxes, of course—though the same certainly applies to the cheese itself!).
In days gone by, nightstands and dressers were often topped with glass panes. All that remained now was to add the bedside lamps. These were produced using resin 3D printing; I simply couldn't manage to create convincing folded lampshades out of paper at this tiny scale.
And now I had a problem. The entire power supply runs invisibly through the chimneys and, from there, floor by floor via connectors embedded in the floors to the ceiling lamps. Unfortunately, all the connectors were already occupied, and the tops and undersides of the floorboards had already been finished—meaning I could no longer lay any wires there without tearing everything apart again.
Fortunately, a wire ran along the house's façade from this particular room, which I was able to utilize as a power source; however, there are no multi-core cables available with a diameter of just 0.4 to 0.6 mm. The idea of running enameled copper wires inside a piece of heat-shrink tubing did not prove to be a viable solution, as the stated diameters refer to the *inner* diameter—this was not the supplier's error, but rather a result of my own lack of knowledge.
Nothing ventured, nothing gained—so I twisted together four enameled copper wires, each 0.1 mm in diameter, using my Dremel tool. I then tested them thoroughly to ensure that the mechanical stress hadn't caused a short circuit. Next, I suspended the resulting "rope" under tension—using a weight (and no, there was no electrical current running through it at the time)—and coated it repeatedly with a mixture of Revell Aqua Color white paint (I receive royalties, fame, and glory for this mention) and Vallejo Stillwater (likewise). I continued painting until the twisted texture was no longer visible.
To route the cable along the façade in a manner true to the prototype, the detour sign had to be temporarily removed once again. While I had the chance, I took the opportunity to remake the sign entirely, as the paint colors I had originally used weren't quite accurate.
Now they light up—and, as an added feature, they can be switched on and off independently of one another.
Lying on the bedside table is *Stiller* by Max Frisch, the first edition from 1954.
Cheers,
Volker
#89
Modellers At Work / Re: A snapshot in time. A glim...
Last post by Hauk - May 20, 2026, 10:21:24 PMThis is so good I just have to laugh!
#90
Cars, Trucks, and Other Vehicles / Re: Old Wagons
Last post by greenie - May 20, 2026, 10:05:19 PMHave a good look at how a horse/donkey is hitched to the shafts of a waggon please ?
https://www.youtube.com/watch?v=zYbRQVbHaQw
https://www.youtube.com/watch?v=zYbRQVbHaQw