- Welcome to Westlake Publishing Forums.

News:
REGARDING MEMBERSHIP ON THIS FORUM: Due to spam, our server has disabled the forum software to gain membership. The only way to become a new member is for you to send me a private e-mail with your preferred screen name (we prefer you use your real name, or some variant there-of), and email adress you would like to have associated with the account. -- Send the information to: Russ at finescalerr@msn.com
Recent posts
#1
Modellers At Work / Re: Feldbahnmodule with ship
Last post by Bill Gill - Today at 12:51:59 PMIt's those kind of details that add credibility to the entire project. Good stuff.
#2
General Forums / Re: modern science
Last post by finescalerr - Today at 11:58:20 AMThanks, Kim. Modern science caused the problem. Human intelligence fixed it. -- Russ
#3
Modellers At Work / Re: Feldbahnmodule with ship
Last post by finescalerr - Today at 11:55:48 AMAre you sure the guy with the sledge hammer didn't attack the two missing boards and the support posts? He looks angry.
This addition will look wonderful when you tone down the board colors and add sand and scenery. Work faster!
Russ
This addition will look wonderful when you tone down the board colors and add sand and scenery. Work faster!
Russ
#4
Modellers At Work / Re: Feldbahnmodule with ship
Last post by fspg2 - Today at 10:36:22 AMHi,
Thank you gentlemen!
I wrote:
However, I now find it more logical that the crane operator probably bumped a little roughly against the board wall with his grab... especially as the left corner post appears to be quite bent.
So I bent the two left-hand posts a little more.
Hafenmodul_31 (fspg2)

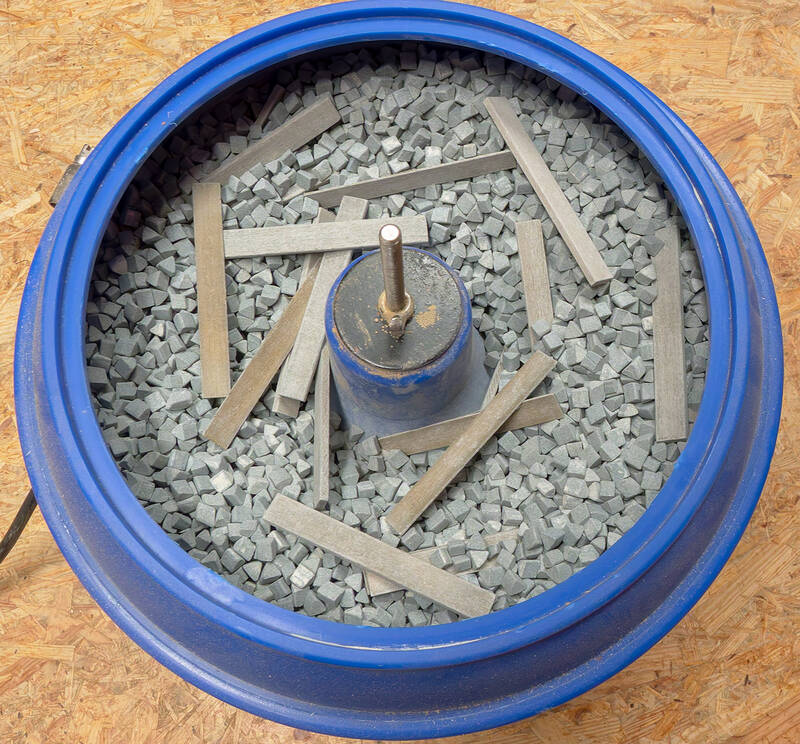
The boards were sawn from 10.0 mm x 3.0 mm lime wood, which had previously been sanded with 80 g sandpaper on a belt sander.
They were then treated with various brown and gray stains.
After drying, I put them in the tumbler for 10 to 15 minutes.
This gave me the first sandy impression.
When all the boards are firmly assembled, they will receive an individual finishing treatment.
Holz im Tumbler_02 (fspg2)
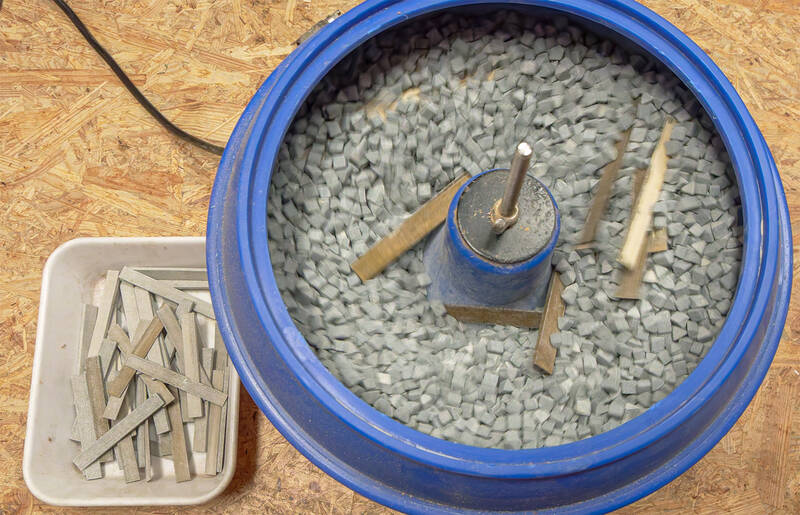
Holz im Tumbler_01 (fspg2)
The board wall of the sand pile grows slowly.
Hafenmodul_32 (fspg2)
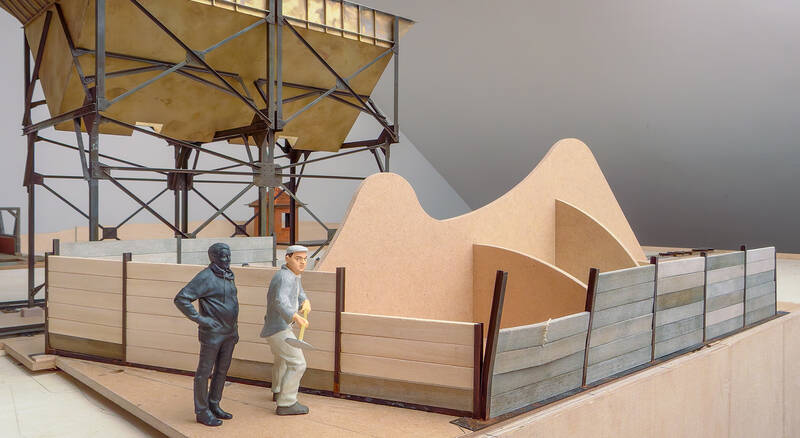
The two missing upper boards and the third broken board are evidence of the "accident" with the grab.
Thank you gentlemen!
I wrote:
QuoteThe wall of boards, slightly tilted by the sand, makes a wonderful motif for a replica.
However, I now find it more logical that the crane operator probably bumped a little roughly against the board wall with his grab... especially as the left corner post appears to be quite bent.
So I bent the two left-hand posts a little more.
Hafenmodul_31 (fspg2)
The boards were sawn from 10.0 mm x 3.0 mm lime wood, which had previously been sanded with 80 g sandpaper on a belt sander.
They were then treated with various brown and gray stains.
After drying, I put them in the tumbler for 10 to 15 minutes.
This gave me the first sandy impression.
When all the boards are firmly assembled, they will receive an individual finishing treatment.
Holz im Tumbler_02 (fspg2)
Holz im Tumbler_01 (fspg2)
The board wall of the sand pile grows slowly.
Hafenmodul_32 (fspg2)
The two missing upper boards and the third broken board are evidence of the "accident" with the grab.
#5
General Forums / modern science
Last post by 1-32 - Today at 12:26:02 AMThe Miraculous of modern science, we are back
Thanks Russ
Thanks Russ
#6
Modellers At Work / Re: Another Fordson project in...
Last post by Stuart - July 17, 2025, 10:26:35 PMIn looking over and studying your most excellent model, it suddenly dawned on me that the steering wheel was pretty much useless. There wasn't much an operator could do to direct his "little locomotive" except either forward or backward. But, I'm sure it provided some sense of security to be able to hold on to something and feel as if he had some sense of control.
I know, I'll now go stand in the corner.
Stuart
I know, I'll now go stand in the corner.
Stuart
#7
Military Modeling / Re: Rivet counter
Last post by Bernhard - July 17, 2025, 02:13:20 PMI'm really looking forward to the model of this crane. Together with the Mörser, one can certainly create an interesting diorama.
Bernhard
Bernhard
#8
Military Modeling / Re: Rivet counter
Last post by finescalerr - July 17, 2025, 12:03:10 PMIf you build it they will come. -- Russ
#9
Military Modeling / Re: Rivet counter
Last post by Peter_T1958 - July 17, 2025, 01:27:46 AMThanks, gents!
@ Bernhard
As all of my WWI designs, also this one is planned to become a 3d kit in the distant future. There are some producers around that are seriously interested in this subject, although the number of potential customers would be very small.
But if all that were not enough, there will be also a related crane to be done...
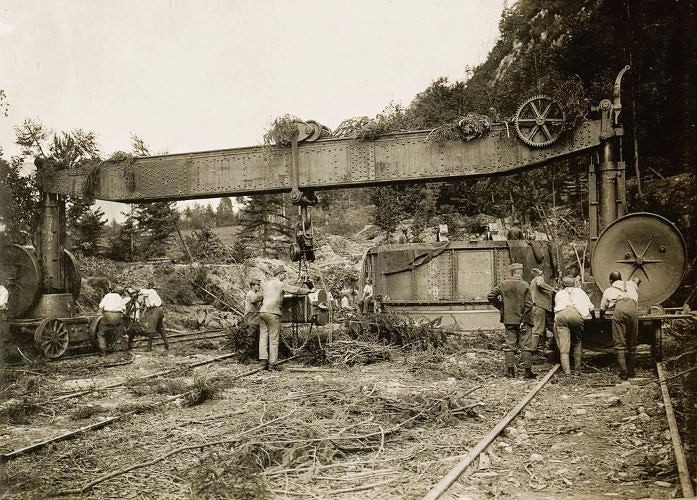
Fortunately I found a large photo collection at the «Österreichisches Nationalarchiv». These pictures help a lot in understanding the whole buld up process. Astonishingly enough, this gun was described as «mobiler» Mörser M.14...

@ Bernhard
As all of my WWI designs, also this one is planned to become a 3d kit in the distant future. There are some producers around that are seriously interested in this subject, although the number of potential customers would be very small.
But if all that were not enough, there will be also a related crane to be done...
Fortunately I found a large photo collection at the «Österreichisches Nationalarchiv». These pictures help a lot in understanding the whole buld up process. Astonishingly enough, this gun was described as «mobiler» Mörser M.14...
#10
Modellers At Work / Re: Another Fordson project in...
Last post by TRAINS1941 - July 16, 2025, 08:57:21 PMAfter seeing this completed. One can only say there is only one Chuck Doan. Absolutely beautiful!
Jerry
Jerry