- Welcome to Westlake Publishing Forums.

News:
REGARDING MEMBERSHIP ON THIS FORUM: Due to spam, our server has disabled the forum software to gain membership. The only way to become a new member is for you to send me a private e-mail with your preferred screen name (we prefer you use your real name, or some variant there-of), and email adress you would like to have associated with the account. -- Send the information to: Russ at finescalerr@msn.com
Recent posts
#11
Modellers At Work / Re: Feldbahnmodule with ship
Last post by Barney - October 13, 2026, 01:48:43 PMExceptional work - so realistic and true to the prototype
Barney
Barney
#12
Modellers At Work / Re: Luke's Garage & Gas Statio...
Last post by Barney - October 13, 2026, 01:45:57 PMVery nice and very realistic
Barney
Barney
#13
Modellers At Work / Re: Feldbahnmodule with ship
Last post by fspg2 - October 13, 2026, 01:07:08 PMThe windows have all been installed in the meantime, and the window sills have been mounted in front of them.
Alter_Lagerschuppen_345 (fspg2)
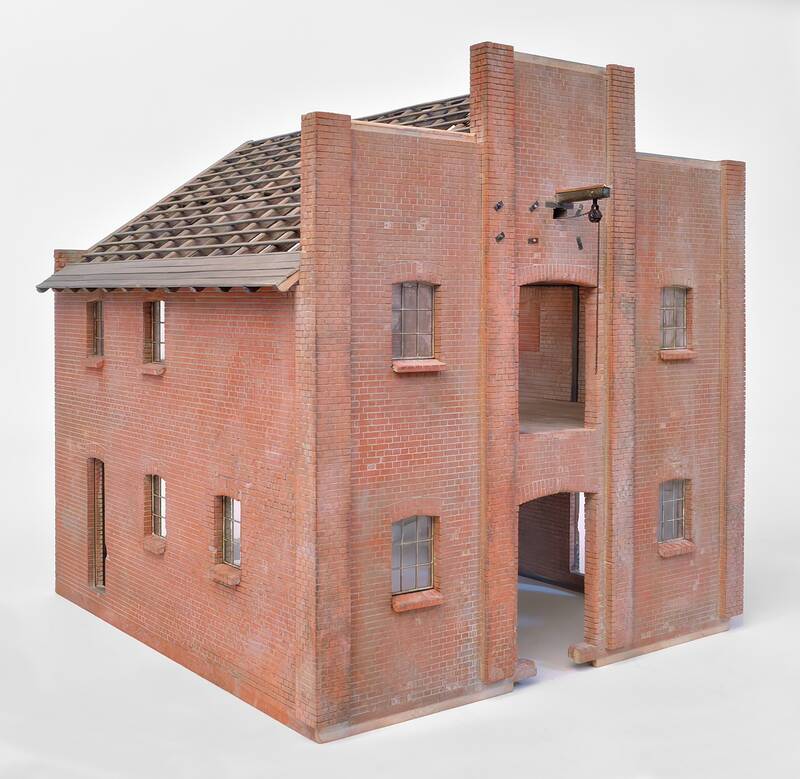
There's definitely a certain resemblance to the prototype.
Rotstein_Lagerschuppen_01_Helmut_Schmidt_ (fspg2)
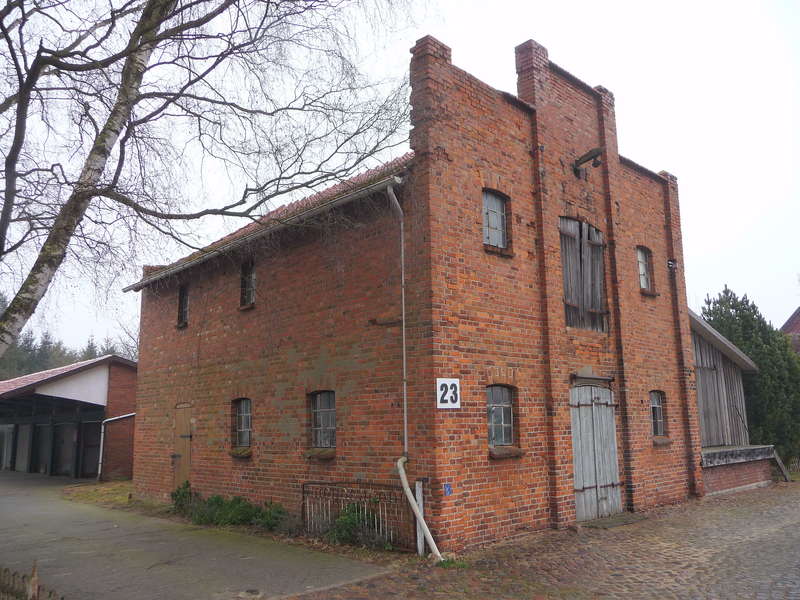
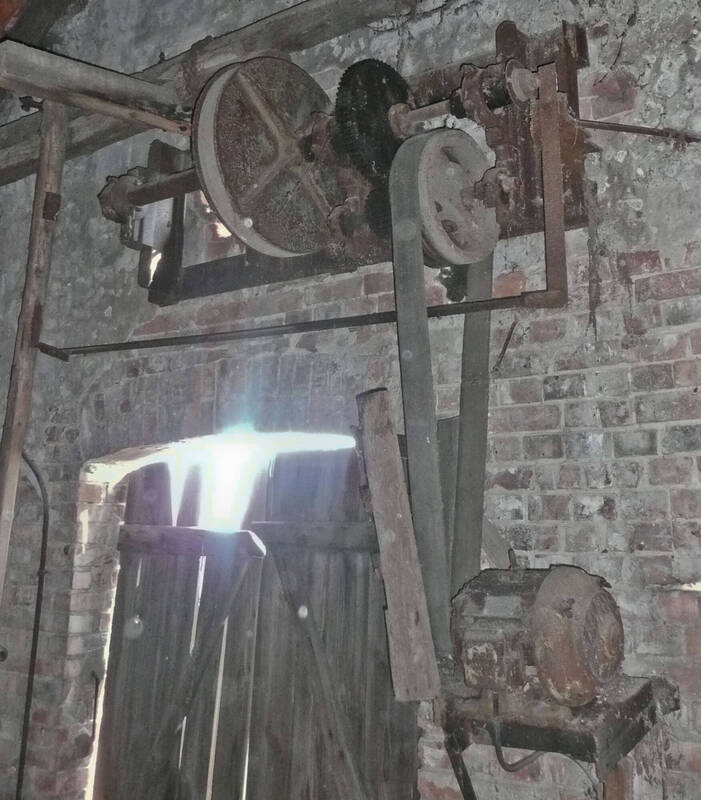
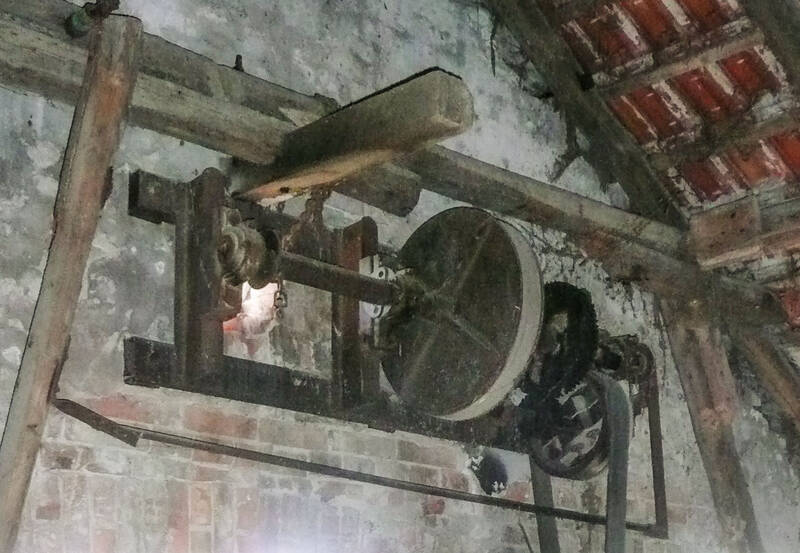
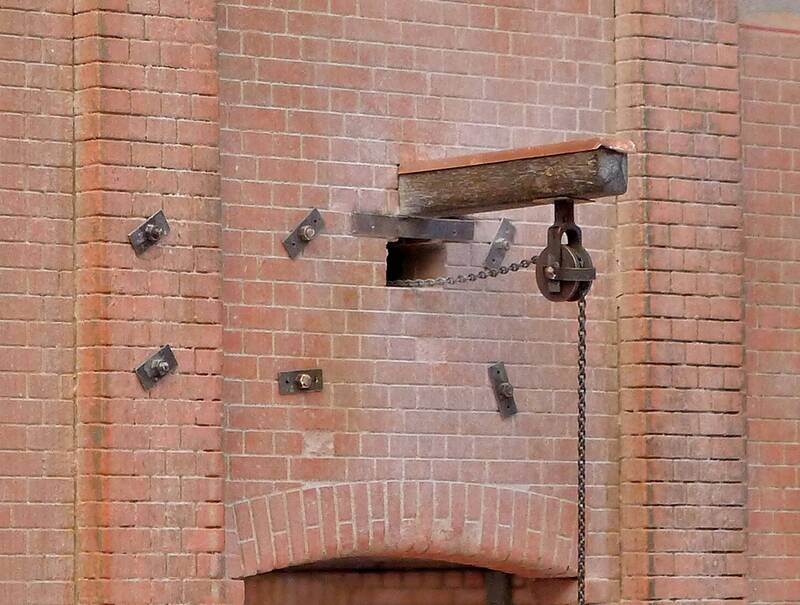
Inside the old storage shed there's a motor-driven winch for the crane beam. Its mounting anchors pass through the wall and are secured on the outside of the gable front with iron plates.
Alter_Lagerschuppen_339 (fspg2)
Alter_Lagerschuppen_340 (fspg2)
Alter_Lagerschuppen_341 (fspg2)
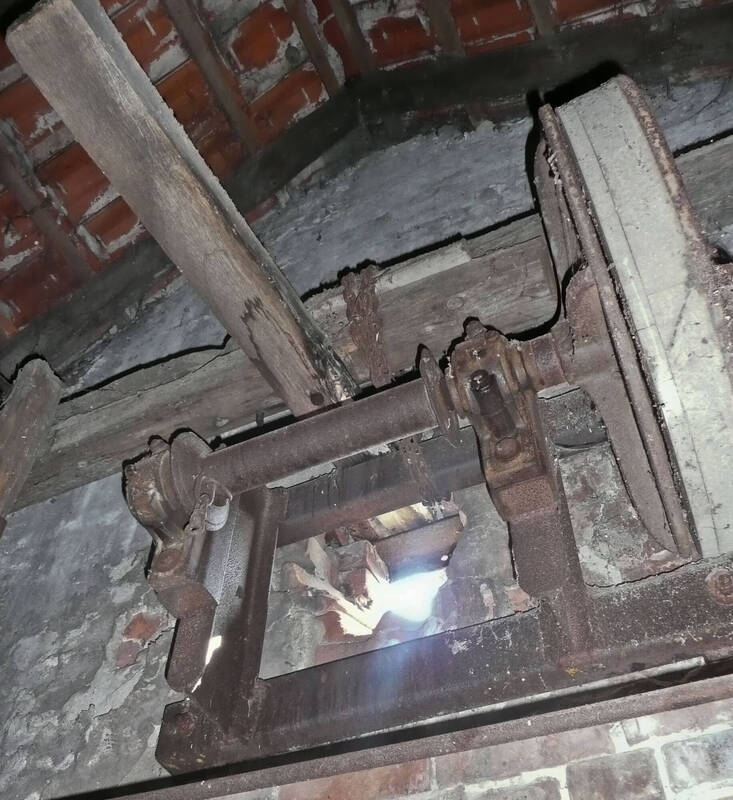
Alter_Lagerschuppen_342 (fspg2)
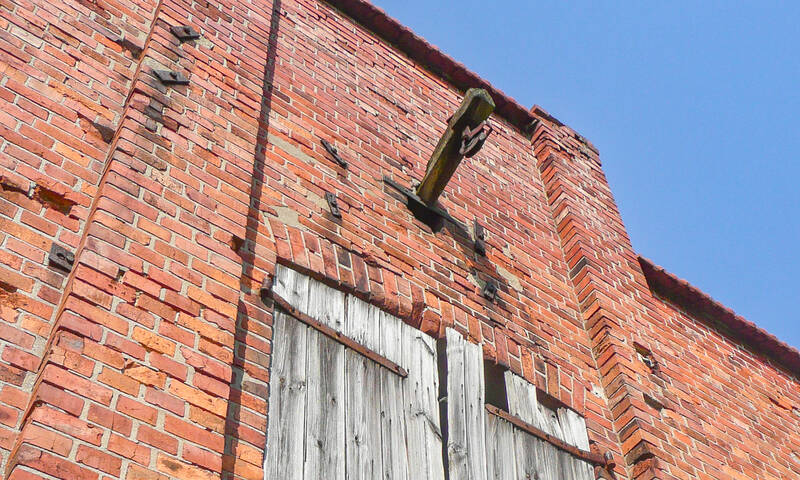
I already reported on the construction of the winch in detail back in 2009 -
have a look: https://www.buntbahn.de/viewtopic.php?t=6691&start=190 - and https://www.buntbahn.de/viewtopic.php?t=6691&sid=f4dec3997d457db62e1d8ccbcec7ce94&start=210
Now it was time to continue. First, the "iron plates" were milled from 0.3 mm nickel silver, and 1.0 mm brass threaded rods were soldered to M1.0 nuts. Then everything was sandblasted and blackened.
Alter_Lagerschuppen_343 (fspg2)
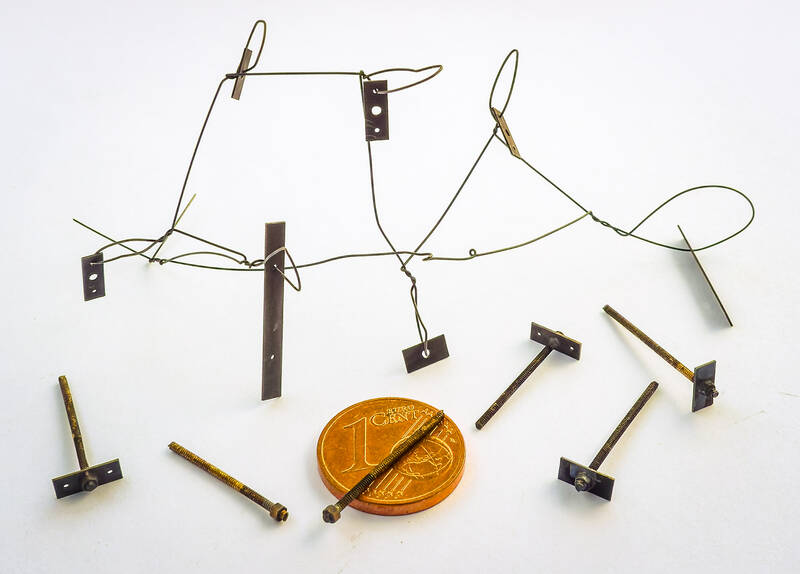
The already pre-assembled winch was pushed, with its threaded rods, through the six 1.1 mm holes drilled in the gable wall...
Alter_Lagerschuppen_346 (fspg2)
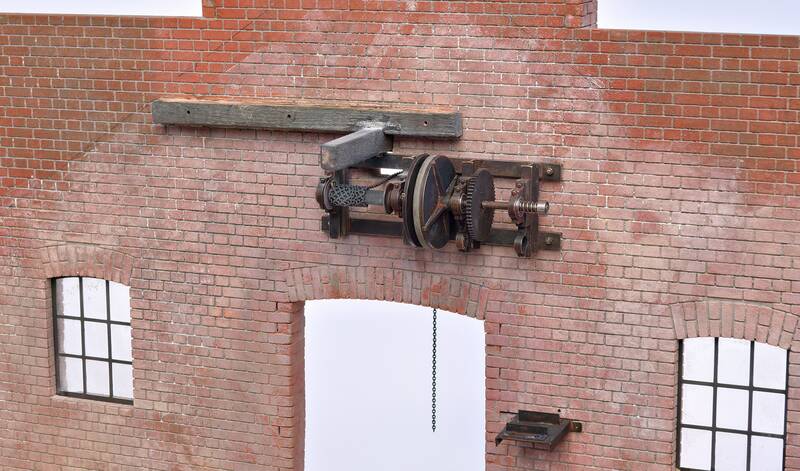
...and secured from the outside with the small anchor plates and M1.0 nuts.
Alter_Lagerschuppen_346 (fspg2)
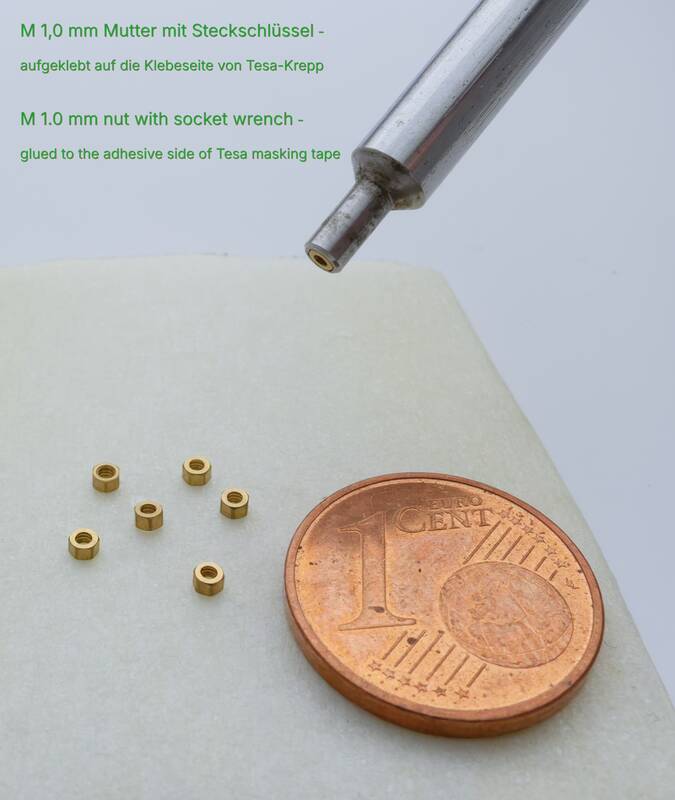
To make it easier to pick up the tiny M1.0 nuts with the nut driver, I simply set them with their bottom sides on the sticky side of Tesa masking tape. That eliminates the tedious fiddling with my fingers, and the work goes much faster.
M1.0 nut with nut driver (fspg2)
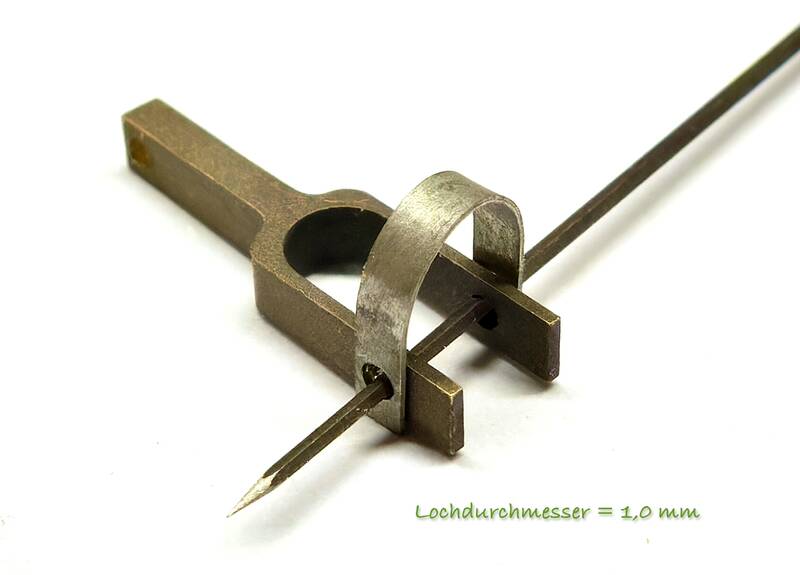
I found it a bit tricky to solder the fork for the cable pulley at a right angle to the bent nickel-silver strip (0.2 mm thick, 1.5 mm high). The 1.0 mm holes will later accept the 1.0 mm axle of the cable pulley, so they had to line up exactly.
To align them, I had originally planned to use a 1.0 mm brass wire that I had colored black with a permanent marker, since marker ink usually works as a solder resist. With parts this small, though, I wasn't sure I'd be able to get the wire back out afterward without damaging the thin nickel-silver sheet. I didn't have a wire made of silver steel that thin, which solder wouldn't stick to in the first place.
Volker came up with the solution (many thanks for that!): the shank of a 1.0 mm drill bit aligned both parts reliably and didn't pick up any solder. A small block of Pertinax (phenolic laminate) served as a stop to ensure the right angle. I did the soldering with a 12 V / 8 W soldering iron.
Alter_Lagerschuppen_344 (fspg2)
Alter_Lagerschuppen_345 (fspg2)
There's definitely a certain resemblance to the prototype.
Rotstein_Lagerschuppen_01_Helmut_Schmidt_ (fspg2)
Inside the old storage shed there's a motor-driven winch for the crane beam. Its mounting anchors pass through the wall and are secured on the outside of the gable front with iron plates.
Alter_Lagerschuppen_339 (fspg2)
Alter_Lagerschuppen_340 (fspg2)
Alter_Lagerschuppen_341 (fspg2)
Alter_Lagerschuppen_342 (fspg2)
I already reported on the construction of the winch in detail back in 2009 -
have a look: https://www.buntbahn.de/viewtopic.php?t=6691&start=190 - and https://www.buntbahn.de/viewtopic.php?t=6691&sid=f4dec3997d457db62e1d8ccbcec7ce94&start=210
Now it was time to continue. First, the "iron plates" were milled from 0.3 mm nickel silver, and 1.0 mm brass threaded rods were soldered to M1.0 nuts. Then everything was sandblasted and blackened.
Alter_Lagerschuppen_343 (fspg2)
The already pre-assembled winch was pushed, with its threaded rods, through the six 1.1 mm holes drilled in the gable wall...
Alter_Lagerschuppen_346 (fspg2)
...and secured from the outside with the small anchor plates and M1.0 nuts.
Alter_Lagerschuppen_346 (fspg2)
To make it easier to pick up the tiny M1.0 nuts with the nut driver, I simply set them with their bottom sides on the sticky side of Tesa masking tape. That eliminates the tedious fiddling with my fingers, and the work goes much faster.
M1.0 nut with nut driver (fspg2)
I found it a bit tricky to solder the fork for the cable pulley at a right angle to the bent nickel-silver strip (0.2 mm thick, 1.5 mm high). The 1.0 mm holes will later accept the 1.0 mm axle of the cable pulley, so they had to line up exactly.
To align them, I had originally planned to use a 1.0 mm brass wire that I had colored black with a permanent marker, since marker ink usually works as a solder resist. With parts this small, though, I wasn't sure I'd be able to get the wire back out afterward without damaging the thin nickel-silver sheet. I didn't have a wire made of silver steel that thin, which solder wouldn't stick to in the first place.
Volker came up with the solution (many thanks for that!): the shank of a 1.0 mm drill bit aligned both parts reliably and didn't pick up any solder. A small block of Pertinax (phenolic laminate) served as a stop to ensure the right angle. I did the soldering with a 12 V / 8 W soldering iron.
Alter_Lagerschuppen_344 (fspg2)
#14
Modellers At Work / Re: Luke's Garage & Gas Statio...
Last post by finescalerr - October 13, 2026, 11:57:30 AMBefore I read your post, I thought the painted rocks on the right were real and you were using them for inspiration. Either you did a remarkable job or I need another visit to my eye doctor. -- Russ
#15
Modellers At Work / Re: Luke's Garage & Gas Statio...
Last post by Bill Gill - October 13, 2026, 08:58:35 AMStuart,
Like Volker said, really good looking stones. the finished retaing walls will be very nice.
Like Volker said, really good looking stones. the finished retaing walls will be very nice.
#16
Modellers At Work / Re: Luke's Garage & Gas Statio...
Last post by Hydrostat - October 12, 2026, 11:33:14 PMThose stones look really good!
#17
Modellers At Work / Re: Luke's Garage & Gas Statio...
Last post by Stuart - October 12, 2026, 09:24:21 PMThought I'd show what I have been up to lately.
There are a couple locations on my gas station diorama where rock retaining walls are needed. I experimented with a couple of methods, such as real rock pieces, molding the rocks from paper mache pulp, and making plaster castings but the one that I finally landed on was to use high-density foam.
I laid out my rock pattern on a piece of illustration board cut to the size of the retaining wall area. I transferred the pattern to the piece of high-density foam, cut each individual rock piece out using a jeweler's scroll saw, whittled away at the piece of foam with my utility knife until I created a rough rock form then using some actual pieces of rock, pressed the rock surface into the foam to create the texture I wanted. Using inexpensive acrylic craft paints of various shades of gray, browns and yellows I paint and spatter the surfaces to represent granite rock. It's a bit of a chore working this way but I'm getting the results I want.
The photo shows one section of retaining wall in progress. Some rocks in their whittled-out state, others with the rock texture pressed into their surfaces and then some in their final painted condition.

Stuart
There are a couple locations on my gas station diorama where rock retaining walls are needed. I experimented with a couple of methods, such as real rock pieces, molding the rocks from paper mache pulp, and making plaster castings but the one that I finally landed on was to use high-density foam.
I laid out my rock pattern on a piece of illustration board cut to the size of the retaining wall area. I transferred the pattern to the piece of high-density foam, cut each individual rock piece out using a jeweler's scroll saw, whittled away at the piece of foam with my utility knife until I created a rough rock form then using some actual pieces of rock, pressed the rock surface into the foam to create the texture I wanted. Using inexpensive acrylic craft paints of various shades of gray, browns and yellows I paint and spatter the surfaces to represent granite rock. It's a bit of a chore working this way but I'm getting the results I want.
The photo shows one section of retaining wall in progress. Some rocks in their whittled-out state, others with the rock texture pressed into their surfaces and then some in their final painted condition.
Stuart
#18
Modellers At Work / Re: Shasta Pacific outdoor rai...
Last post by lab-dad - October 09, 2026, 06:51:14 AMVery cool!
Nice to see it earning its keep.
I wanted to build one to drag logs on my property. I ended up using the winch on my utility (Kabota RTV) lifting it and dragging it.
MJINTN
Nice to see it earning its keep.
I wanted to build one to drag logs on my property. I ended up using the winch on my utility (Kabota RTV) lifting it and dragging it.
MJINTN
#19
Modellers At Work / detailing HO shorty combine
Last post by Bill Gill - October 08, 2026, 01:40:01 PMHere's a MDC Roundhouse shorty combine that will do double duty. Sometimes it will be a combine at the head of a short mixed local freight and other times it will serve as a caboose at the end of a milk train.
Details include: wider endsteps at both ends, seats and passengers inside, a smokejack Will get a potbelly stove inside when I can find where I put it), brake details and the little detail that started it all, a screened vent replacing a clerestory window on each side.
(I just discovered this side has the vent with the crooked frame. Well it's an older car that's seen a lot of miles and will get some weathering to reflect that.)
#20
Military Modeling / Re: Rivet counter
Last post by Peter_T1958 - October 07, 2026, 12:47:05 AMIt is quite satisfying when, after years of research, an idea can finally be turned into reality. But who am I telling that to? ;-) As I have written before, I have now spent more than forty years intensively researching and looking for documentation on various objects from that period. What is perhaps even more satisfying for me, however, is being able to pass on all this work and knowledge to a small group of enthusiasts, either in the form of model kits (in the broadest sense) or through publications, before it is eventually forgotten.
Unfortunately, that is also why I currently have hardly any time for active modelling – but the dark winter days are still to come!
Unfortunately, that is also why I currently have hardly any time for active modelling – but the dark winter days are still to come!