- Welcome to Westlake Publishing Forums.

News:
REGARDING MEMBERSHIP ON THIS FORUM: Due to spam, our server has disabled the forum software to gain membership. The only way to become a new member is for you to send me a private e-mail with your preferred screen name (we prefer you use your real name, or some variant there-of), and email adress you would like to have associated with the account. -- Send the information to: Russ at finescalerr@msn.com
Recent posts
#1
Modellers At Work / Re: A snapshot in time. A glim...
Last post by Bill Gill - Today at 11:54:57 AMNicely designed and fabricated sign. Looks good Volker.
#2
Modellers At Work / Re: A snapshot in time. A glim...
Last post by finescalerr - Today at 11:41:28 AMOne could surmise that young Volker has attained the apex of modeling skills. -- Russ
#3
Modellers At Work / Re: A snapshot in time. A glim...
Last post by Hydrostat - Today at 10:00:04 AMQuote from: Ray Dunakin on March 24, 2024, 10:12:14 PMGreat work on that display cabinet! What did you use for the glass?
Ray, I used 0.5 mm Vivak, a plastic that has a very glass-like surface.
Quote from: nk on April 05, 2024, 09:49:57 AMThose clocks are terrific. I can almost hear the crackle of my Geiger-counter is it picks up the radium on the dials. Do you have room inside for some ads for the fine horologists of Glashutte?
Indeed there's an old Glashütte sign involved later on. If I got it right, Alpina was a cooperative that Glashütte became a part of.
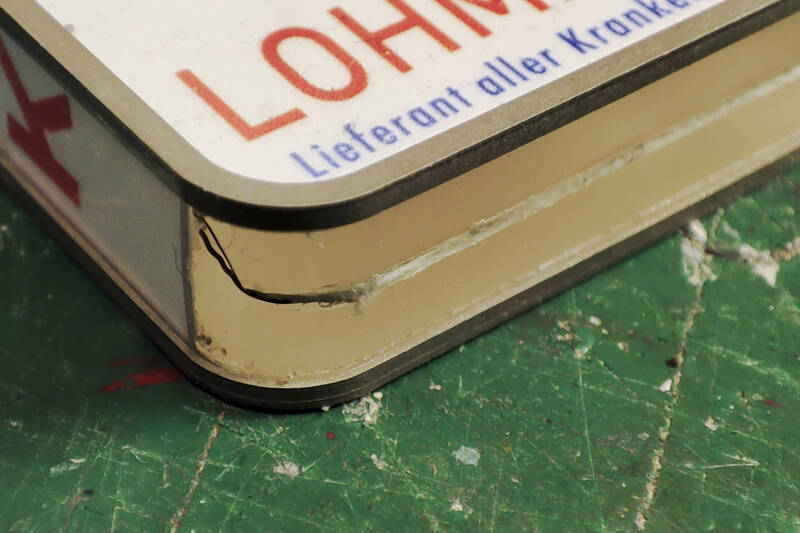
The facade of Haus Lohmann was decorated with distinctive neon signs that changed over time. I chose this short-term situation with an old Zeiss and a then-modern Dugena advertisement, the Zeiss advertisement can be seen on the right in the picture at the back corner of the house:
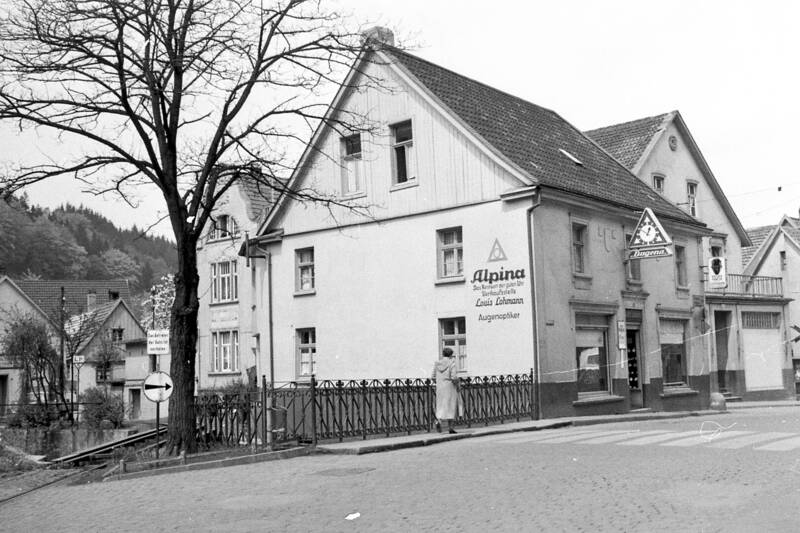
Photo: Coll. Heimatkreis Plettenberg e.V. https://www.heimatkreis-plettenberg.de/
For the older Zeiss advertising, I used frames milled from nickel silver and etched brass cover plates. A core made of 6 mm thick Plexiglas fits in there. Panes made of 0.5 mm Vivak are used for lining to the target size and 0.25 mm polycarbonate panes form the actual glass fronts.
The frames and sheets were first sprayed in the desired tone.
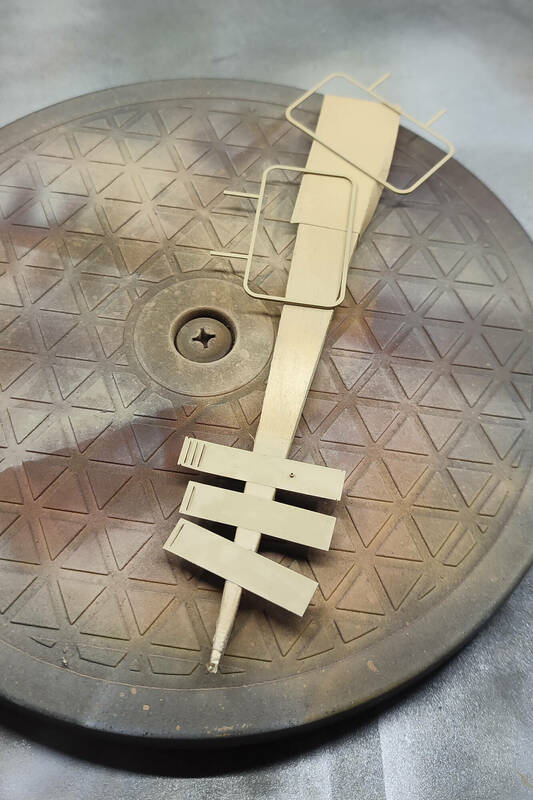
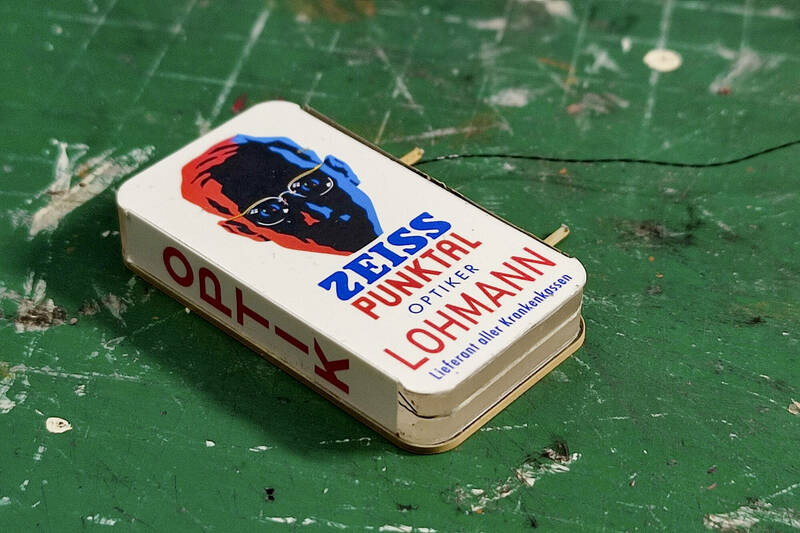
After several attempts, the motif was simply printed out on Photoglossy paper and fixed with fixative.
To imitate a fluorescent tube, which has been on the market since 1938, I glued two cold white LEDs to a plexiglass rod, roughened it up and glued it into a plastic rod (the tube from a pennant with an Italian flag - that doesn't matter, but it is a fact).
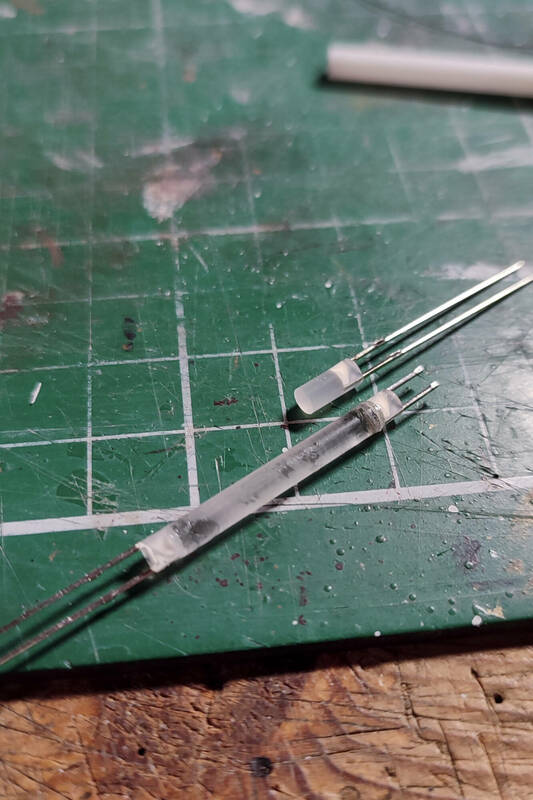
The plexiglass core was given a cross hole to accommodate the "tube".

The connection cable of one LED runs through a groove cut all around to the exit point...
... in the rear cover plate, which has a cable entry.
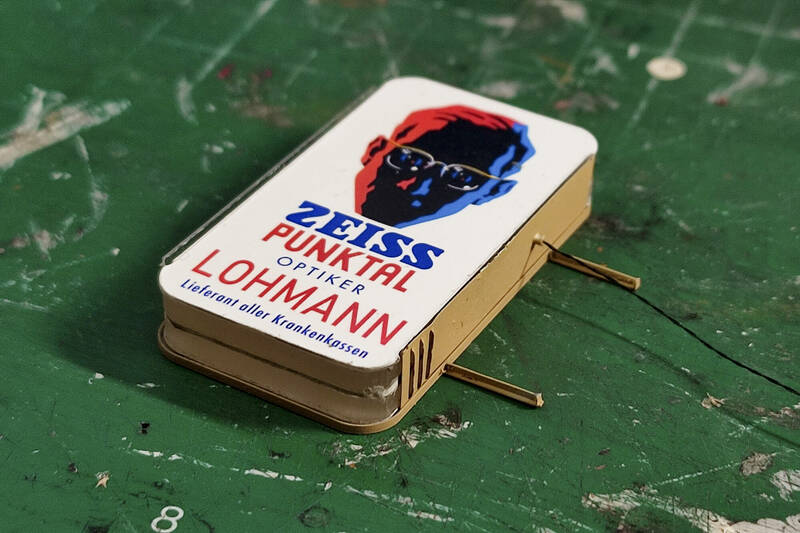
Voila:


Cheers,
Volker
#4
Modellers At Work / Re: Feldbahnmodule with ship
Last post by finescalerr - April 18, 2024, 01:34:36 PMThat looks so easy I'm sure anyone can do it with no practice! -- ssuR
#5
Modellers At Work / Re: Feldbahnmodule with ship
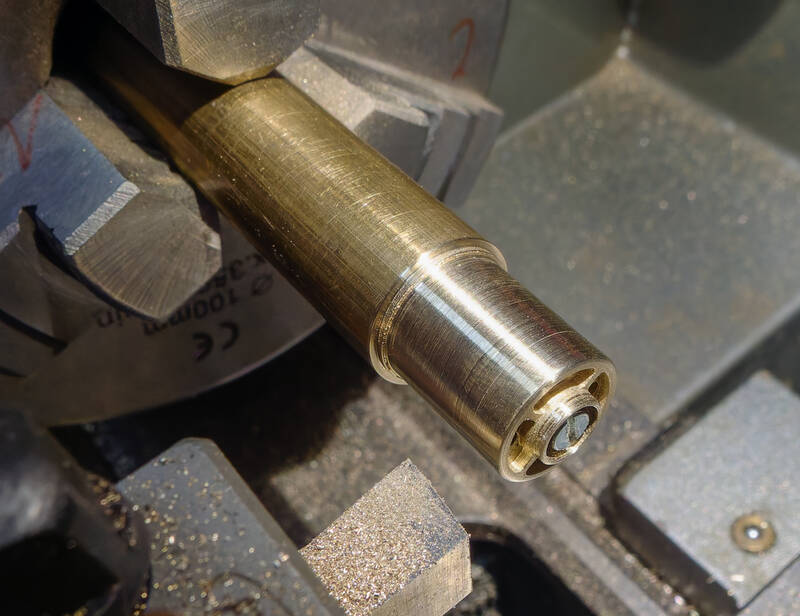
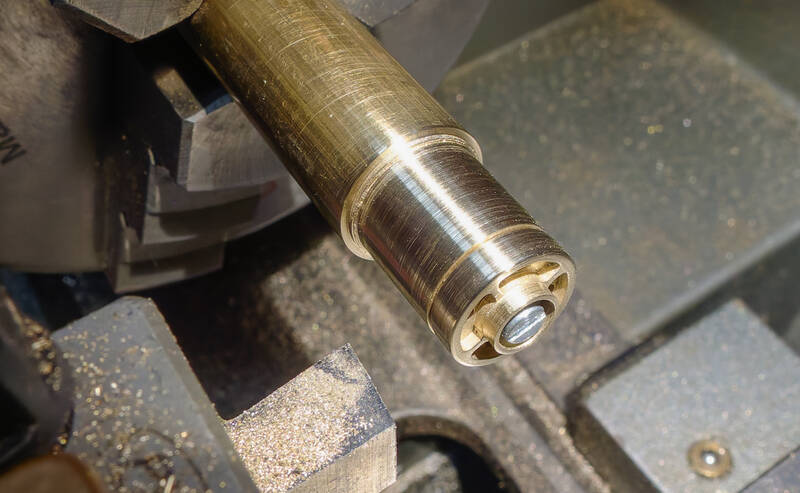
Last post by fspg2 - April 18, 2024, 07:08:45 AMI continued with the machining of the four wheels.
After cutting through the retaining bars, I was able to continue machining the wheels on the lathe.
To do this, I turned the end of a 14.0mm brass round rod to 12.0mm, drilled a 1.6mm deep hole with a 5.0mm milling cutter and then milled it to a diameter of 6.0mm. This gave me a centric pocket for the 6.0mm collar of the wheels.
This was followed by a 1.8mm hole for a 2.0mm thread to secure the wheels.
Laufrad abdrehen 01 (fspg2)
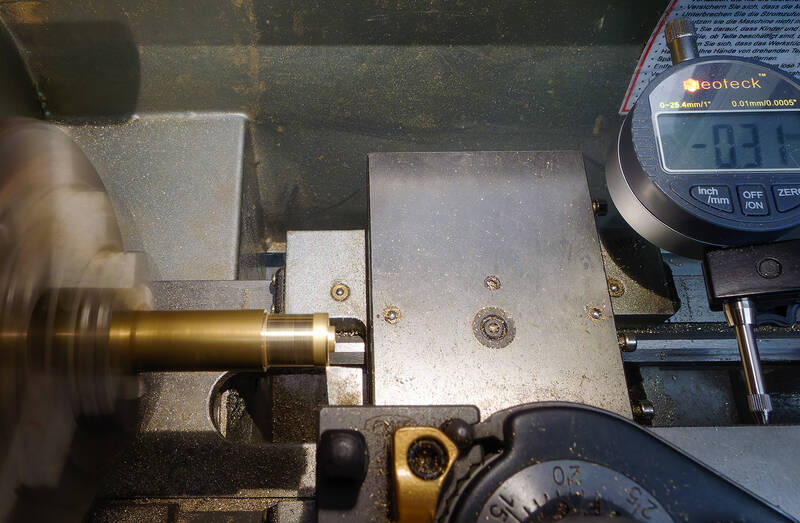
This allowed me to bring the four wheels to the final dimension in three passes, one after the other. A dial gauge showed the exact depth.
Laufrad abdrehen 02 (fspg2)
The outer edges were slightly rounded with a small flat file.
Laufrad abdrehen 03 (fspg2)
After the second side of the wheel had also been rounded, the surface was treated with 1000 grit sandpaper and sanding fleece.
Laufrad abdrehen 04 (fspg2)
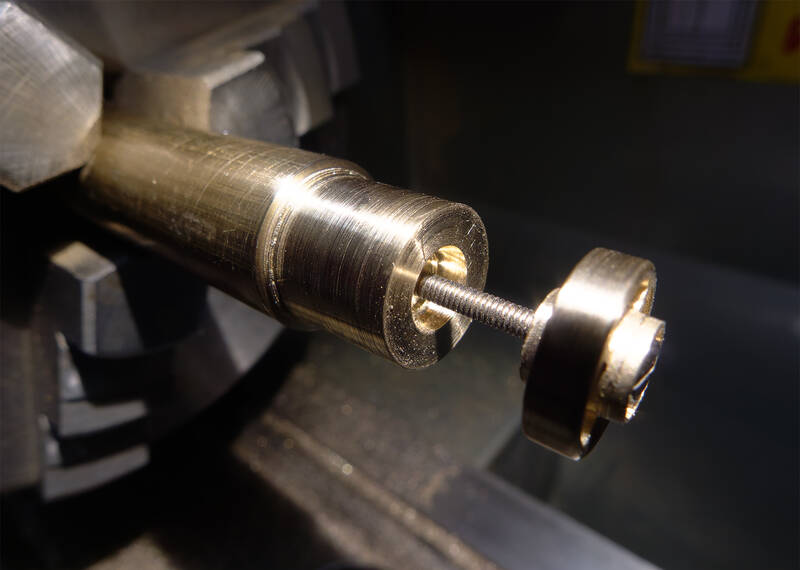
(a longer screw was used for this photo to show the assembly more clearly)
Then the wheels were changed.
Laufrad abdrehen 05 (fspg2)
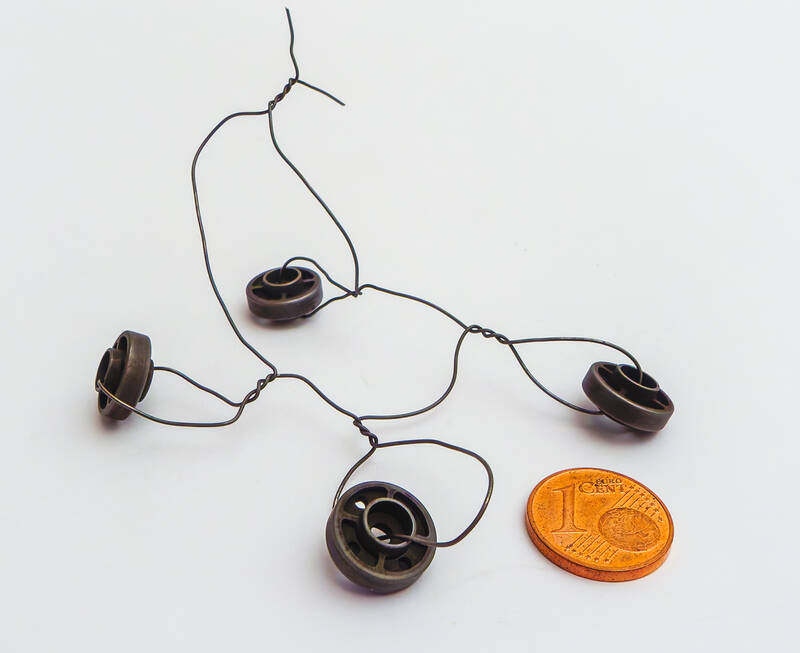
Now the wheels just had to be sandblasted and burnished.
Laufrad abdrehen 06 (fspg2)
After cutting through the retaining bars, I was able to continue machining the wheels on the lathe.
To do this, I turned the end of a 14.0mm brass round rod to 12.0mm, drilled a 1.6mm deep hole with a 5.0mm milling cutter and then milled it to a diameter of 6.0mm. This gave me a centric pocket for the 6.0mm collar of the wheels.
This was followed by a 1.8mm hole for a 2.0mm thread to secure the wheels.
Laufrad abdrehen 01 (fspg2)
This allowed me to bring the four wheels to the final dimension in three passes, one after the other. A dial gauge showed the exact depth.
Laufrad abdrehen 02 (fspg2)
The outer edges were slightly rounded with a small flat file.
Laufrad abdrehen 03 (fspg2)
After the second side of the wheel had also been rounded, the surface was treated with 1000 grit sandpaper and sanding fleece.
Laufrad abdrehen 04 (fspg2)
(a longer screw was used for this photo to show the assembly more clearly)
Then the wheels were changed.
Laufrad abdrehen 05 (fspg2)
Now the wheels just had to be sandblasted and burnished.
Laufrad abdrehen 06 (fspg2)
#6
Modellers At Work / Re: Feldbahnmodule with ship
Last post by finescalerr - April 17, 2024, 12:14:53 AMSatisfactory, of course. -- Russ
#7
Modellers At Work / Re: Feldbahnmodule with ship
Last post by fspg2 - April 16, 2024, 01:09:57 PMMerci
@Bernhard
There are many pulleys available from various suppliers, for example: click
or click
After I wrote the other day...
..I had already machined the second rope pulley a few days ago with my old Proxon milling machine.
I had clamped it crosswise in the Multifix quick-change system in a special holder with 43mm neck.
Seilscheibe_14 (fspg2)
The result looked better right from the start.
The last few days went by very quickly - but little was done. As already mentioned, the small parts require an enormous amount of time.
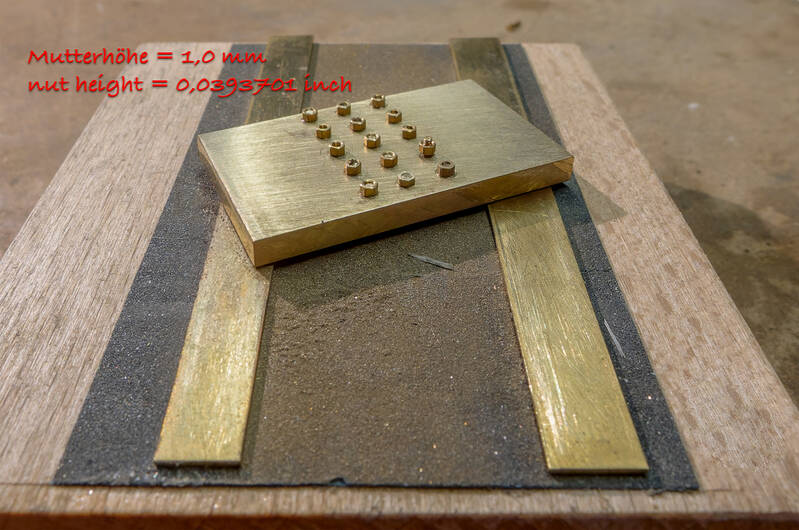
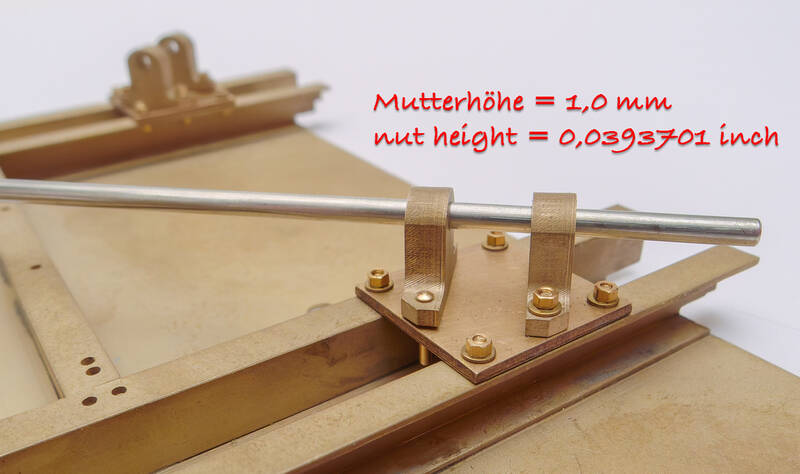
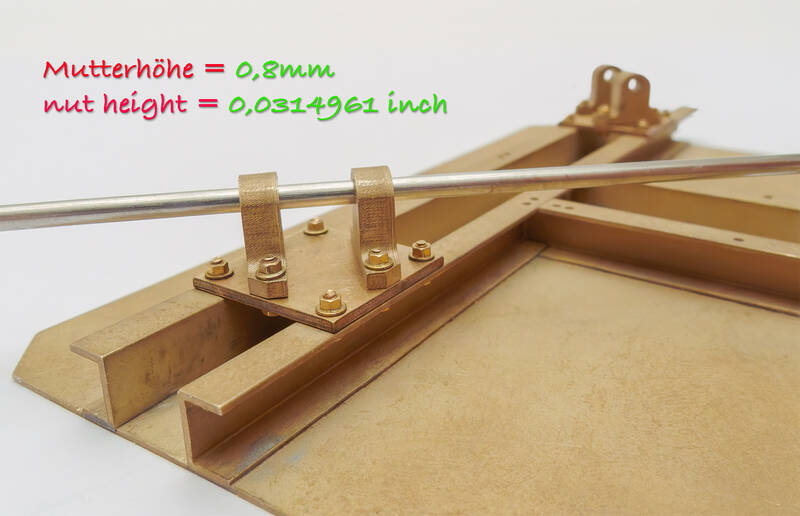
On the prototype, nuts with 20mm [size=85](21mm)[/size] threads have a height of 18.0mm [size=85](19.4mm)[/size].
Various suppliers offer brass model nuts with a high head and or flat head ...... However, both versions of the 1.0mm nut have the same height of 1.0mm.
After the first trial assembly, this height seemed too high to me. So I drilled fifteen 1.0mm holes in a 3.0mm MS58 remnant and inserted an M1.0mm bolt with a (too high) nut in each.
Two 0.8mm brass strips and 240 grit sandpaper were glued to the sides of a dressing board that had been built some time ago.
runter von der hohen Mutter 1 (fspg2)
The surface grinding was carried out with even pressure until the remaining piece scraped along the two lateral guides.
runter von der hohen Mutter 2 (fspg2)
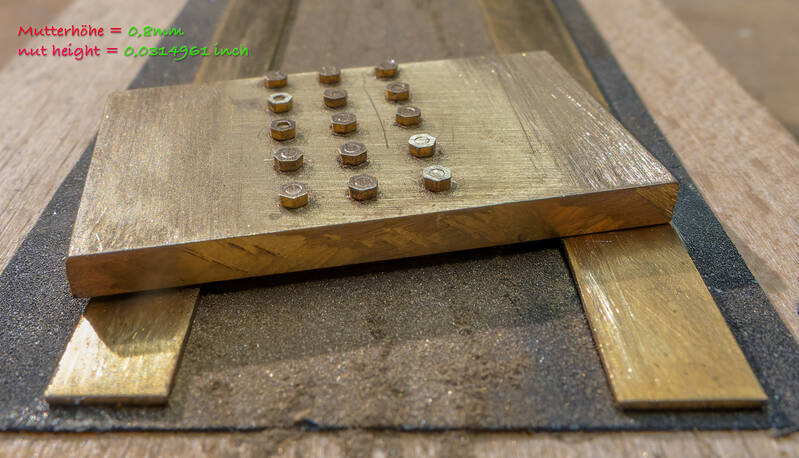
ere again the comparison with 1.0mm and 0.8mm nuts:
runter von der hohen Mutter 3 (fspg2)
runter von der hohen Mutter 4 (fspg2)
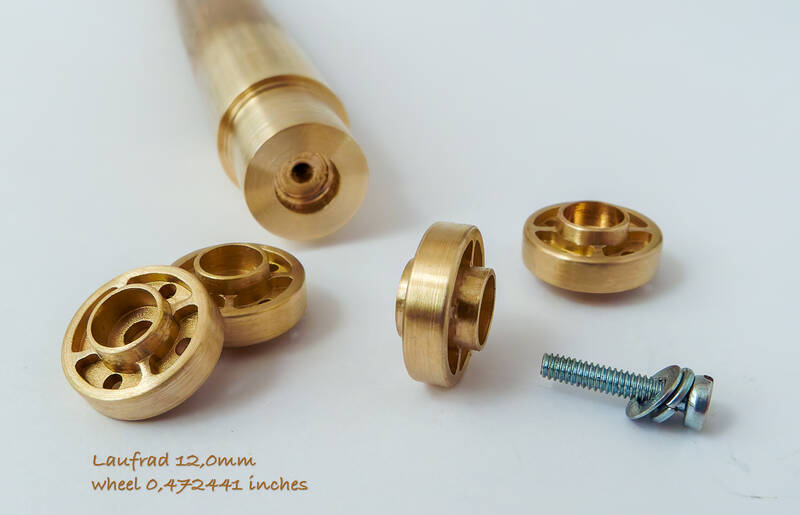
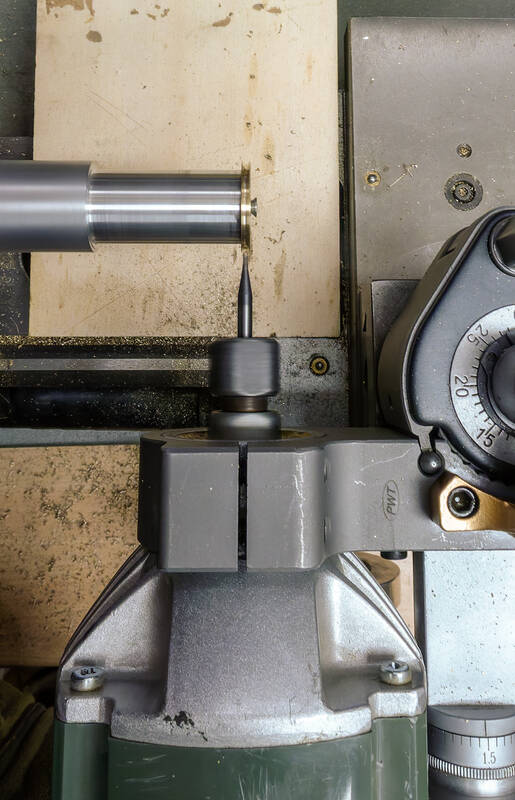
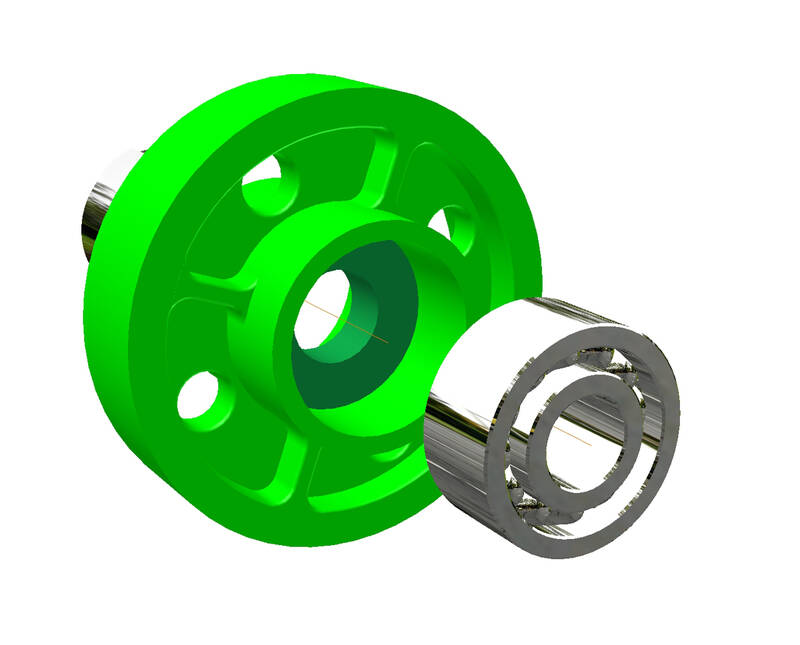
Today I started on the four running wheels. These are guided on both sides by 2mm x 5mm x 2.5mm deep groove ball bearings. The diameter is 12.0mm with a tread width of 3.0mm. The total width with collar is 6.0mm.
Münzelkran Laufrad 01 (fspg2)
MS58 in the dimensions: 45.0mm x 40.0mm x 6.0mm, which was positioned in a milled pocket in the MDF material, serves as the base material.
Münzelkran Laufrad 02 (fspg2)
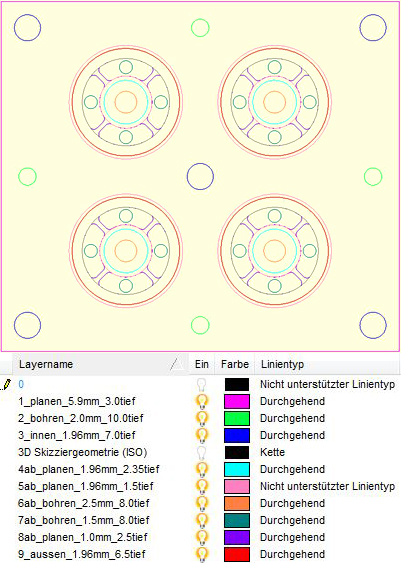
Various 2.0mm rivet pins were once again used for precise alignment on both sides, while small screws prevented wobbling during milling.
In the following photo, most of the fastening screws have already been removed.
Münzelkran Laufrad 03 (fspg2)
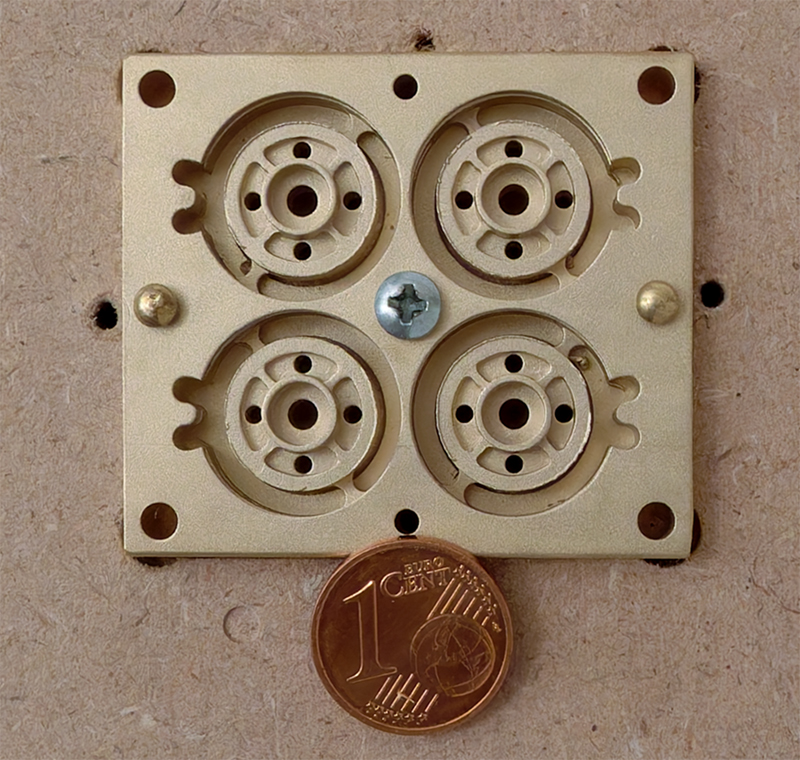
The milled outer diameter here is still 12.3 mm and will be brought to the final dimension of 12.0 mm on the lathe in the next step.
Time required with milling data creation and milling around 2.5 hours - costs significantly cheaper than 3D printing at shapeways (here around € 72.00 for delivery on May 14, 2024).
@Bernhard
There are many pulleys available from various suppliers, for example: click
or click
After I wrote the other day...
QuoteAs the ball cutter was firmly clamped in the top slide (and was not turned by a small drilling machine), the main work was carried out by only one (here left) cutting edge.
..I had already machined the second rope pulley a few days ago with my old Proxon milling machine.
I had clamped it crosswise in the Multifix quick-change system in a special holder with 43mm neck.
Seilscheibe_14 (fspg2)
The result looked better right from the start.
The last few days went by very quickly - but little was done. As already mentioned, the small parts require an enormous amount of time.
On the prototype, nuts with 20mm [size=85](21mm)[/size] threads have a height of 18.0mm [size=85](19.4mm)[/size].
Various suppliers offer brass model nuts with a high head and or flat head ...... However, both versions of the 1.0mm nut have the same height of 1.0mm.
After the first trial assembly, this height seemed too high to me. So I drilled fifteen 1.0mm holes in a 3.0mm MS58 remnant and inserted an M1.0mm bolt with a (too high) nut in each.
Two 0.8mm brass strips and 240 grit sandpaper were glued to the sides of a dressing board that had been built some time ago.
runter von der hohen Mutter 1 (fspg2)
The surface grinding was carried out with even pressure until the remaining piece scraped along the two lateral guides.
runter von der hohen Mutter 2 (fspg2)
ere again the comparison with 1.0mm and 0.8mm nuts:
runter von der hohen Mutter 3 (fspg2)
runter von der hohen Mutter 4 (fspg2)
Today I started on the four running wheels. These are guided on both sides by 2mm x 5mm x 2.5mm deep groove ball bearings. The diameter is 12.0mm with a tread width of 3.0mm. The total width with collar is 6.0mm.
Münzelkran Laufrad 01 (fspg2)
MS58 in the dimensions: 45.0mm x 40.0mm x 6.0mm, which was positioned in a milled pocket in the MDF material, serves as the base material.
Münzelkran Laufrad 02 (fspg2)
Various 2.0mm rivet pins were once again used for precise alignment on both sides, while small screws prevented wobbling during milling.
In the following photo, most of the fastening screws have already been removed.
Münzelkran Laufrad 03 (fspg2)
The milled outer diameter here is still 12.3 mm and will be brought to the final dimension of 12.0 mm on the lathe in the next step.
Time required with milling data creation and milling around 2.5 hours - costs significantly cheaper than 3D printing at shapeways (here around € 72.00 for delivery on May 14, 2024).
#8
General Forums / Re: Need Some Advice
Last post by Lawton Maner - April 15, 2024, 10:35:09 PMI don't think veneer would work because the material to be modeled is the bark of the tree which never looks like the wood inside. The suggestion for water colour paper will do quite fine. I only need to find sheets which resemble the cambium layer inside of the bark so I only need to finish one side. Wetting and wrapping around a dowel once dry will give the curl in a finished piece.
The idea of using real bark from something such as azalea, crepe myrtle, or the bark of a young poplar for the top of the load will make it more realistic.
The idea of using real bark from something such as azalea, crepe myrtle, or the bark of a young poplar for the top of the load will make it more realistic.
#9
Modellers At Work / Re: Luke's Garage & Gas Statio...
Last post by Ray Dunakin - April 15, 2024, 10:26:50 PMThose look really sharp!
#10
Dioramas / Re: Chamonix Mont-Blanc
Last post by Stuart - April 15, 2024, 08:48:03 PMLooks good.