- Welcome to Westlake Publishing Forums.

News:
REGARDING MEMBERSHIP ON THIS FORUM: Due to spam, our server has disabled the forum software to gain membership. The only way to become a new member is for you to send me a private e-mail with your preferred screen name (we prefer you use your real name, or some variant there-of), and email adress you would like to have associated with the account. -- Send the information to: Russ at finescalerr@msn.com
Recent posts
#1
Dioramas / Re: Chamonix Mont-Blanc
Last post by Sami - Today at 01:07:21 PMThank's for your comments !
I finished the diorama and I'm happy I tried another scale.

I finished the diorama and I'm happy I tried another scale.
#2
Modellers At Work / Re: a small detail for the C&V...
Last post by finescalerr - Today at 12:46:35 AMAtlas' "lumber" never resembled wood but it now clearly looks like a radiator. Satisfactory. -- Russ
#3
Modellers At Work / a small detail for the C&V RR
Last post by Bill Gill - May 20, 2024, 06:30:08 PMModeling opportunties continue to be scarce. Here's a new small detail from today. It's unnoteworthy other than it shows one of the things I enjoy most about modelmaking: turning leftover stuff I already have into other things needed for the layout, simple though they may be.
The depot for my C&VRR is the last building needed. It will sit close to the front of the layout and some interior will be seen through the windows.
All the small depot interiors I found online had pot belly coal stoves for heat, but any stoves took up too much space no matter where I tried placing them. Instead I decided to add 1950s narrow steam radiators against the walls between the windows in the waiting room and the office. So I rummaged around through my odds and ends looking for anything that might work.
I started with a couple layers of lumber from the Atlas lumber stacks for its lumberyard. After cutting them up and gluing them bottom side to bottom side, I slightly rounded the top edge (still need to round the bottom edge). Viewed on end, the separated "boards" look kind of like the cast iron paired vertical sections that join together to make a radiator. When cleaned up a bit and painted silver they ought to pass for radiators when glimpsed through the windows. A little wire plumbing will mount them to the depot floor.
The Atlas lumber layer on the left has boards slightly wider than the layers I used, but you get the idea.
#4
Modellers At Work / Re: Feldbahnmodule with ship
Last post by Lawrence@NZFinescale - May 20, 2024, 01:37:52 PMQuote from: fspg2 on May 20, 2024, 02:11:04 AMHowever, I don't find the result at all convincing. The ball of the holder simply seems far too large in relation to the diameter of the rod!
Hi Frithjof
Always a pleasure to catch up on progress. I imagine your nuts/boltheads will never be seen when the model is complete :-)
Attached is a drawing (sorry about the quality) of some knobs for a locomotive. No relation to your crane, of course, but I imagine handrail and knob dimensions did not vary much. Perhaps your proportions are not right, but the real pedestals were often tapered and had a flange at the base. As here, for the fixing nut to clamp against, or with screw holes for attaching to wood. Adding a flange (from a washer maybe), would probably improve the look of what you have.
However this model is great because of your uncompromising approach and execution, so I'm sure you will find a good solution.
It won't surprise you to know that mine is to print and cast them. Attached are some in 1:64 for a 0.4/0.5mm wire. The holes do not form especially well, but they do form and can easily be broached out. This would work better in your larger scale. Curiously handrails on passenger cars seem to be 7/8", while on locomotives 1 1/4". I suppose the former need to allow for smaller hands.
#5
Modellers At Work / Re: Feldbahnmodule with ship
Last post by Bernhard - May 20, 2024, 08:24:30 AMFrithjof, you are a real perfectionist!
Bernhard
Bernhard
#6
Modellers At Work / Re: Feldbahnmodule with ship
Last post by fspg2 - May 20, 2024, 02:11:04 AMThanks Bill 
@Russ
Unfortunately not quite perfect
Thanks to a tip from a model builder friend, I have already changed the fastening screws to nuts with washers in the drawing.
neu: Mutter mit U-Scheibe 01 (fspg2)
neu: Mutter mit U-Scheibe 02 (fspg2)
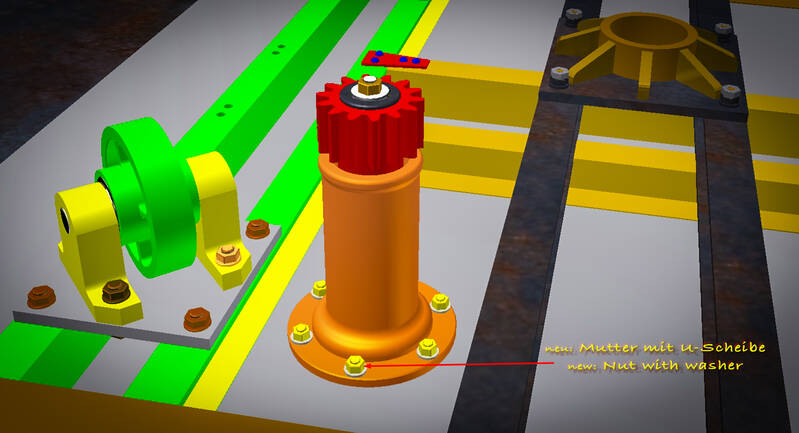
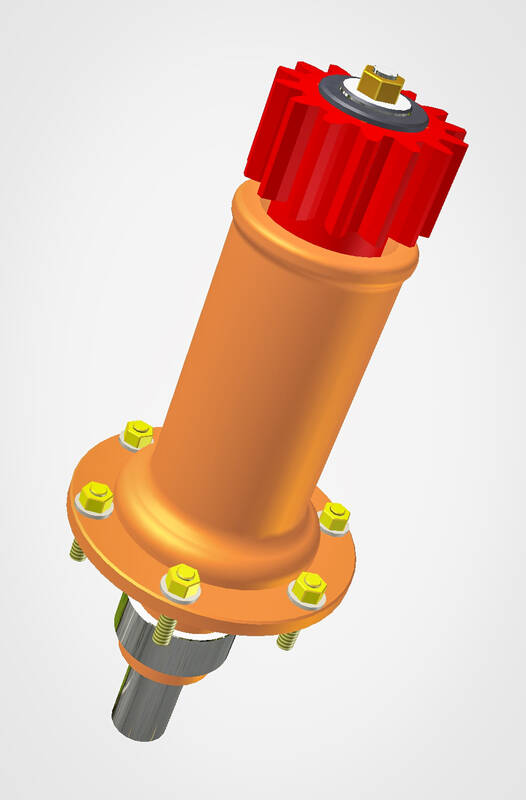
Fortunately, I had not yet soldered the guide tube for the pinion shaft to the base of the crane housing. This makes it easier for me to unsolder the M0.8mm screws and replace them with the nuts.
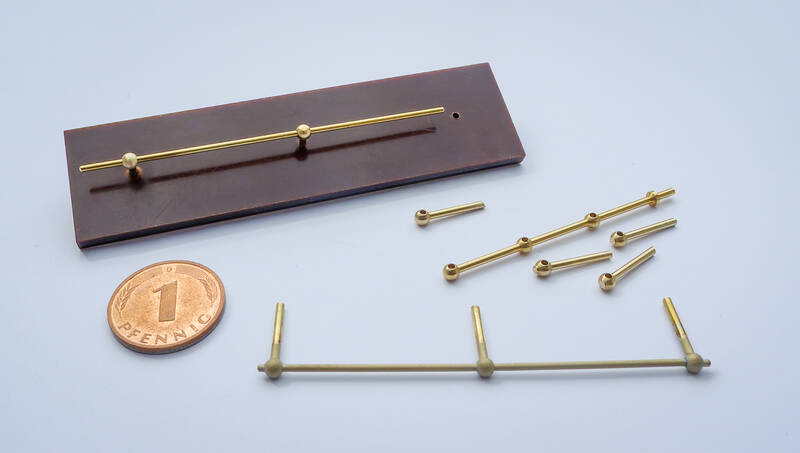
To build the handrails on both sides, railing supports (40mm long with 3 pull-throughs) were purchased from the local model ship dealer. These have a ball diameter of 2.5mm. However, I drew a diameter of 2.0mm.
Handlauf 01 (fspg2)
I obtained the 12 required holders from three supports. After cutting off the two lower sections, they were clamped in the pillar drill to round the ball cleanly.
A small Pertinax jig held the three holders vertically when soldering them to the 1.0 mm brass rod.
Handlauf 02 (fspg2)
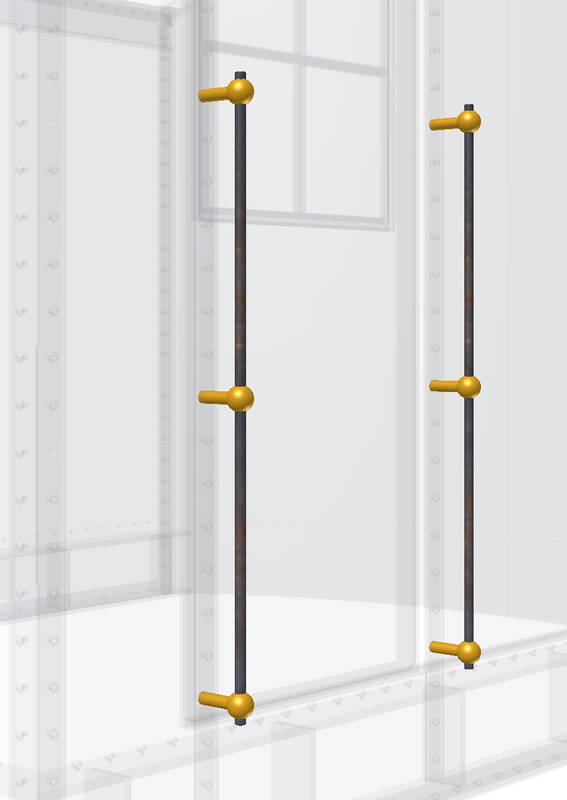
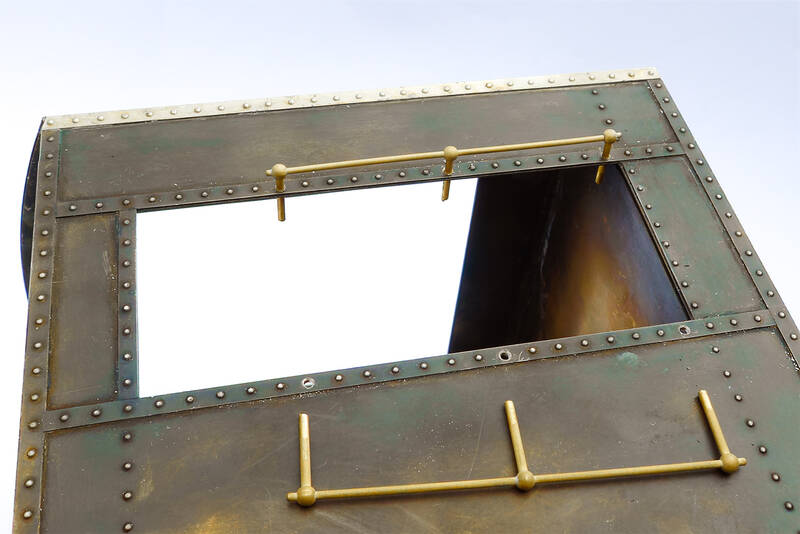
I had already planned the space for the brackets on the door frame of the crane housing and had not pressed any rivets there. Unfortunately, however, I had only drilled the holes on one side of the housing on the milling machine... why was it forgotten on the opposite side... ?
?
So once again a drilling template helped.
Handlauf Bohrschablone (fspg2)
Handlauf 03 (fspg2)
Handlauf 04 (fspg2)
However, I don't find the result at all convincing. The ball of the holder simply seems far too large in relation to the diameter of the rod.
!
Handlauf 05 (fspg2)
So I will probably look for smaller holders again.
@Russ
QuoteAnd it's perfect.
Unfortunately not quite perfect
Thanks to a tip from a model builder friend, I have already changed the fastening screws to nuts with washers in the drawing.
neu: Mutter mit U-Scheibe 01 (fspg2)
neu: Mutter mit U-Scheibe 02 (fspg2)
Fortunately, I had not yet soldered the guide tube for the pinion shaft to the base of the crane housing. This makes it easier for me to unsolder the M0.8mm screws and replace them with the nuts.
To build the handrails on both sides, railing supports (40mm long with 3 pull-throughs) were purchased from the local model ship dealer. These have a ball diameter of 2.5mm. However, I drew a diameter of 2.0mm.
Handlauf 01 (fspg2)
I obtained the 12 required holders from three supports. After cutting off the two lower sections, they were clamped in the pillar drill to round the ball cleanly.
A small Pertinax jig held the three holders vertically when soldering them to the 1.0 mm brass rod.
Handlauf 02 (fspg2)
I had already planned the space for the brackets on the door frame of the crane housing and had not pressed any rivets there. Unfortunately, however, I had only drilled the holes on one side of the housing on the milling machine... why was it forgotten on the opposite side...
?So once again a drilling template helped.
Handlauf Bohrschablone (fspg2)
Handlauf 03 (fspg2)
Handlauf 04 (fspg2)
However, I don't find the result at all convincing. The ball of the holder simply seems far too large in relation to the diameter of the rod.
!
Handlauf 05 (fspg2)
So I will probably look for smaller holders again.
#7
Modellers At Work / Re: Feldbahnmodule with ship
Last post by finescalerr - May 19, 2024, 12:13:43 PMAnd it's perfect. -- Russ
#8
Modellers At Work / Re: Feldbahnmodule with ship
Last post by Bill Gill - May 19, 2024, 05:41:58 AM Good to read that the first rotational test went well - It's alive!
#9
Modellers At Work / Re: Feldbahnmodule with ship
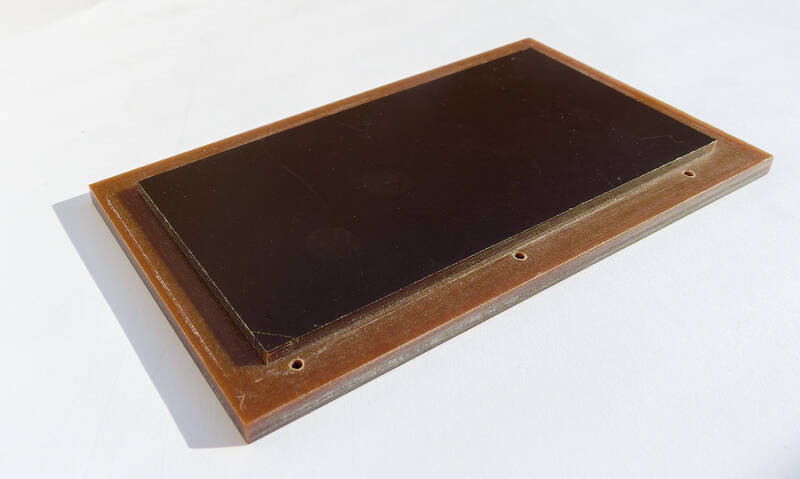
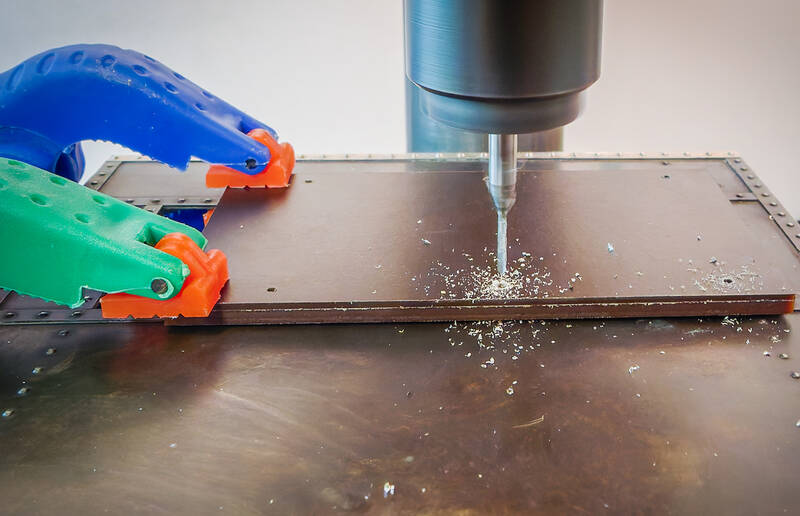
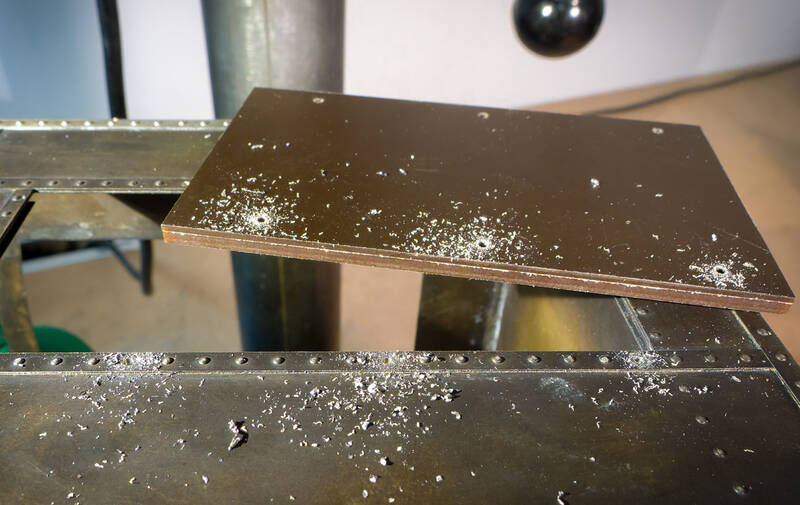
Last post by fspg2 - May 18, 2024, 12:09:37 PMTo drill the six 0.8 mm holes in the "gear carrier tube", I milled a corresponding recess in a 20 mm thick Pertinax plate and inserted the brass part with the long neck facing downwards. Fixing it in place with masking tape was completely sufficient, nothing shifted during drilling on the CNC milling machine.
Antriebszahnrad 12 (fspg2)
The same Pertinax plate also helped with the vertical soldering of the M0.8mm hexagon screws. In the following picture, only a drop of soldering water is missing before the resistor solderer went into action.
Antriebszahnrad 17 (fspg2)
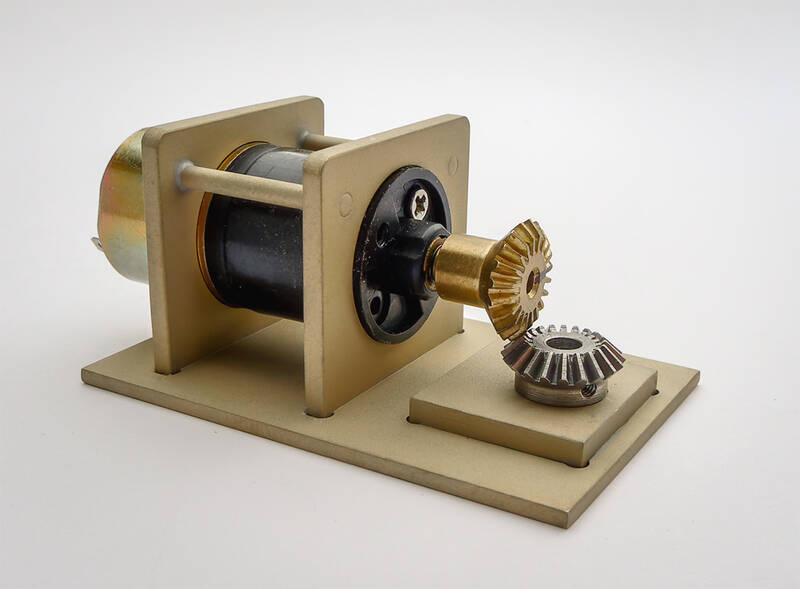
After inserting them into the corresponding holes in the base plate, a first functional test rotation followed.
The result looked satisfactory.
Antriebszahnrad 13 (fspg2)
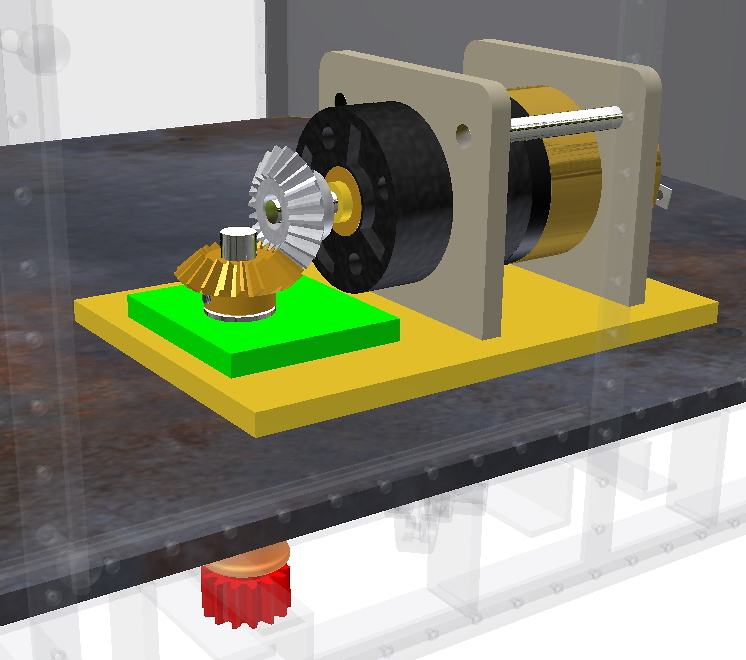
A Faulhaber geared motor is to provide the rotation.
There is a choice of either a 2225V024S with a 243:1 reduction ratio or alternatively a smaller 1616E018S with a 485:1 reduction ratio.
The animation shows a vertical and a horizontal installation.
Antriebszahnrad 14 (fspg2)
(In the enlargement you can see the details better without disturbances : 1st click on the picture, then a 2nd click in the gallery that appears)
I favored the horizontal installation of the 1616 Faulhaber.
Let's see whether the 15 seconds calculated for a 360° rotation at 18 volts can be achieved - a little mass has to be moved, after all!
Antriebszahnrad 15 (fspg2)
Antriebszahnrad 16 (fspg2)
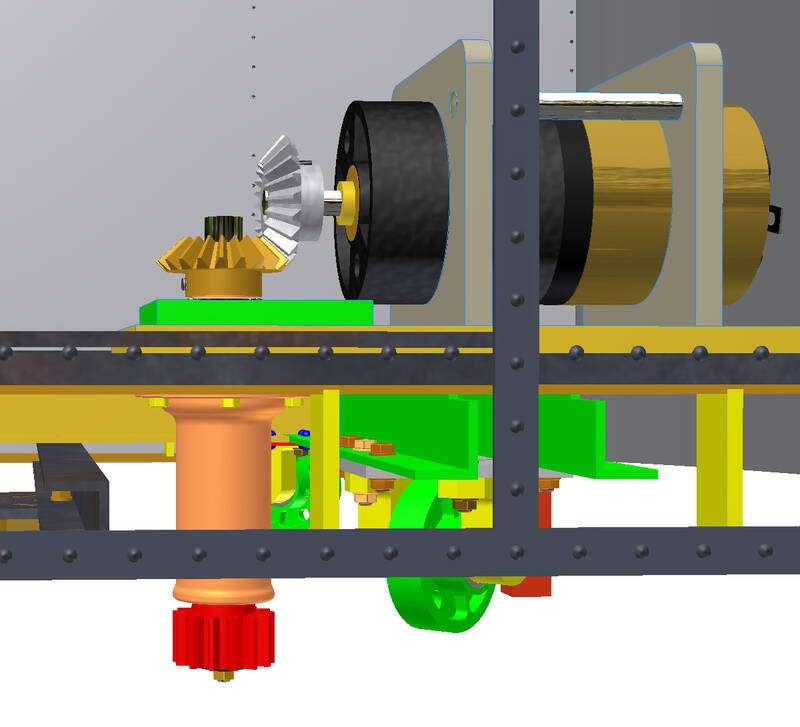
Here you can see the motor mount for the 1616 Faulhaber motor. The exact alignment of the gear wheels is done later in the crane housing.
Motor Drehachse 01 (fspg2)
Antriebszahnrad 12 (fspg2)
The same Pertinax plate also helped with the vertical soldering of the M0.8mm hexagon screws. In the following picture, only a drop of soldering water is missing before the resistor solderer went into action.
Antriebszahnrad 17 (fspg2)
After inserting them into the corresponding holes in the base plate, a first functional test rotation followed.
The result looked satisfactory.
Antriebszahnrad 13 (fspg2)
A Faulhaber geared motor is to provide the rotation.
There is a choice of either a 2225V024S with a 243:1 reduction ratio or alternatively a smaller 1616E018S with a 485:1 reduction ratio.
The animation shows a vertical and a horizontal installation.
Antriebszahnrad 14 (fspg2)
(In the enlargement you can see the details better without disturbances : 1st click on the picture, then a 2nd click in the gallery that appears)
I favored the horizontal installation of the 1616 Faulhaber.
Let's see whether the 15 seconds calculated for a 360° rotation at 18 volts can be achieved - a little mass has to be moved, after all!
Antriebszahnrad 15 (fspg2)
Antriebszahnrad 16 (fspg2)
Here you can see the motor mount for the 1616 Faulhaber motor. The exact alignment of the gear wheels is done later in the crane housing.
Motor Drehachse 01 (fspg2)
#10
Modellers At Work / Re: Sandy Hollow
Last post by Krusty - May 18, 2024, 02:18:53 AMThanks Kim. Yes, very nice.